
When it comes to working with metal, wood, or plastics, precision is everything. One of the essential tools in any machinist’s or DIY enthusiast’s kit is the drill tap chart. Whether you are threading holes for bolts or creating a tapped hole that needs to match perfectly with screws, this chart helps you choose the right drill bit size before tapping threads. Without it, you risk loose fittings, broken taps, or damaged workpieces.
This guide will walk you through what a drill tap chart is, why it matters, how to use it effectively, and some practical tips for both beginners and experienced machinists.
What is a Drill Tap Chart?
A drill tap chart is essentially a reference guide that matches drill bit sizes with the appropriate tap sizes for cutting threads. For instance, if you need to cut a thread for a ¼”-20 screw, the chart tells you exactly what size drill bit you need to use before tapping. This ensures the hole is the correct size—not too tight, not too loose.
By using a drill tap chart, you eliminate guesswork. Instead of relying on trial and error, you can refer to a standardized table that provides accurate sizes in both metric and imperial units.
Why Do You Need a Drill Tap Chart?
Precision: Screws and bolts only fit properly when the threads match perfectly.
Efficiency: Saves time by giving you the right drill size instantly.
Prevents Damage: Using the wrong drill bit can cause taps to break, especially in hard metals.
Versatility: Works for metric, imperial, fine, and coarse threads.
For anyone who works regularly with threaded fasteners, a drill tap chart is as important as the drill and tap set itself.
Understanding Taps and Threads
Before diving deeper into how to use a drill tap chart, it’s worth revisiting a few basics:
Tap: A tool used to cut internal threads inside a drilled hole.
Die: A tool used to cut external threads on rods or bolts.
Thread Pitch: The distance between thread peaks. For example, metric threads are defined as M6 × 1.0, where “6” is the diameter in millimeters and “1.0” is the thread pitch in millimeters.
TPI (Threads Per Inch): The imperial system equivalent to thread pitch, e.g., ¼”-20 means a quarter-inch screw with 20 threads per inch.
A drill tap chart brings all these measurements together so you can easily match the right tools with the right fasteners.
How to Read a Drill Tap Chart
Reading a drill tap chart is straightforward once you know the layout:
Screw Size Column: Lists common screw or bolt sizes.
Thread Pitch / TPI Column: Shows how fine or coarse the thread is.
Drill Size Column: Indicates the correct drill bit size needed before tapping.
For example, if you’re working with a 10-32 screw (imperial), the chart might recommend a #21 drill bit. If you’re working with M6 × 1.0 (metric), the chart would suggest a 5.0 mm drill bit.
Basic Drill Tap Chart
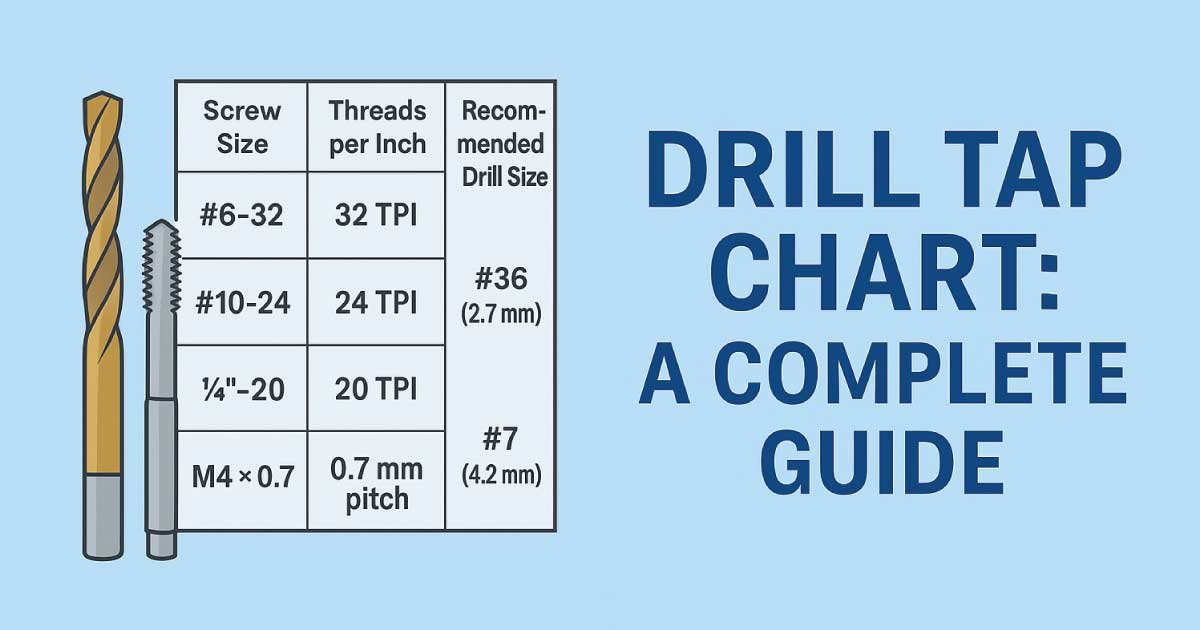
Here’s a simplified example of how a drill tap chart looks:
| Screw Size | Threads per Inch / Pitch | Recommended Drill Bit |
|---|---|---|
| #6-32 | 32 TPI | #36 (2.7 mm) |
| #10-24 | 24 TPI | #25 (3.5 mm) |
| ¼”-20 | 20 TPI | #7 (4.2 mm) |
| M4 × 0.7 | 0.7 mm pitch | 3.3 mm |
| M6 × 1.0 | 1.0 mm pitch | 5.0 mm |
This small table demonstrates how vital a drill tap chart is when selecting the correct drill size.
Drill Tap Chart Pdf
If you often work with screws, bolts, or threaded fasteners, having a Drill tap chart Pdf can save you both time and effort. It provides accurate drill sizes for matching taps, ensuring precise threading every time. Whether you’re a machinist, mechanic, or DIY hobbyist, a Drill tap chart Pdf is a must-have reference guide that helps prevent errors and improves efficiency in your projects.
💡 Don’t miss 👉 Drill Chart 2025: Complete Guide with PDF
Benefits of Using a Drill Tap Chart
Accuracy in Assembly: Using the correct drill size ensures that bolts and screws fit tightly, preventing mechanical failures.
Reduced Risk of Tap Breakage: When drilling into hard metals like stainless steel, using an incorrect size could cause taps to snap. A drill tap chart minimizes that risk.
Improved Workflow: In workshops or production environments, time is money. With a drill tap chart, machinists can quickly look up drill sizes without guesswork.
Consistency Across Projects: If you are building multiple components, consistency is key. Following a drill tap chart ensures that every tapped hole is uniform.
Metric vs. Imperial Drill Tap Charts
Depending on your region or project, you’ll come across either metric or imperial systems:
Metric: Common in Europe and Asia, measured in millimeters. Example: M8 × 1.25 requires a 6.8 mm drill bit.
Imperial: Used mainly in the U.S., measured in inches and fractions. Example: 5/16”-18 requires an “F” size drill bit.
A complete drill tap chart usually includes both systems side by side, making it easier to switch between them depending on the fasteners you are using.
Tips for Using a Drill Tap Chart Effectively
Use Lubrication: Even with the correct size, tapping without lubrication can damage both the tap and the workpiece.
Go Slow: Always cut threads slowly, especially in harder metals.
Back Off Frequently: Rotate the tap forward and backward to clear chips.
Double-Check Measurements: Make sure your fasteners match the chart you are using—don’t mix imperial with metric.
Keep a Printed Copy: Having a laminated drill tap chart in your workshop saves time compared to looking it up online.
Common Mistakes to Avoid
Using the Wrong Drill Size: Without a drill tap chart, it’s easy to pick a drill bit that’s either too big or too small. Both mistakes can ruin your project.
Forgetting Thread Pitch: Especially in metric systems, thread pitch matters as much as diameter.
Not Accounting for Material: Some charts are optimized for steel. When working with softer materials like aluminum or plastic, adjustments may be needed.
Mixing Units: Accidentally combining metric screws with imperial drill sizes can create major issues.
Real-World Applications of a Drill Tap Chart
Automotive Repairs: Mechanics often need to re-thread stripped holes in engine blocks or chassis.
DIY Projects: From furniture assembly to building machinery, a drill tap chart ensures screw fitment is precise.
Manufacturing: In production lines, uniformity is critical, and charts help maintain standards.
Metal Fabrication: Fabricators rely on drill tap charts when creating custom parts with threaded holes.
Final Thoughts
Whether you are a beginner DIYer, a student learning machining basics, or a professional fabricator, a drill tap chart is an indispensable tool. It bridges the gap between drill bits, taps, and fasteners, ensuring everything works seamlessly together.
The more you use it, the more you’ll appreciate its importance. From reducing errors to saving time and preventing costly mistakes, this simple reference guide can transform how you approach threading and drilling tasks.
So, if you don’t already have one, print out a drill tap chart and keep it in your toolbox—you’ll thank yourself later.
🛠 To see more, visit 👉 Metric Drill and Tap Chart: A Complete Guide
FAQs:
What is the purpose of a Drill Tap Chart?
The main purpose of a Drill tap chart is to give accurate drill sizes for different tap threads. Without this chart, you might choose a drill that’s too big or too small, leading to weak or damaged threads. It acts as a quick reference, saving time and reducing errors. For machinists, DIY enthusiasts, and professionals alike, this chart is an essential tool for precise and consistent results.
How do I choose the right drill size using a Drill Tap Chart?
To choose the right drill size using a Drill tap chart, first identify your tap or screw size. Then, find that size in the chart and look at the recommended drill bit. For example, if you’re tapping for M6 × 1.0, the chart will tell you to use a 5.0 mm drill. Following this ensures that the drilled hole is the perfect size before threading.
Can I use one Drill Tap Chart for all materials?
While a Drill tap chart provides standard drill-to-tap matches, the actual material you’re working with may affect your choice. Softer materials like aluminum or plastic might allow a slightly different size for better thread holding, while harder metals like stainless steel require exact precision. Most general charts are designed for steel, so always consider the material type and adjust accordingly if needed for best results.
Are Drill Tap Charts standardized worldwide?
Yes and no. A Drill tap chart follows standard thread systems, but the units differ across regions. In the U.S., imperial sizes like ¼”-20 are common, while in Europe and Asia, metric taps like M6 × 1.0 are standard. Many modern charts include both systems side by side, making them universally useful. However, it’s important to double-check whether your project uses metric or imperial threads.
Do beginners need a Drill Tap Chart?
Absolutely! A Drill tap chart is perfect for beginners because it eliminates guesswork. If you’re new to drilling and tapping, you might not know which drill bit matches which tap size. The chart simplifies this by giving you exact recommendations. Even professionals rely on it daily, so beginners should too. Having it printed or saved digitally helps you achieve professional-level accuracy even in simple DIY projects.
How often should I refer to a Drill Tap Chart?
You should refer to a Drill tap chart every time you’re preparing to tap a hole. Even experienced machinists don’t memorize all thread and drill size combinations. Using the chart ensures consistency and prevents mistakes. Whether you’re working on a single DIY repair or a large manufacturing project, keeping the chart close by saves time and guarantees your tapped holes will fit screws correctly and securely.
Can I create my own customized Drill Tap Chart?
Yes, you can create your own Drill tap chart tailored to the sizes you use most often. Many machinists or workshops keep a simplified version that highlights their frequently used taps and drill bits. You can also design one digitally and print it for quick reference. However, it’s best to base it on standard charts so that your measurements remain accurate and consistent with industry norms.