
If you have ever tried replacing a bolt and ended up with the wrong size, you already know how frustrating it can be. I’ve personally made that mistake more than once, especially when working on small mechanical repairs at home.
The truth is, measuring a bolt correctly isn’t complicated, but it does require attention to detail and the right method.
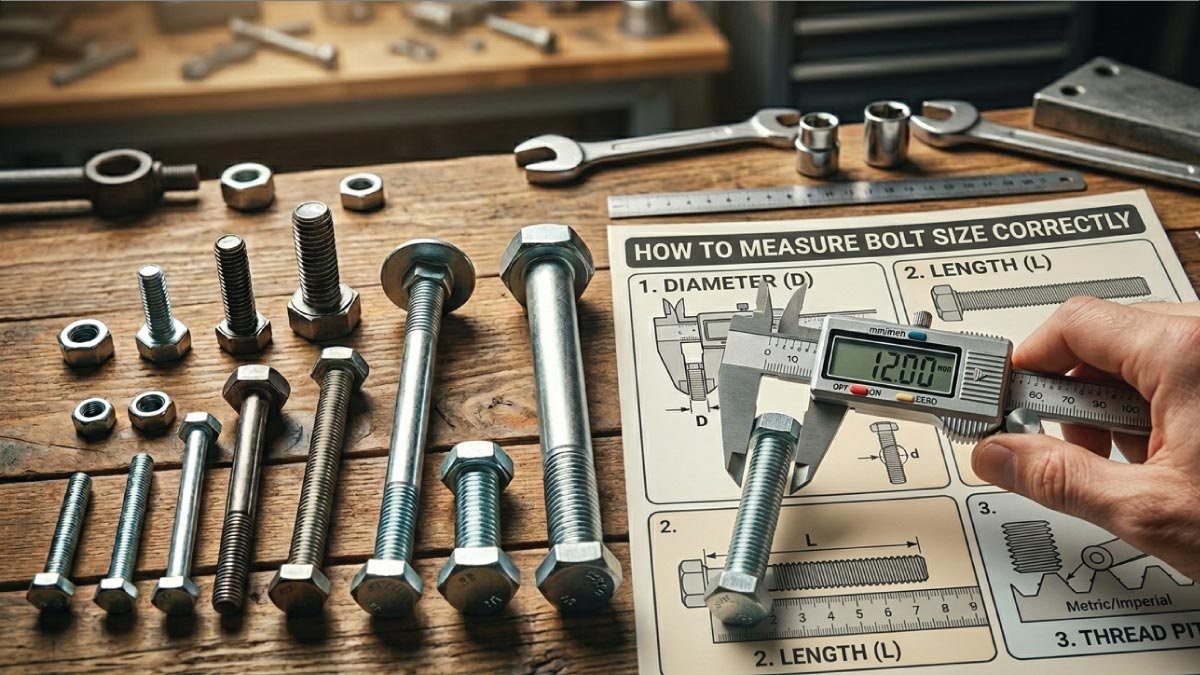
In this guide, I will walk you through everything you need to know about measuring bolt size correctly, step by step, using a clear and practical approach. Whether you are working on a DIY project, automotive repair, or mechanical equipment, this will save you time, money, and effort.
Why Measuring Bolt Size Correctly Matters
Before we jump into the steps, it’s important to understand why accurate bolt measurement plays such a crucial role in any mechanical task. Whether you are working on vehicles, machinery, or home repairs, precision directly affects performance and safety.
A bolt that’s too small won’t hold parts securely, while a bolt that’s too large simply won’t fit. In mechanical systems, even a slight mismatch can lead to:
- Loose connections
- Structural weakness
- Equipment damage
- Safety risks
So, getting the exact measurement isn’t just about convenience—it’s essential for proper functionality.
Understand the Bolt Size Basics
To measure a bolt correctly, you first need to understand the basic parameters that define its size. These measurements are standard across most applications and help ensure compatibility between bolts, nuts, and threaded holes.
Bolt size is typically defined by three main measurements:
- Diameter (thickness of the bolt)
- Length (from under the head to the tip)
- Thread pitch (distance between threads)
In some cases, you may also need to consider the head size and thread type (metric or imperial).
Tools You will Need
Using the right tools can make bolt measurement easier, faster, and far more accurate. While professionals often rely on precise instruments, even beginners can achieve good results with basic measuring tools if used carefully.
Before starting, gather these basic tools:
- Vernier caliper (best for accuracy)
- Measuring tape or ruler
- Thread pitch gauge (optional but helpful)
- Nut or bolt comparison board (if available)
If you don’t have advanced tools, don’t worry—you can still measure with simple items, but precision may be slightly lower.
Step 1: Identify the Bolt Type
The first step in measuring a bolt correctly is understanding what type of bolt you’re dealing with. Different bolt types have slightly different measurement methods, so identifying this early will save time and prevent mistakes during the process.
Ask yourself:
- Is it a hex bolt, carriage bolt, or machine bolt?
- Does it have full threads or partial threads?
- Is it metric or imperial (inch-based)?
Quick Tip:
Metric bolts usually have numbers like M6, M8, M10, while imperial bolts are measured in inches like 1/4″, 3/8″.
Identifying this early helps you use the correct measurement system.
Step 2: Measure the Bolt Diameter
The diameter is one of the most critical dimensions because it determines compatibility with nuts and threaded holes. Even a small error in diameter measurement can result in improper fitting, leading to weak connections or complete assembly failure in mechanical applications.
How to Measure:
- Use a vernier caliper for best results
- Measure across the outer threads (not the smooth part)
Example:
If the diameter is 6 mm, it’s an M6 bolt
If it measures about 0.25 inches, it’s likely a 1/4-inch bolt
Common Mistake:
Many beginners measure the inner shaft instead of the outer thread edges. Always measure across the widest part.
Step 3: Measure the Bolt Length
Bolt length is another key measurement, but it depends on the type of bolt head. Measuring incorrectly can cause bolts to be too short for proper grip or too long, which may interfere with surrounding components or structures.
For Most Bolts:
- Measure from under the head to the tip
For Countersunk Bolts:
- Measure the entire length, including the head
Example:
If the measurement from under the head to the tip is 50 mm, then it’s a 50 mm bolt.
Pro Tip:
Place the bolt on a flat surface and align it with a ruler for more accurate results.
Step 4: Determine the Thread Pitch
Thread pitch is essential for ensuring that the bolt fits perfectly into a nut or threaded hole. If the pitch doesn’t match, the bolt won’t tighten properly, even if the diameter and length are correct.
Method 1: Using a Thread Pitch Gauge
- Match the threads with the gauge teeth
- The correct match will fit perfectly
Method 2: Manual Measurement
- Measure the distance between two threads
- Or count threads over a known length
Example:
If there are 10 threads in 10 mm, the pitch is 1.0 mm
If there are 8 threads in 10 mm, the pitch is 1.25 mm
Important:
Metric bolts use pitch (mm), while imperial bolts use threads per inch (TPI).
Step 5: Check the Thread Type (Metric vs Imperial)
One of the most common mistakes people make is mixing metric and imperial threads. Even if a bolt looks similar, the thread system must match exactly; otherwise, it can damage threads or fail during use.
Metric Threads:
- Measured in millimeters
- Example: M8 × 1.25
Imperial Threads:
- Measured in inches
- Example: 1/4″-20 (20 threads per inch)
How to Identify:
- If measurements are in mm → Metric
- If in fractions or inches → Imperial
Never mix the two—they are not compatible.
Step 6: Measure the Bolt Head Size
While head size is not part of the official bolt size, it is still very important in practical situations. Knowing the head size helps you choose the correct wrench or socket, making installation and removal much easier and more efficient.
How to Measure:
- Measure across the flat sides of the head
Example:
An M10 bolt typically has a 17 mm head size
This isn’t part of the bolt size itself, but it’s useful for practical applications.
Step 7: Compare with a Standard Chart
After taking all measurements, comparing your results with a standard bolt size chart helps confirm accuracy. This step ensures that your measurements align with industry standards and reduces the risk of selecting the wrong bolt for your application.
For example:
Diameter | Standard Size
6 mm | M6
8 mm | M8
10 mm | M10
This helps confirm your measurements and avoid errors.
Step 8: Double-Check Your Measurements
Before finalizing your bolt selection, always double-check each measurement carefully. Even a small mistake in diameter, length, or thread pitch can lead to poor fitting, equipment issues, or safety risks during operation or installation.
Here’s what to verify:
- Diameter matches exactly
- Length is correct
- Thread pitch fits properly
A small mistake here can lead to major problems later
Also Read:
Real Example (From Experience)
I once tried replacing a bolt in a bike repair. I measured only the length and assumed the rest. The bolt looked similar, but the thread pitch was slightly different.
Result? It damaged the threads in the hole.
Since then, I always measure all three factors: diameter, length, and pitch—never just one.
Common Mistakes to Avoid
Even experienced mechanics can make mistakes when measuring bolts. Being aware of these common errors can prevent costly problems, loose fittings, or equipment damage. Paying attention to detail ensures that your bolts perform safely and effectively under load.
Ignoring Thread Pitch: Many people assume all bolts of the same diameter have the same threads—not true.
Mixing Metric and Imperial: This can completely ruin your fitting.
Measuring from the Wrong Point: Always measure from under the head (except countersunk bolts).
Using Inaccurate Tools: A simple ruler can work, but a caliper is much more reliable.
Tips for Better Accuracy
Accuracy comes from using the right tools and adopting good habits. Small adjustments in your approach can make a big difference in both professional and DIY projects, ensuring your bolts fit perfectly and avoid unnecessary frustration during installation.
- Use a vernier caliper whenever possible
- Keep a bolt size chart handy
- Label bolts when removing them from machines
- Store bolts in organized containers
These small habits can save a lot of time during future repairs.
Also Read:
When You Should Replace Instead of Reuse
Not all bolts are safe to reuse, even if the size matches. Inspect bolts carefully for damage, as a worn or compromised bolt can fail under pressure, potentially causing machinery problems or safety hazards. Always prioritize integrity over convenience.
Replace the bolt if you notice:
- Worn-out threads
- Rust or corrosion
- Bent shaft
- Damaged head
Even if the size is correct, a damaged bolt can fail under pressure.
Final Thoughts
Measuring bolt size correctly might seem like a small skill, but it makes a huge difference in mechanical work. Once you understand the process—diameter, length, and thread pitch—you’ll be able to identify any bolt with confidence.
From my own experience, taking a few extra minutes to measure properly can save hours of frustration later. Whether you’re fixing a machine, assembling furniture, or working on a vehicle, accuracy is everything.
Also Read:
FAQs:
How do I measure bolt size correctly?
To measure a bolt, first identify the type and thread system (metric or imperial). Measure the diameter across the outer threads using a caliper. Measure the length from under the head to the tip (or full length for countersunk bolts). Check the thread pitch with a gauge or ruler.
What does M8, M10, M12 mean?
M8, M10, and M12 indicate the metric bolt diameter in millimeters. “M” stands for metric, and the number represents the nominal diameter of the bolt shaft. For example, M8 is 8 mm thick, M10 is 10 mm, and M12 is 12 mm. These numbers do not include thread pitch.
What does M8 * 20 screw mean?
An M8 × 20 screw is a metric bolt with an 8 mm diameter and a 20 mm length from under the head to the tip. The “M” indicates it is metric, the first number is the diameter, and the second number represents the length of the bolt shaft in millimeters.
Is an M12 bolt 12 mm?
Yes, an M12 bolt has a nominal diameter of 12 mm across its threads. The “M” stands for metric. Note that the bolt’s outer thread width is 12 mm, but the internal thread size of a nut for this bolt may be slightly smaller to allow proper fitting.
What does M8x1.25 bolt mean?
An M8 × 1.25 bolt is a metric bolt with an 8 mm diameter and a thread pitch of 1.25 mm, meaning the distance between threads is 1.25 mm. The “M” stands for metric. Length is separate and may be listed additionally, such as M8 × 1.25 × 20.
What size is M10 in mm?
An M10 bolt has a nominal diameter of 10 mm. This refers to the width of the threaded shaft. Metric bolts like M10 follow standard sizing for diameter, length, and thread pitch, which ensures compatibility with corresponding nuts, washers, and threaded holes in mechanical and construction applications.