
When I first started working with tools in my small workshop, one thing that confused me more than anything else was Allen keys. I used to think, “It’s just a simple hex tool—how complicated can it be?” But the moment I tried to loosen a stubborn bolt and the key slipped, I realized I was using the wrong size.
That small mistake taught me a big lesson: Allen key sizes matter a lot more than we think.
In this guide, I will walk you through everything I have learned—from metric and inch size charts to practical tips I personally use. Whether you’re a beginner, a DIY enthusiast, or someone working in mechanical fields, this will save you time, effort, and frustration.
What Is an Allen Key?
An Allen key (also called a hex key) is a simple L-shaped tool used to drive bolts and screws with a hexagonal socket.
I remember the first time I opened a flat-pack furniture box—there it was, a tiny Allen key included inside. At that time, I didn’t even know different sizes existed. I just used whatever was in the box.
But in real-world work—especially in mechanical, automotive, or fabrication—using the correct size is critical.
Why Allen Key Size Matters (From My Experience)
Let me share a quick personal mistake.
Once, I was working on a motorcycle part. I didn’t have the exact Allen key size, so I used a slightly smaller one. It “fit” at first, but when I applied force, it stripped the bolt head.
That one mistake cost me:
- Extra time
- A damaged bolt
- A lot of frustration
Since then, I always double-check sizes before using any tool.
Using the wrong Allen key can:
- Strip bolt heads
- Damage tools
- Cause slipping injuries
- Lead to loose or unsafe fittings
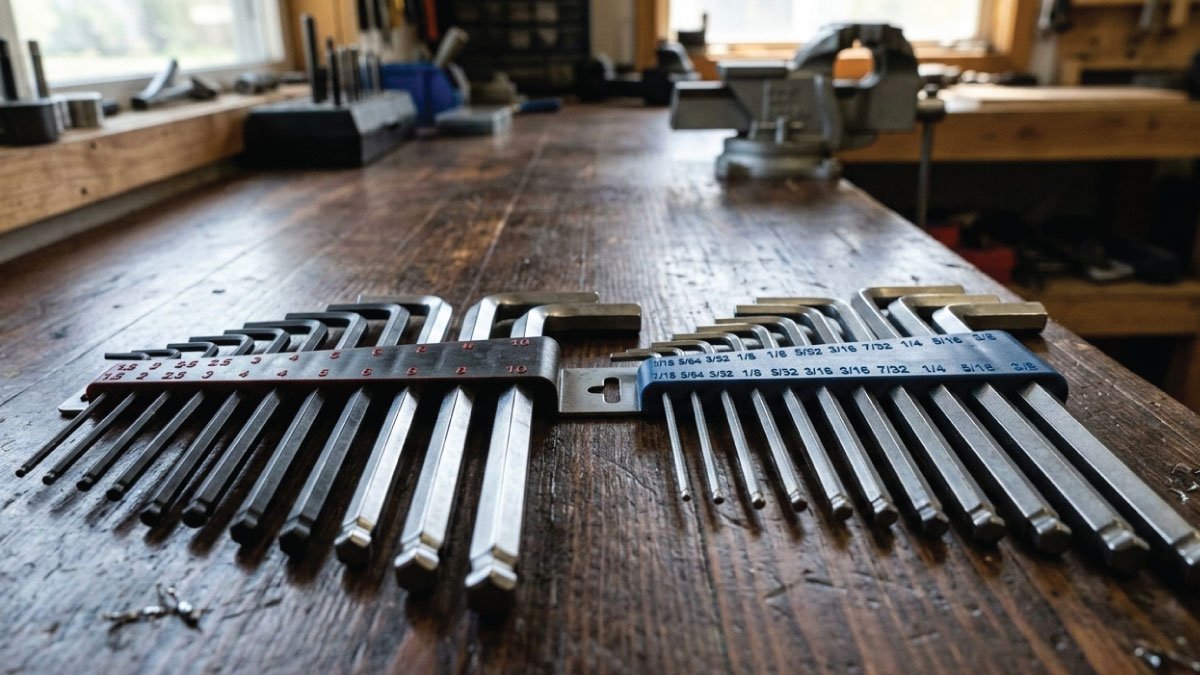
Allen Key Size Chart (Metric)
Here is the metric Allen key size chart I personally keep saved in my workshop:
| Size (mm) | Typical Use |
|---|---|
| 0.7 mm | Electronics, small devices |
| 0.9 mm | Precision tools |
| 1.0 mm | Watches, eyeglasses |
| 1.5 mm | Small machinery |
| 2.0 mm | Bicycles, light fittings |
| 2.5 mm | Furniture assembly |
| 3.0 mm | General mechanical work |
| 4.0 mm | Automotive parts |
| 5.0 mm | Medium bolts |
| 6.0 mm | Heavy-duty use |
| 8.0 mm | Industrial applications |
| 10.0 mm | Large machinery |
👉 In my experience, 3mm, 4mm, and 5mm are the most commonly used sizes for everyday work.
Allen Key Size Chart (Inch / Imperial)
If you are working with imported tools or US-based products, you’ll often encounter inch sizes.
| Size (Inch) | Decimal Equivalent |
|---|---|
| 0.028″ | 0.71 mm |
| 0.035″ | 0.89 mm |
| 1/16″ | 1.59 mm |
| 5/64″ | 1.98 mm |
| 3/32″ | 2.38 mm |
| 7/64″ | 2.78 mm |
| 1/8″ | 3.17 mm |
| 9/64″ | 3.57 mm |
| 5/32″ | 3.97 mm |
| 3/16″ | 4.76 mm |
| 7/32″ | 5.56 mm |
| 1/4″ | 6.35 mm |
| 5/16″ | 7.94 mm |
| 3/8″ | 9.53 mm |
Metric vs Inch: What I Learned the Hard Way
This is where many beginners get confused.
At first, I thought:
“Close size hai, chal jaye ga” (It’s close enough, it will work)
But that’s not true.
Key differences:
- Metric is measured in millimeters
- Inch is measured in fractions
- They are NOT interchangeable
Example:
- 5 mm is close to 3/16″
- But not exact
Even a small difference can:
- Cause slipping
- Damage bolts
👉 My rule now: Never mix metric and inch tools—always match exactly.
Also Read:
Common Allen Key Sizes and Their Uses
From my daily work, these are the sizes I use most:
1.5 mm – 3 mm
- Electronics
- Small screws
- Watches
3 mm – 5 mm
- Furniture
- Bikes
- Household items
5 mm – 8 mm
- Automotive work
- Machinery
- Heavy bolts
Types of Allen Keys (Based on My Usage)
Over time, I’ve worked with different types of Allen keys in my workshop, and honestly, each one has its own purpose depending on the job. In the beginning, I thought one type was enough, but real experience taught me that having variety makes work faster, easier, and more professional.
1. Standard L-Shaped Key
This is the most basic and commonly used type of Allen key that almost everyone starts with. I still use it regularly because it’s simple, reliable, and gets the job done in most situations without any complications.
Most common
Cheap and reliable
Good for tight spaces
👉 This is what I started with.
2. Ball-End Allen Key
After struggling with hard-to-reach bolts, I switched to ball-end Allen keys, and it made a noticeable difference. These are specially designed for flexibility, allowing you to work at angles where a standard key simply won’t fit properly.
Allows angled use
Great for awkward positions
👉 I bought this after struggling with tight corners—it made life much easier.
3. T-Handle Allen Key
When I started working on projects that required more force, I realized the importance of grip and control. That’s when I began using T-handle Allen keys. They provide better leverage, making it easier to apply torque without straining your hands.
Better grip
More torque
👉 Perfect for long working sessions.
4. Folding Allen Key Set
For portability, nothing beats a folding Allen key set. I like how all sizes are kept together in one compact unit, which makes it perfect for carrying around. It’s especially useful when I’m working outside or on quick repair jobs.
Compact
Easy to carry
👉 I keep one in my bike toolkit.
Also Read:
My Personal Workshop Tip
One of the smartest improvements I made in my workshop was organizing my Allen keys properly. Earlier, I didn’t pay attention to tool organization, but over time I realized how much time and energy gets wasted just searching for the right size.
Before:
Lost keys
Mixed sizes
Time wasted searching
Now:
I use a labeled holder
Metric and inch sets separated
👉 This small change saved me a lot of time daily.
Common Mistakes to Avoid
I’ve made plenty of mistakes while learning, and these are the most common ones I now avoid. Trust me, even small errors with Allen keys can lead to bigger problems, especially when working with expensive parts or tight fittings.
❌ Using wrong size
Leads to stripped bolts
❌ Applying too much force
Breaks tools or damages screws
❌ Mixing metric and inch
Doesn’t fit properly
❌ Using worn-out keys
Slips easily
Also Read:
Pro Tips (From Real Experience)
After years of hands-on work, I’ve developed a few simple habits that make a big difference. These tips may sound basic, but they help improve efficiency and prevent unnecessary damage during work.
✔ Always keep a full set (don’t rely on one key)
✔ Replace worn-out keys immediately
✔ Use ball-end keys for tricky angles
✔ Keep tools clean and rust-free
✔ Use proper lighting when working
Where Allen Keys Are Commonly Used
Allen keys are one of those tools that you’ll find almost everywhere, whether it’s a simple home task or a complex mechanical job. I’ve personally used them in a wide range of applications, which makes them an essential part of any toolkit.
You will find Allen keys almost everywhere:
Furniture assembly
Bicycles
Cars and motorcycles
Machines
Electronics
In my case, I use them mostly in:
Mechanical work
Small fabrication projects
Repair tasks
Over time, I realized that no matter what type of work you do, having the right Allen key and knowing how to use it properly can make your job much smoother and more efficient.
Also Read:
Final Thoughts (From My Journey)
If you had asked me a few years ago about Allen keys, I would have said:
“Bas ek simple tool hai” (It’s just a simple tool)
But today, I know better. Experience in my workshop changed my thinking completely. I’ve learned that even the smallest tool can make a big difference when used correctly. A simple tool becomes powerful when you use the correct size, understand its purpose, and handle it properly with care.
From stripped bolts to smooth, professional work, this journey taught me one important lesson: precision is everything. Even small mistakes can create big problems, but the right approach saves time, effort, and frustration every single day.