
If you have ever worked on an electrical project, whether it’s a DIY home repair or a professional installation, you have probably come across something called AWG or American Wire Gauge. While it may seem like just another technical term, understanding AWG is crucial for safety, efficiency, and even saving money on your wiring projects.
In this post, I will break down everything you need to know about AWG, its size chart, and how to choose the right wire for your needs — in simple, human terms.
What is AWG?
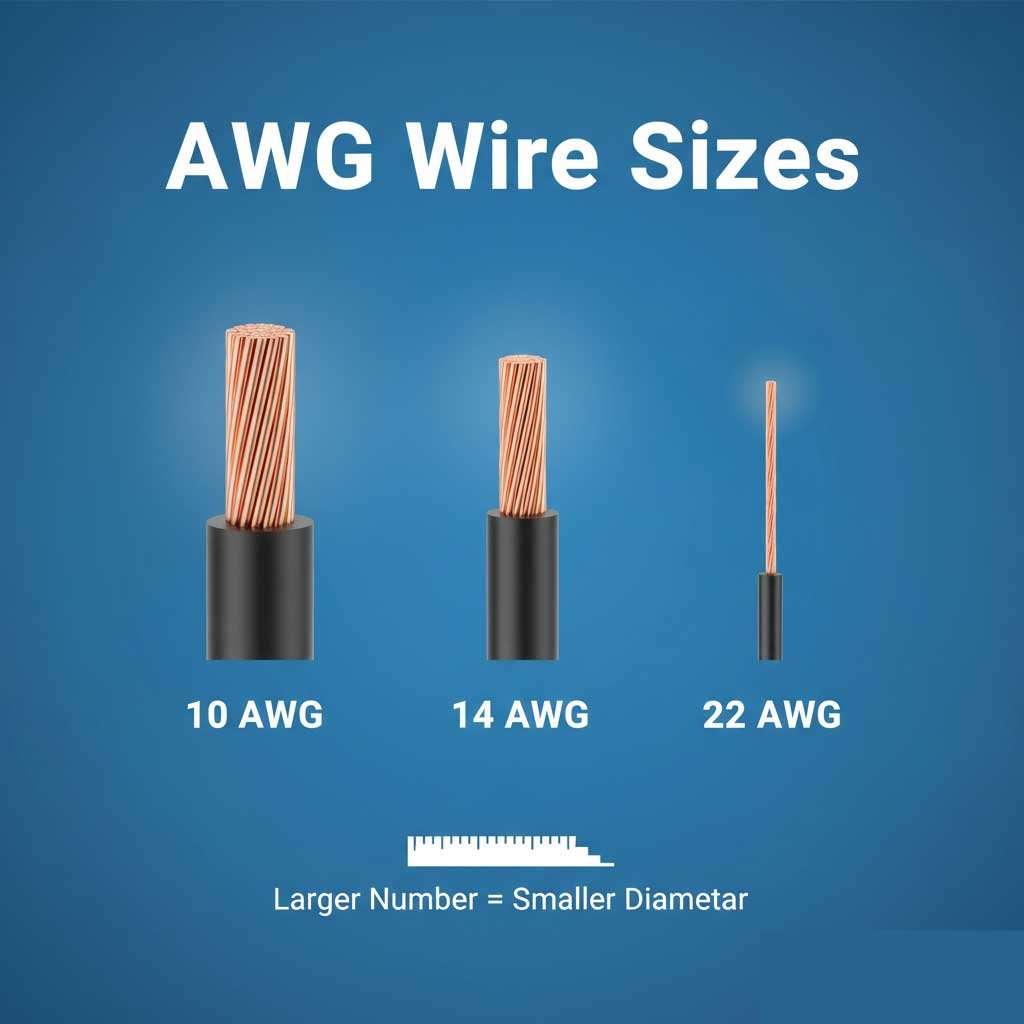
AWG, or American Wire Gauge, is a standardized system for measuring the thickness of electrical wires. Unlike metric systems that use millimeters, AWG uses a numerical scale where the smaller the number, the thicker the wire.
For example:
12 AWG is thicker than 18 AWG.
A thicker wire can carry more current safely.
Think of it like drinking straws: a thicker straw allows more liquid to flow at once. Similarly, a thicker wire allows more electricity to flow safely without overheating.
Why AWG Matters
Many beginners underestimate the importance of choosing the right wire size. But here’s why AWG is so important:
Safety First – Using a wire that’s too thin for the current can cause overheating and even fires.
Efficiency – Thinner wires increase resistance, meaning more electricity is lost as heat.
Equipment Protection – Incorrect wire size can damage your appliances or tools over time.
Even if you are just plugging in a lamp, understanding AWG ensures everything works smoothly without risk.
AWG Size Chart Overview
Here’s a simplified AWG size chart to help you understand the relationship between gauge, diameter, and ampacity (the amount of current a wire can safely carry):
| AWG Size | Diameter (inches) | Diameter (mm) | Approx. Ampacity (A) |
|---|---|---|---|
| 0000 (4/0) | 0.46 | 11.684 | 230 |
| 000 (3/0) | 0.4096 | 10.404 | 200 |
| 00 (2/0) | 0.3648 | 9.266 | 175 |
| 0 (1/0) | 0.3249 | 8.252 | 150 |
| 2 | 0.2576 | 6.544 | 95 |
| 4 | 0.2043 | 5.189 | 70 |
| 6 | 0.1620 | 4.115 | 55 |
| 8 | 0.1285 | 3.264 | 40 |
| 10 | 0.1019 | 2.588 | 30 |
| 12 | 0.0808 | 2.053 | 20 |
| 14 | 0.0641 | 1.628 | 15 |
| 16 | 0.0508 | 1.291 | 10 |
| 18 | 0.0403 | 1.024 | 7 |
| 20 | 0.0320 | 0.812 | 5 |
Note: Ampacity values can vary depending on insulation, temperature, and installation conditions. Always check manufacturer recommendations.
Read This Guide:
Metric Bolt Size Chart: A Complete Guide
AWG Size Chart PDF
Understanding wire sizes is essential for safe and efficient electrical work. The American Wire Gauge (AWG) system helps you determine the right wire thickness for your project. This AWG Size Chart provides an easy reference for wire diameter, ampacity, and common applications, making it simple for both DIY enthusiasts and professionals to choose the correct wire safely and effectively.
AWG_Size_Chart PDF
How to Read an AWG Size Chart
The AWG size chart might seem intimidating at first, but once you know what to look for, it’s actually quite simple:
Gauge Number – Smaller numbers mean thicker wire.
Diameter – Wire thickness in inches or millimeters.
Ampacity – How much current (in Amps) the wire can safely handle.
So, if you are wiring a new kitchen circuit that needs 20 amps, the chart tells you that 12 AWG wire is safe to use. If you choose a thinner wire, like 14 AWG, it could overheat and become a hazard.
Read This Guide:
Allen Bolt Size Chart: A Complete Guide
Choosing the Right Wire Size
When selecting wire for your project, consider these factors:
Current Load – How many amps will flow through the wire?
Length of Wire – Longer wires experience more voltage drop, so you may need a thicker wire.
Type of Insulation – Some insulation types allow higher temperature ratings.
Safety Standards – Follow local electrical codes; they often specify minimum AWG sizes for circuits.
For example, for a typical household 15-amp circuit, 14 AWG is generally recommended. But for a 20-amp circuit, you’d need 12 AWG.
Common AWG Sizes and Their Uses
Here’s a quick guide to what different AWG sizes are typically used for:
14 AWG – Standard for most lighting circuits in homes.
12 AWG – Common for kitchen outlets or small appliances.
10 AWG – Good for water heaters, dryers, or AC units.
8 AWG – Often used for electric ranges or subpanels.
6 AWG – Larger appliances or feeder circuits.
4 AWG and above – Mainly for industrial applications or large service panels.
Tips for Working With AWG
If you’re new to electrical work, here are some practical tips:
Always Check Your Load – Don’t guess wire sizes; calculate the current load first.
Use a Multimeter – Check voltage and resistance if unsure.
Label Wires – Keep wires organized to avoid confusion, especially in bigger projects.
Don’t Overload Wires – Even if a wire looks sturdy, exceeding its ampacity is dangerous.
Follow Color Codes – Most wiring uses color codes to indicate live, neutral, and ground wires.
Wire Gauge Conversion: AWG vs Metric
Sometimes you’ll see wires measured in millimeters squared (mm²) instead of AWG. Here’s a simple reference:
| AWG | mm² |
|---|---|
| 14 | 2.08 |
| 12 | 3.31 |
| 10 | 5.26 |
| 8 | 8.37 |
| 6 | 13.3 |
| 4 | 21.2 |
| 2 | 33.6 |
| 1/0 | 53.5 |
This is helpful if you’re working with international projects or sourcing wires from global suppliers.
Safety Reminder
Electricity is unforgiving. One wrong wire size can lead to overheating, equipment failure, or fire. Always make sure you:
Double-check AWG sizing before installation.
Follow local electrical codes.
Use proper tools for cutting and stripping wires.
Consult a licensed electrician if you’re unsure.
Remember, taking a few extra minutes to choose the correct wire size could save you from serious hazards later.
Read This Guide:
Bolt Size Chart: A Complete Guide 2025
Conclusion
Understanding the AWG size chart may seem technical at first, but it’s actually straightforward once you know the basics. The key takeaway is simple: thicker wires (smaller AWG numbers) carry more current safely, while thinner wires (larger AWG numbers) are only suitable for lower loads.
Whether you are doing a small home project or wiring an entire workshop, keeping a reference AWG chart handy can make your work safer, more efficient, and even cost-effective.
Investing a little time in learning about wire sizes today can save you headaches — and potentially dangerous accidents — tomorrow.
Next Steps: Keep a printed AWG size chart near your workbench, double-check your circuit loads, and make sure every wire you use is safe for the job. With that approach, your projects will not only work perfectly but remain safe for years to come.
FAQs:
What is AWG wire size?
AWG stands for American Wire Gauge, a standard system used to measure the thickness of electrical wires in the U.S. The smaller the AWG number, the thicker the wire. It helps determine how much current a wire can safely carry. For example, 12 AWG is thicker than 16 AWG and handles more power.
What size is AWG in mm?
AWG wire sizes can be converted to millimeters by checking charts. For example, 12 AWG wire is about 2.05 mm in diameter, and 10 AWG is around 2.59 mm. As the AWG number increases, the wire diameter gets smaller. This conversion helps when comparing U.S. wire standards with metric sizes.
What AWG is 2.5 mm wire?
A 2.5 mm wire is roughly equal to 14 AWG in the American Wire Gauge system. It’s a medium-thickness wire often used in home wiring for sockets and small appliances. This size can handle around 18 to 20 amps safely, depending on insulation type and cable length.
Which is bigger, 2 AWG or 4 AWG?
2 AWG is bigger than 4 AWG. In the AWG system, a smaller number means a thicker wire that can carry more current. For example, 2 AWG is often used for heavy-duty applications like car batteries or large inverters, while 4 AWG is used for slightly lighter loads.
Is 1 AWG good for 100 amps?
Yes, 1 AWG wire is suitable for carrying around 100 amps over a short distance. It’s a thick wire used for high-power applications such as inverters, battery banks, or welding machines. For longer distances, even thicker wires like 1/0 AWG may be needed to prevent voltage drop.
How to check AWG size?
To check the AWG size, you can use a wire gauge tool or measure the wire’s diameter with a caliper and compare it to an AWG chart. Stripping off the insulation helps you get an accurate reading. Manufacturers often print the AWG size on the wire’s insulation as well.