
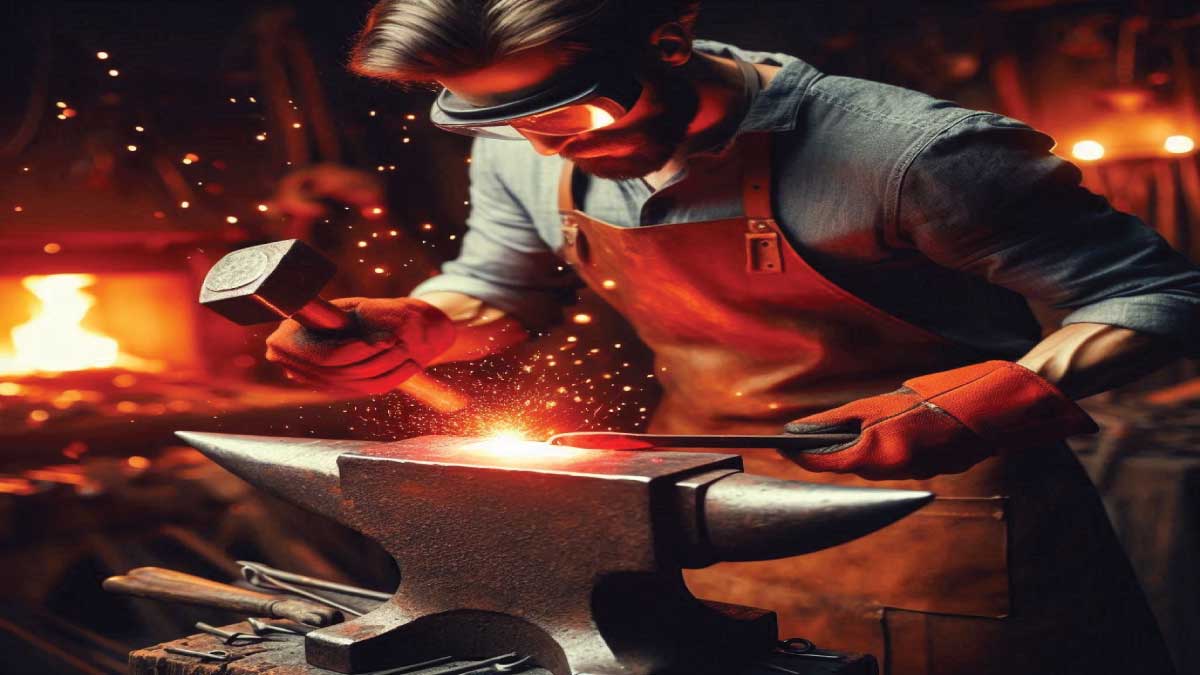
Hand forging is a metalworking process where metal is heated and shaped by hammering on an anvil. This traditional technique allows for precise control over the shape and properties of the metal, making it ideal for creating durable tools, custom components, and artistic metalwork.
Hand forging is an ancient art form that transforms raw metal into useful tools and beautiful objects. In this guide, we’ll walk you through the complete hand forging process, highlighting the tools, techniques, and materials involved. Whether you’re a beginner or looking to refine your skills, this guide covers everything you need to know about hand forging.
Introduction to Hand Forging
Hand forging has a rich history, dating back thousands of years. It’s a process where metal is heated and shaped by hammering on an anvil, typically using a forge. Unlike modern mass production techniques, hand forging allows for meticulous attention to detail and customization, making it a popular choice for artisans and craftsmen.
Essential Tools for Hand Forging
To get started with hand forging, you’ll need a basic set of tools. Here’s a list of essential tools for beginners:
1. Anvils
Anvils provide a solid surface for shaping metal. They come in various sizes and shapes, but a common beginner’s anvil is typically 70-100 pounds.
Type of Anvil |
Description |
Recommended Use |
|---|---|---|
| London Pattern | Features a horn and a flat surface | General forging and shaping |
| Farrier’s Anvil | Smaller, designed for horseshoe work | Specialized metalworking |
| Double Horn | Two horns for complex shaping | Advanced metal projects |
2. Hammers
Hammers are crucial for shaping metal. There are various types, each serving a specific purpose:
Cross-peen Hammer: Ideal for general forging.
Ball-peen Hammer: Great for shaping and bending metal.
Sledgehammer: Used for heavy-duty forging and bending.
3. Tongs and Vises
Tongs and vises are crucial tools in hand forging that help ensure precision and safety. Tongs are used to securely grip and maneuver hot metal pieces during the forging process. They come in various shapes and sizes, each designed to handle different types of metalwork, from flat bars to round stock. The correct tongs provide a firm hold, allowing the blacksmith to manipulate the metal accurately without the risk of dropping or mishandling it.
Vises, on the other hand, are used to clamp the workpiece in place on the anvil or workbench. They provide stability, ensuring the metal stays steady during intricate shaping, bending, or cutting processes, which is essential for maintaining control and achieving precise results in hand forging.
4. Forge
The forge is where metal is heated. Traditional forges use coal, but propane forges are popular for their convenience and cleaner operation.
Type of Forge |
Fuel Type |
Heat Control |
Recommended For |
|---|---|---|---|
| Coal Forge | Coal | Manual | Traditional forging |
| Propane Forge | Propane | Adjustable | Beginner to advanced |
| Electric Forge | Electric | Precision | Jewelry making |
Materials Used in Hand Forging
Choosing the right material is crucial for successful hand forging. Here are some common materials:
1. Steel
Steel is the most popular choice due to its durability and versatility. Types of steel used include:
Carbon Steel: Ideal for tools and knives.
Stainless Steel: Used for its corrosion resistance.
Alloy Steel: Contains elements like chromium and vanadium to enhance properties.
2. Non-Ferrous Metals
Non-ferrous metals, such as copper, brass, and aluminum, are often used for decorative items and specialty applications.
3. Tool Steels
These are specifically designed for making cutting tools and are known for their hardness and resistance to wear.
Basic Hand Forging Techniques
Understanding the basic techniques of hand forging is crucial for anyone looking to craft high-quality metalwork. These techniques form the foundation of the forging process, allowing smiths to manipulate metal into a variety of shapes and forms. Here are some fundamental methods used in hand forging:
1. Drawing Out
Drawing out is one of the most common and essential techniques in hand forging. This method involves lengthening the metal by hammering it along its length, effectively reducing its cross-sectional area and extending its length. The process starts by heating the metal in a forge until it reaches a bright red or orange color, indicating it’s malleable enough to be worked on. Once heated, the metal is placed on the anvil, and the blacksmith uses a hammer to strike the metal, stretching it out.
Drawing out is frequently used to create long, thin shapes such as blades, chisels, and other elongated tools. The technique requires a combination of force and precision, as the metal must be evenly hammered to avoid creating weak spots or irregularities. Consistent, controlled strikes ensure that the metal elongates uniformly, producing a smooth and even shape. Mastery of drawing out is essential for any blacksmith, as it serves as the basis for many other forging techniques.
2. Upsetting
Upsetting is the process of increasing the thickness of a metal piece by compressing it. This technique involves heating a specific section of the metal and then hammering it, causing the material to gather and thicken at the desired point. Upsetting is typically used to create components that require added thickness or strength in a localized area, such as the heads of bolts, rivets, and the bases of certain tools.
The upsetting process begins with heating the targeted section of the metal until it’s sufficiently soft. The heated portion is then placed on the anvil, and the blacksmith strikes it with a hammer, forcing the metal to bulge and increase in thickness. This technique requires careful control to ensure the metal thickens evenly and maintains the desired shape. Upsetting is particularly useful for creating strong, durable components that can withstand high stress and pressure.
3. Bending
Bending is a fundamental technique used to shape metal into curves, angles, and various forms. This process involves heating the metal to a pliable state and then manually bending it to the desired shape using hammers, anvils, and other tools. Bending is essential for creating items such as hooks, rings, handles, and various architectural elements.
The bending process typically starts by heating the metal in a forge until it’s malleable. The metal is then placed on the anvil, where the blacksmith uses tools like bending forks, scrolling tongs, and bending jigs to manipulate the metal into the desired shape. The metal can be bent into simple curves or more complex shapes, depending on the requirements of the project. This technique allows for a high degree of creativity and flexibility, making it a crucial skill for both functional and decorative forging.
4. Twisting
Twisting is a technique that involves rotating a piece of metal along its axis to create decorative patterns and shapes. This method is often used in artistic metalwork to add intricate designs and textures to items like railings, gates, and jewelry. Twisting not only enhances the aesthetic appeal of the metalwork but also adds strength and rigidity to the piece.
The twisting process begins by heating the metal to a temperature that makes it flexible but not so hot that it loses its structural integrity. The metal is then clamped in a vise, and the blacksmith uses a twisting wrench or tongs to rotate the metal along its length. The degree of twist can vary depending on the desired pattern, from tight, intricate spirals to broader, more open twists. Twisting requires a keen eye for detail and a steady hand to ensure that the pattern is even and consistent throughout the length of the metal.
5. Flattening and Shaping
Flattening and shaping are additional fundamental techniques in hand forging that involve transforming the metal into flat, smooth surfaces and specific shapes. Flattening is achieved by repeatedly hammering the metal on an anvil to spread it out evenly, reducing its thickness and creating a uniform surface. Shaping, on the other hand, involves forming the metal into specific contours and designs using various tools and techniques.
The process of flattening typically starts with heating the metal until it reaches a workable temperature. The blacksmith then places the metal on the anvil and uses a hammer to strike it, spreading the material out and reducing its thickness. This technique is essential for creating flat components such as plates, blades, and other flat items. Shaping involves using tools like hammers, chisels, and bending jigs to manipulate the metal into the desired form, whether it’s a simple curve or a complex three-dimensional shape.
6. Punching and Cutting
Punching and cutting are techniques used to create holes and cut shapes in the metal. Punching involves using a punch tool to create holes in the metal, which can be used for fastening, decoration, or other purposes. Cutting, on the other hand, involves using tools like chisels and cutting shears to cut the metal into specific shapes or sections.
The punching process typically starts with heating the metal until it’s soft enough to be punctured. The blacksmith then uses a punch tool and hammer to create the desired holes, ensuring that the punch is applied evenly to avoid deforming the metal. Cutting involves heating the metal and using tools to remove unwanted sections or create specific shapes. Both punching and cutting require precision and control to ensure that the metal retains its structural integrity and desired shape.
7. Finishing Techniques
Finishing techniques are used to smooth and polish the metal, removing any rough edges or imperfections and giving the piece a refined appearance. These techniques include grinding, sanding, and polishing, each of which helps to enhance the metal’s surface and prepare it for any additional treatments, such as painting or coating.
The finishing process begins with grinding, where the metal is smoothed using a grinding wheel or belt. This removes any rough edges and creates a smooth surface. Sanding follows, further refining the surface and preparing it for polishing. Finally, the metal is polished using polishing wheels and compounds, giving it a shiny, reflective finish. Finishing techniques are essential for creating high-quality, professional-looking metalwork that is both functional and visually appealing.
Step-by-Step Hand Forging Process
Now, let’s dive into the step-by-step process of hand forging. This process assumes you have basic knowledge of handling metal and tools.
1. Preparing the Metal
Select the appropriate material and cut it to the required size. Heat the metal in the forge until it reaches a bright orange color, indicating it’s ready for shaping.
Step |
Action |
Tool Used |
|---|---|---|
| Material Prep | Cut and measure the metal | Cutting tools |
| Heating | Heat metal to forging temp | Forge |
| Handling | Position for forging | Tongs |
2. Forging the Metal
Once heated, move the metal to the anvil. Use a hammer to shape the metal according to your design.
Shaping: Use drawing out and bending techniques to achieve the desired shape.
Detailing: Switch to finer tools for detailed work, like grooves or patterns.
3. Cooling and Hardening
After shaping, cool the metal gradually in air (annealing) or quench it in water or oil to harden it, depending on the desired properties.
4. Finishing
Polish and grind the metal to remove any imperfections and achieve a smooth finish. Apply protective coatings if necessary.
Step |
Action |
Tool Used |
|---|---|---|
| Quenching | Cool in oil or water | Quench tank |
| Polishing | Smooth and shine the metal | Polishing wheel |
| Coating | Apply protective layer | Paintbrush |
Safety Measures in Hand Forging
Safety is paramount in hand forging. Here are some key safety measures:
1. Personal Protective Equipment (PPE)
Safety Glasses: Protect your eyes from sparks and debris.
Heat-Resistant Gloves: Shield your hands from hot metal.
Aprons: Wear a heavy-duty apron to protect your body from heat and sparks.
2. Workspace Safety
Ventilation: Ensure your workspace is well-ventilated to avoid inhaling harmful fumes.
Fire Safety: Keep fire extinguishers and a water source nearby in case of emergencies.
Tool Maintenance: Regularly check and maintain tools to prevent accidents.
Applications of Hand Forging
Hand forging is utilized across various industries for creating both functional and decorative items. Here are some key applications:
1. Tool Making
Hand forging is ideal for crafting durable tools like hammers, chisels, and knives. The process allows for precise control over the shape and hardness of the tool.
2. Artistic Metalwork
Many artists use hand forging to create intricate sculptures, jewelry, and decorative items. The ability to shape metal into unique forms makes it a favorite technique among metal artists.
3. Automotive Industry
Forged components, such as crankshafts and connecting rods, are crucial in the automotive industry for their strength and reliability.
Industry |
Commonly Forged Items |
Benefits |
|---|---|---|
| Tool Making | Hammers, chisels | Durability, precision |
| Artistic Metalwork | Sculptures, jewelry | Customization, intricate designs |
| Automotive | Crankshafts, rods | Strength, fatigue resistance |
Hand Forging vs. Other Metalworking Methods
Hand forging has unique advantages and disadvantages compared to other metalworking techniques like casting and machining.
1. Advantages
Strength and Durability: Forged metals are often stronger and more durable than cast or machined parts.
Customization: Allows for a high degree of customization and intricate designs.
Material Efficiency: Less material wastage compared to casting.
2. Disadvantages
Time-Consuming: The process is slower compared to mass production methods.
Skill Requirement: Requires a high level of skill and experience.
Cost: Higher labor costs can make hand-forged items more expensive.
Method |
Advantages |
Disadvantages |
|---|---|---|
| Hand Forging | Customization, strength | Time-consuming, costly |
| Casting | Mass production, cost-effective | Limited customization |
| Machining | Precision, repeatability | Material wastage, setup cost |
Future Trends in Hand Forging
As technology advances, hand forging continues to evolve. Here are some trends to watch:
1. Automation and Robotics
While hand forging is traditionally a manual craft, advancements in automation and robotics are slowly being integrated into the process. These technologies can handle repetitive tasks and assist with heavy lifting, allowing artisans to focus on the finer details of their work. This not only enhances efficiency but also reduces physical strain on the smith.
2. Sustainable Practices
Sustainability is becoming increasingly important in all industries, including metalworking. Efforts are being made to reduce the environmental impact of forging by using recycled metals, improving energy efficiency in forges, and adopting waste reduction practices. The move towards greener practices ensures that hand forging remains viable and responsible in the long term.
3. Advanced Materials
New materials, such as advanced alloys and composites, are being developed for use in forging. These materials offer enhanced properties like higher strength-to-weight ratios and better resistance to corrosion and wear. Incorporating these materials into the forging process can lead to the production of components with superior performance characteristics.
4. Digital Design and Simulation
Digital tools and simulations are being used to design and test forged components before they are physically created. These technologies allow for precise control over the forging process, reducing the need for trial and error and minimizing material waste. They also make it easier to customize and optimize designs for specific applications.
Most Read Topics :
Forged Steel: Process, Application, Advantages Metal Forging Guide Metal Manufacturing Differences Between Forging and Casting
Conclusion
Hand forging is a timeless craft that combines traditional techniques with modern advancements to produce durable, high-quality metalwork. Whether you’re interested in creating tools, artistic pieces, or industrial components, understanding the basics of hand forging is essential. This guide provides a comprehensive overview of the process, from selecting materials and tools to mastering techniques and ensuring safety.
The future of hand forging looks promising with the integration of new technologies and sustainable practices, ensuring that this ancient art continues to thrive in the modern world. By mastering the principles of hand forging, you can create unique, customized pieces that stand the test of time.
FAQs:
What is the primary difference between hand forging and machine forging?
Hand forging involves manually shaping metal using hammers and anvils, offering greater customization and detail. Machine forging uses automated equipment, which is faster and suitable for mass production.
Can beginners start with hand forging?
Yes, beginners can start with basic hand forging. It’s important to learn the fundamental techniques and gradually work on more complex projects as skills improve.
What materials are best for hand forging?
Common materials include carbon steel, stainless steel, and various non-ferrous metals like copper and brass. The choice of material depends on the intended use of the forged item.
How can I ensure safety while hand forging?
Use appropriate PPE such as safety glasses, heat-resistant gloves, and aprons. Ensure your workspace is well-ventilated and equipped with fire safety measures. Regularly inspect and maintain your tools.
What are some common applications of hand-forged items?
Hand-forged items are used in tool making, artistic metalwork, and the automotive industry. They include tools like hammers and chisels, decorative pieces, and critical automotive components.

HA Chaudhary is an experienced engineer with 15 years in the mechanical and industrial sectors. Holding advanced degrees and multiple certifications in engineering, he combines technical expertise with a passion for writing to provide valuable insights into engineering innovations and business strategies. His content empowers professionals to excel in their fields and stay updated with the latest industry trends.