
Cracked grout in your bathroom may seem like a small issue, but it can lead to bigger problems if ignored. Gaps in grout let water slip behind your tiles, which can cause mold, mildew, and even tile damage. The good news? You don’t need to be a professional to repair it. In this beginners guide, we’ll show you how to fix cracked grout in your bathroom step-by-step using simple tools and materials. Whether you’re repairing a single hairline crack or replacing larger sections, this guide will help you restore your bathroom tiles and keep them looking fresh.
Understanding Grout and Why It Cracks
Before learning how to fix cracked grout in your bathroom, it’s important to know what grout is and why it fails. This helps you choose the right repair method and prevent future damage.
What is Grout?
Grout is a type of paste made from cement, water, and sometimes sand. It’s used to fill the spaces between tiles, keeping them in place and preventing water from getting behind them. When installed correctly, grout can last for years.
Common Reasons Why Grout Cracks
Natural Wear and Tear – Over time, grout can shrink, loosen, or become brittle.
Movement of Tiles – If your bathroom floor or walls shift slightly, the grout may crack.
Poor Installation – Using the wrong grout type or mixing it incorrectly can cause early damage.
Moisture Problems – Bathrooms are high-moisture areas, and constant water exposure can weaken grout.
Wrong Cleaning Methods – Harsh chemicals or rough scrubbing can break down the surface of grout.
Signs You Need to Fix Cracked Grout
Small hairline cracks between tiles
Missing or crumbling sections of grout
Discoloration or dark patches caused by water
Loose tiles around cracked areas
Why You Should Fix It Quickly
When grout cracks, water can leak into the gaps, damaging your bathroom walls and floor. Over time, this can cause mold growth, bad odors, and costly repairs. By learning how to fix cracked grout in your bathroom, you protect both the beauty and structure of your space.
Tools and Materials You will Need
Before starting, gather the following:
Grout saw or grout removal tool
Small chisel or flathead screwdriver
Vacuum or small brush
New grout (choose sanded or unsanded depending on your tile gaps)
Grout float or small rubber spatula
Sponge and bucket of water
Grout sealer
Safety glasses and gloves
💡 Pro Tip: If you’re unsure which grout type to use, take a small piece of your old grout to a hardware store and ask for a match.
Also Read: ⇒ How to Fix a Broken Doorknob Latch, Complete Guide
Step-by-Step Process: How to Fix Cracked Grout in Your Bathroom
Now that you understand why grout cracks and why it’s important to repair it, let’s go through exactly how to fix cracked grout in your bathroom from start to finish. Follow these steps carefully, and you’ll have a clean, watertight finish that lasts for years.
Table of Contents
ToggleStep 1 – Prepare the Area
Before doing anything, make sure the area is dry. Working on wet grout will prevent the new material from sticking properly.
Turn off any running water in the bathroom.
Use a towel or hair dryer to make sure the grout and tiles are completely dry.
Lay down an old sheet or newspaper to catch dust and debris.
Why this matters: Proper preparation makes your repair cleaner, faster, and more durable.
Also Read:⇒ How to Fix Garage Door Sensor: Complete Step-by-Step Guide
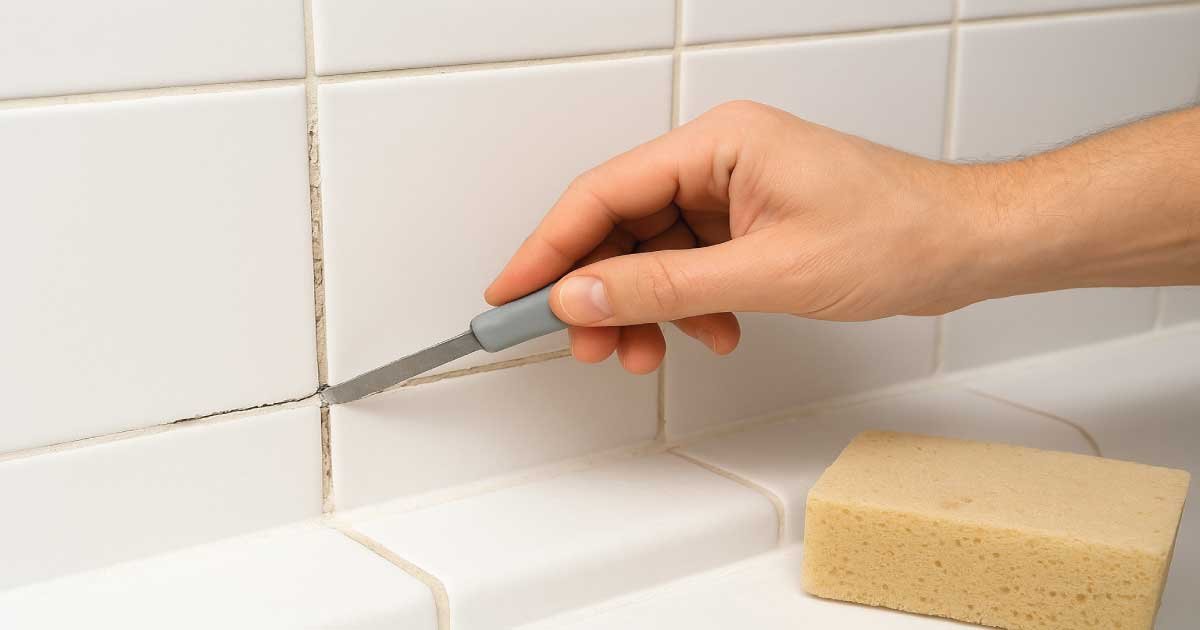
Step 2 – Remove the Damaged Grout
You can’t just fill over cracked grout; you need to remove the weak or broken sections first.
Use a grout saw or removal tool – These are small hand tools designed to scrape out old grout without damaging tiles.
Work slowly – Push the tool along the grout line, scraping away the cracked or loose grout.
Clean as you go – Use a vacuum or small brush to remove the dust so you can see your progress.
💡 Beginner Tip: If you’re nervous about scratching your tiles, wrap masking tape along the edges before removing grout.
Step 3 – Clean the Joints Thoroughly
Once the damaged grout is gone, clean the gaps (also called joints) to make sure no debris remains.
Use a damp sponge or cloth to wipe the joints.
Remove any loose particles, dust, or old sealant.
Allow the joints to dry completely before moving on.
Why this matters: Any leftover dust will stop your new grout from bonding to the tiles.
Also Read:⇒ How to Fix Garage Door Cable: Step-by-Step Complete Guide
Step 4 – Mix the New Grout
Depending on the type of grout you bought, you may need to mix it yourself.
For powder grout: Mix according to the package instructions, usually combining the powder with water until you get a smooth, toothpaste-like consistency.
For pre-mixed grout: Simply stir it before applying.
Important: Only mix as much as you can use in 20–30 minutes. Grout dries quickly once mixed.
Step 5 – Apply the New Grout
Here’s where you really start learning how to fix cracked grout in your bathroom:
Load grout onto a float – A grout float is a flat tool with a rubber edge that helps press grout into joints.
Spread the grout – Hold the float at a 45-degree angle and press the grout into the gaps between tiles.
Work in small sections – This prevents the grout from drying before you can smooth it out.
💡 Beginner Tip: Push grout firmly into the joints to avoid air pockets that can cause cracks later.
Also Read:⇒ How to Patch a Large Hole in Drywall: Very Easy DIY Guide
Step 6 – Remove Excess Grout
Once the joints are filled, remove extra grout from the tile surface.
Hold the float almost flat and scrape diagonally across the tiles.
Avoid digging into the joints—you only want to clear the surface.
Step 7 – Wipe the Tiles Clean
After about 15–20 minutes, the grout will begin to set. This is the time to wipe away the haze.
Use a damp sponge and gently wipe in a circular motion.
Rinse the sponge often to avoid spreading grout residue.
Note: Don’t use too much water, as it can weaken fresh grout.
Step 8 – Let the Grout Cure
Grout needs time to harden fully before it can handle moisture.
Most grout takes 24–72 hours to cure.
Keep the bathroom dry during this time—no showers or cleaning.
Step 9 – Apply a Grout Sealer
After curing, apply a grout sealer to protect your work.
Use a small brush or applicator bottle to apply sealer directly over the grout lines.
Let it dry according to the instructions on the bottle.
Why this matters: Sealer repels water and reduces the chance of future cracks and stains.
Also Read:⇒ How to Find a Water Leak Inside a Wall: Very Easy Guide
Tips, Maintenance, and Mistakes to Avoid
By now, you’ve completed the hands-on repair process, but the work doesn’t stop there. To make sure your grout stays strong and your bathroom looks great, you need to maintain it properly and avoid the errors many beginners make.
Extra Beginner Tips for Better Results
These tips will make your grout repair easier and more professional-looking:
1- Match the Color Carefully – Take a sample of your old grout to the store or use a grout color chart. Even small shade differences can be noticeable.
2- Use the Right Grout Type – Sanded grout for gaps wider than 1/8 inch, Unsanded grout for smaller gaps
3- Work in Cool, Dry Conditions – High humidity slows drying and can weaken grout.
4- Protect Fresh Grout from Water – Avoid showers, baths, or steam for at least 48–72 hours.
5- Seal Your Grout Every 6–12 Months – Regular sealing helps prevent cracks, stains, and water damage.
By following these tips, you’ll master how to fix cracked grout in your bathroom and make the repair last much longer.
Also Read:⇒ How to Fix Cracks in Concrete Patio: A Complete Guide
Ongoing Maintenance to Prevent Cracks
Even the best grout can crack again if it’s not cared for. Here’s how to protect your repair:
Clean Gently – Use mild cleaners and a soft brush. Avoid bleach or strong chemicals that can break down grout.
Dry After Use – Wipe down tiles after showers to reduce moisture damage.
Check for Loose Tiles – If tiles shift, grout will crack. Fix loose tiles immediately.
Repair Small Cracks Early – Don’t wait for cracks to get bigger; small touch-ups are quick and easy.
A little regular care goes a long way in keeping your bathroom looking like new.
Common Mistakes to Avoid
When learning how to fix cracked grout in your bathroom, many beginners make these errors:
1- Filling Over Damaged Grout – This only hides the crack temporarily. The old grout underneath will keep breaking.
2- Skipping the Cleaning Step – Dust and debris prevent grout from bonding to tiles.
3- Using Too Much Water When Cleaning – Excess moisture can weaken fresh grout.
4- Not Letting Grout Cure Fully – Using the shower too soon can wash away the grout before it hardens.
5- Forgetting to Seal the Grout – Without sealer, water can seep in and cause more cracks.
Avoiding these mistakes will help your repair last for many years.
When to Call a Professional
Sometimes, the damage is too extensive for a DIY fix. You should call a professional if:
Large areas of grout are missing or crumbling
Tiles are loose or cracked
Water damage has spread behind the walls or floor
Mold or mildew keeps returning after cleaning
A professional can repair the tiles, replace all grout, and ensure your bathroom is fully sealed.
Final Thoughts
Learning how to fix cracked grout in your bathroom is a valuable skill that saves money and keeps your space looking fresh. By understanding why grout cracks, using the right tools, and following the step-by-step process, even beginners can get professional results. With proper maintenance, sealing, and gentle cleaning, your grout repair can last for years—keeping your bathroom safe, dry, and beautiful.
Also Read:⇒ How to Fix Cracks in Concrete Walls: A Practical Guide
FAQs:
Can I fix cracked grout without removing it?
No, you should always remove the damaged grout before adding new grout. Filling over cracks is just a short-term solution and will likely fail quickly. Old, weakened grout will continue to break underneath, so removal ensures the new grout bonds well, lasts longer, and protects your bathroom from water damage.
How long does it take to fix cracked grout in a bathroom?
For a small repair job, the hands-on work usually takes about 1–2 hours, depending on your experience level. However, grout needs time to cure—usually 24–72 hours—before it can safely be exposed to water. Rushing this process can weaken the grout and cause it to crack or crumble again in a short time.
What type of grout should I use for bathroom tiles?
For narrow gaps less than 1/8 inch, choose unsanded grout because it’s smooth and easy to work with in tight spaces. For wider gaps, sanded grout is best because it’s stronger and more resistant to cracking. Always check the manufacturer’s recommendations to ensure you choose the right grout type for your specific bathroom tiles.
Do I need to seal grout after fixing it?
Yes, sealing grout after it has fully cured is very important. Grout is porous, meaning water can pass through if it’s not sealed. Applying a high-quality grout sealer creates a protective barrier against water, stains, and mold growth. This extra step extends the life of your grout and keeps your bathroom looking cleaner for longer.
Can cracked grout cause water damage?
Absolutely. Cracked grout allows water to seep into the spaces between and behind your tiles. Over time, this hidden moisture can cause mold, mildew, and even structural damage to your bathroom walls or floors. Fixing cracks quickly is essential to prevent expensive repairs and maintain the overall integrity of your bathroom surfaces.
Is grout waterproof on its own?
No, grout is not naturally waterproof. It’s a cement-based material that is porous, meaning water can pass through it over time. While it helps hold tiles in place, grout needs to be sealed to provide full water resistance. Without sealing, moisture can lead to cracking, staining, and mold growth in your bathroom.
Can I re-grout just one section of my bathroom?
Yes, you can re-grout only the cracked or damaged section, but you’ll need to make sure the color matches the surrounding grout. Using a grout color chart or taking a sample to a hardware store can help. This targeted repair is cost-effective, but it still needs proper sealing to ensure lasting results.