
How to fix garage door sensor issues is essential knowledge for every homeowner. Garage door sensors are vital for safety, preventing accidents by detecting obstacles in the door’s path. When these sensors malfunction, your garage door may refuse to close or behave erratically. In this guide, you’ll learn step-by-step solutions—from cleaning and realignment to wiring repairs and replacements—to restore your garage door’s smooth and safe operation.
Table of Contents
ToggleHow to fix Garage Door Sensor: Introduction
Garage doors are an essential part of many homes, providing security and convenience. Modern garage doors come equipped with safety sensors to prevent accidents and injuries. However, like any mechanical or electronic device, garage door sensors can malfunction or fail, causing frustration and inconvenience. If your garage door sensor is not working properly, it might prevent the door from closing or cause erratic behavior.
In this comprehensive guide, we will explain how to fix garage door sensor issues step-by-step. This is the first part, where we focus on understanding what garage door sensors are, how they work, and how to diagnose common problems. In parts two and three, we will cover detailed fixing methods and advanced troubleshooting.
Also Read:
What Is a Garage Door Sensor?
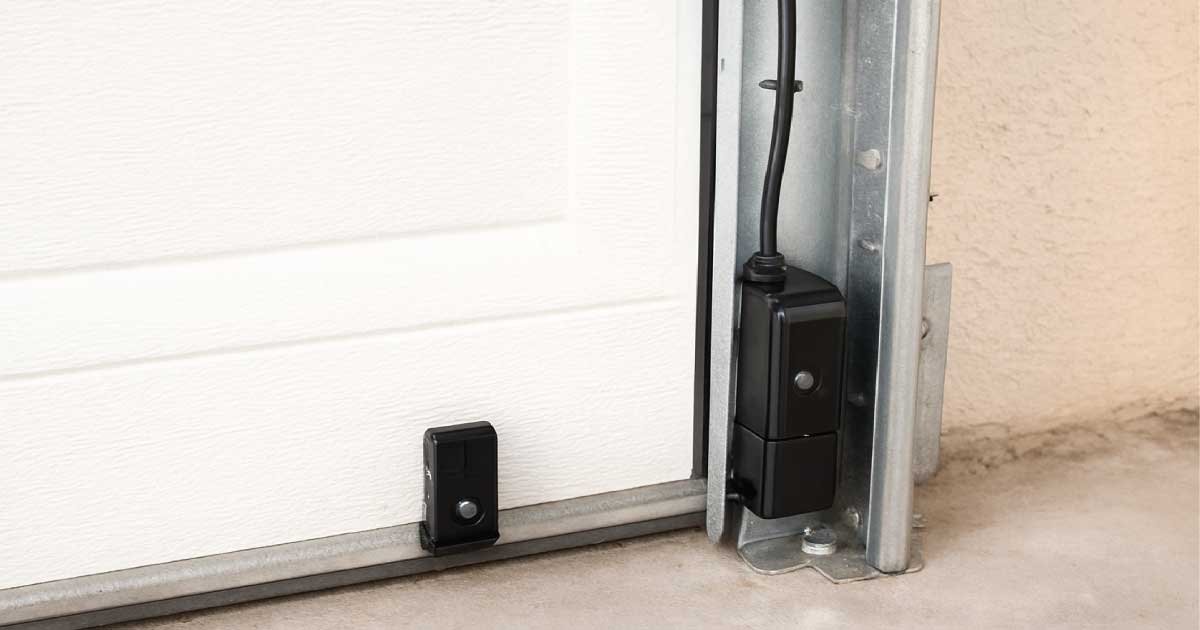
A garage door sensor is a small safety device installed near the bottom of the door tracks, facing each other on opposite sides of the garage door opening. These sensors use infrared technology to detect objects, pets, or people that might be in the path of the door closing. When the sensor beam is interrupted, it sends a signal to the garage door opener to stop or reverse the door’s movement.
This safety mechanism helps prevent accidents, injuries, and damage to property. Without a properly functioning sensor, a garage door could close on a child, pet, or object, potentially causing serious harm.
How Does a Garage Door Sensor Work?
Garage door sensors operate using a simple infrared beam system:
Emitter sensor: One sensor emits an invisible infrared beam across the garage door opening.
Receiver sensor: The opposite sensor receives the beam signal.
When the beam is continuous and uninterrupted, the sensors signal the garage door opener that it is safe to close the door. If the beam is broken or blocked, the sensors signal the opener to stop or reverse the door.
Because these sensors are critical for safety, most modern garage doors won’t close if the sensors are malfunctioning or misaligned.
Common Signs Your Garage Door Sensor Is Not Working
Knowing the symptoms can help you understand how to fix garage door sensor problems effectively. Common signs of sensor malfunction include:
The garage door does not close and reverses as soon as it touches the ground.
The garage door opens fine but won’t close.
The garage door closes partially, then reverses suddenly.
The sensor lights are off or flashing.
The garage door sensor is visibly damaged or misaligned.
Frequent false alarms or inconsistent door behavior.
If you are experiencing any of these issues, it’s time to inspect your garage door sensors carefully.
Also Read:
Safety First: Before You Start Fixing Your Garage Door Sensor
Before attempting any repairs, safety should be your top priority. Here are some important safety tips to follow:
Disconnect the garage door opener power by unplugging it from the electrical outlet.
Avoid working with sensors when the door is moving.
Keep children and pets away from the work area.
Use a sturdy ladder if you need to reach the sensors.
If you are not confident in your ability to fix the sensors, consider hiring a professional.
How to Fix Garage Door Sensor Issues Step-by-Step
Step 1: Inspect the Sensor Lenses for Dirt and Obstructions
One of the simplest causes of sensor failure is dirty or obstructed lenses. Dust, spider webs, or debris can block the infrared beam and prevent the sensors from working.
Carefully wipe the sensor lenses with a soft, dry cloth.
Remove any visible cobwebs, dirt, or debris around the sensors.
Clear the area in front of the sensors to ensure nothing is blocking the beam.
Step 2: Check the Sensor Alignment
Garage door sensors need to be perfectly aligned facing each other for the beam to work correctly.
Examine if the sensors are pointing directly at each other.
Check if the sensors have been knocked loose or shifted.
Adjust the sensors by gently twisting or sliding their mounting brackets until the sensor lights turn solid green or red (depending on your model).
Step 3: Verify the Sensor Wiring
Faulty or loose wiring can cause sensor failure.
Look at the wiring connecting each sensor to the garage door opener.
Ensure wires are firmly connected and not frayed or broken.
If you find damaged wiring, it may need repair or replacement.
Also Read:
Understanding the Sensor Indicator Lights
Most garage door sensors have indicator lights to show their status:
Solid green or red light: The sensor is powered and aligned.
Flashing light: The sensor is misaligned or the beam is obstructed.
No light: No power to the sensor or a wiring issue.
Pay close attention to these lights when troubleshooting how to fix garage door sensor problems.
When to Call a Professional
While many sensor issues are simple fixes, some problems require professional expertise:
Sensors that still don’t work after cleaning and alignment.
Complex wiring or electrical issues.
Sensor replacement.
Garage door opener malfunctions linked to sensor errors.
Calling a certified garage door technician can save time and prevent further damage.
Step 4: Realigning Garage Door Sensors Properly
Even a slight misalignment can cause the sensors to fail. Here’s a detailed guide on how to realign the sensors effectively:
Tools Needed:
A flathead screwdriver or a wrench (depending on your sensor’s mounting brackets)
A level (optional, but helpful for precision)
How to Realign:
Unplug the garage door opener to ensure safety.
Loosen the mounting bracket screws just enough so the sensor can be adjusted.
Gently move each sensor until both sensor lenses face each other directly.
Use a level to check that both sensors are at the same height from the ground.
Tighten the screws to secure the sensors in place.
Plug the opener back in and check the sensor lights. Both should show a solid light (usually green or red).
Test the garage door operation.
Tip: If the sensor lights are still flashing or off, tweak the alignment very slightly until the lights stay solid.
Also Read:
Step 5: Fixing Wiring Issues
Damaged or loose wiring is a common cause of sensor failure. Here’s how to inspect and fix wiring:
How to Check Wiring:
Look at the wires connected to the sensors. They usually run along the garage wall or track.
Check for any frayed, cut, or pinched wires.
If wires are loose, carefully reconnect them to their terminals.
If wires are damaged, you may need to replace the wiring.
How to Replace Sensor Wiring:
Purchase appropriate replacement wire (typically 18/2 or 18/4 gauge garage door sensor wire).
Disconnect power from the garage door opener.
Remove old wires by loosening terminal screws.
Run the new wire along the same path, securing it with wire clips.
Connect the wires firmly to the sensors and opener terminals.
Restore power and test the sensors.
Step 6: Cleaning the Sensor Lens and Surroundings Thoroughly
Sometimes dust or spider webs build up inside or around the sensor lenses causing intermittent issues.
Use a soft microfiber cloth lightly dampened with water or a mild cleaner to clean the sensor lenses.
Avoid abrasive materials which may scratch the lens.
Clean the mounting brackets and remove any cobwebs or dirt around the sensors.
Make sure nothing is blocking the infrared beam path.
Step 7: Testing the Sensors After Repairs
After realigning and fixing wiring or cleaning sensors, test the system carefully:
Plug the garage door opener back into power.
Close the garage door using the remote or wall switch.
Place an object such as a broomstick or box in the sensor’s path.
The door should reverse or stop when the object blocks the beam.
Remove the object and test if the door closes smoothly.
If the door closes without reversing, the sensors are working properly.
Also Read:
Step 8: Replacing Faulty Sensors
If cleaning, wiring fixes, and alignment don’t restore sensor function, the sensors may be faulty or damaged and need replacement.
How to Replace Garage Door Sensors:
Tools Needed:
New compatible garage door sensors (check your garage door opener’s brand and model)
Screwdriver
Wire stripper/cutter
Replacement Steps:
Disconnect power to the garage door opener.
Remove the mounting brackets holding the old sensors.
Disconnect the sensor wires from the opener and sensors.
Install the new sensors in the same position using the mounting brackets.
Connect the new sensors’ wires to the opener terminals.
Ensure the sensors face each other and are at the same height.
Tighten mounting brackets securely.
Restore power and test the sensors.
Note: Always buy sensors compatible with your garage door opener model to avoid connection or functionality issues.
Step 9: Understanding Sensor LED Lights During Troubleshooting
Most garage door sensors have LED indicators to help identify issues:
Solid light (Green or Red): Sensors are powered and aligned correctly.
Flashing light: Sensor beam is blocked, sensor misaligned, or wiring problem.
No light: Sensor has no power or wiring is disconnected/damaged.
Use these signals as a guide when you are fixing or replacing your garage door sensor.
Also Read:
Step 10: Addressing Common Environmental Factors That Affect Sensors
Sometimes environmental factors cause sensor issues, even if the hardware is fine:
Sunlight interference: Bright sunlight shining directly on sensors can disrupt the infrared beam. Installing a shade or cover on the sensor or changing their angle slightly can help.
Physical damage: Sensor brackets or wiring exposed to harsh weather or impacts may get damaged.
Insects and debris: Spiders or insects can create webs on sensor lenses, interfering with the beam.
Temperature extremes: Very cold or hot weather can sometimes affect sensor sensitivity or wiring integrity.
Regular inspection and maintenance can prevent these issues.
Also Read:
Step 11: Advanced Troubleshooting Techniques
If you have cleaned, realigned, repaired wiring, and replaced sensors but still face issues, consider the following advanced troubleshooting steps:
Check the Garage Door Opener’s Sensor Circuit
Sometimes the issue is not the sensors themselves but the garage door opener’s control board:
Inspect the control board for burnt components or loose connections related to the sensors.
Use a multimeter to test voltage at the sensor terminals on the opener.
If voltage is missing or inconsistent, the control board may be faulty and require professional repair or replacement.
Test Sensors Independently
To isolate sensor faults:
Swap the left and right sensors if possible and see if the problem moves sides.
If one sensor causes issues regardless of position, it’s faulty.
Use a multimeter continuity test to check sensor wiring integrity.
Look for Interference Sources
Infrared sensors can be disrupted by:
Reflective surfaces near the sensors causing beam reflection.
LED or fluorescent lighting nearby causing interference.
Electronic devices emitting infrared or radio frequency signals.
Relocate or shield sensors if interference is suspected.
Step 12: Sensor Calibration Tips
Though most garage door sensors are designed to be maintenance-free once installed, some models may allow manual calibration:
Refer to your garage door opener’s manual for sensor calibration procedures.
Use the manual or remote control to trigger calibration mode.
Adjust sensor sensitivity or beam strength if the option is available.
Perform multiple tests blocking and unblocking the beam during calibration.
Proper calibration ensures sensors detect obstacles accurately without false positives or negatives.
Step 13: Regular Maintenance for Garage Door Sensors
Preventive care can minimize sensor malfunctions:
Monthly Maintenance Checklist
Clean sensor lenses with a soft cloth.
Check and adjust sensor alignment.
Inspect wiring for wear or damage.
Remove debris, cobwebs, or dirt near sensors.
Test sensor operation by blocking the beam and observing door response.
Seasonal Checks
Inspect for damage after storms, heavy winds, or temperature extremes.
Check sensor mounting brackets for rust or loosening.
Ensure the sensor beam path is free of leaves, dirt, or ice build-up.
Step 14: When to Replace Your Garage Door Sensors Entirely
Garage door sensors generally last many years, but replacement may be necessary if:
Sensors have physical damage like cracks or corrosion.
Sensors repeatedly malfunction despite cleaning and repairs.
Replacement parts are no longer available for your opener model.
You upgrade your garage door opener system to a newer model.
Choosing high-quality, compatible replacement sensors ensures long-term reliability.
Also Read:
Step 15: Tips to Avoid Future Sensor Problems
Avoid parking vehicles or storing items that block the sensor beam path.
Keep the sensor wiring secured and protected from rodents or pets.
Use weatherproof sensor covers if your sensors are exposed to harsh conditions.
Regularly update or check your garage door opener firmware if applicable.
Final Thoughts: Mastering How to Fix Garage Door Sensor Problems
Knowing how to fix garage door sensor issues can save you time, money, and the hassle of a malfunctioning garage door. By understanding sensor operation, performing regular maintenance, troubleshooting carefully, and replacing components when needed, you can ensure your garage door stays safe and functional.
If you ever feel uncomfortable performing repairs or if problems persist, don’t hesitate to contact a professional garage door technician. Safety should always come first.
Also Read:
FAQs Related to How to fix garage door sensor
Why is my garage door sensor light blinking?
A blinking garage door sensor light usually means the sensors are misaligned or the beam is blocked. Dirt, spider webs, or objects can obstruct the beam. Try cleaning the lenses and adjusting the sensors so they face each other directly. If the light continues blinking after cleaning and realigning, check the wiring for damage or loose connections.
How do I realign garage door sensors?
To realign sensors, first unplug the garage door opener for safety. Loosen the screws holding the sensors and gently adjust their position so the lenses face each other straight across the door opening. Use a level to ensure they are at the same height. Tighten the screws and plug the opener back in. The sensor lights should show solid colors when aligned correctly.
Can I fix a broken garage door sensor myself?
Yes, many sensor issues like dirt, misalignment, and wiring problems can be fixed by homeowners with basic tools. Cleaning the lenses, adjusting alignment, and checking wiring connections are common DIY fixes. However, if sensors are physically damaged or electrical problems persist, it’s safer to hire a professional to avoid injury or further damage.
What causes garage door sensors to stop working suddenly?
Common causes include dirt or debris blocking the sensor beam, misaligned sensors, damaged wiring, power interruptions, or sensor failure due to age or physical damage. Environmental factors such as extreme weather or interference from sunlight or electronic devices can also cause sensor malfunction.
How do I test if my garage door sensor is faulty?
You can test sensors by blocking the beam path while attempting to close the door—the door should reverse or stop. Swap sensor positions to see if problems persist on one side, indicating a faulty sensor. Using a multimeter to check wiring continuity and voltage at sensor terminals helps identify electrical faults.
How often should I clean my garage door sensors?
It’s best to clean your garage door sensors monthly or whenever you notice dust, dirt, or spider webs on the lenses. Regular cleaning prevents beam obstruction and sensor malfunction. Use a soft cloth and mild cleaner, avoiding abrasive materials that can scratch the lenses.
When should I replace my garage door sensors?
Replace sensors if they are physically damaged, corroded, or malfunction despite cleaning and repairs. Sensors that repeatedly cause door closing failures or no longer respond properly indicate replacement is needed. Also, upgrading your garage door opener may require new compatible sensors.