
Drywall is durable, affordable, and a staple in most modern homes. But when accidents happen whether it’s a door knob smash, a plumbing repair, or an energetic kid large holes in drywall can be a real eyesore. Luckily, you don’t always need to hire a professional. With the right approach, patching drywall like a pro is totally achievable, even if you’re not a seasoned handyman.
In this guide, we’ll walk you through how to patch a large hole in drywall step by step. We will also share drywall repair tips, the tools for drywall patching you’ll need, and expert tricks to ensure your wall looks as good as new.
What You’ll Need: Tools and Materials
Before you get started, gather the right tools for drywall patching to make the process smoother and more efficient.
Essential Tools:
Drywall saw or utility knife
Putty knife
Drywall tape
Drywall screws
Drill
Sanding sponge or sandpaper
Dust mask
Measuring tape
Materials:
Drywall patch or new drywall sheet
Drywall mud (joint compound)
Wood strips (for backing, if needed)
Primer and paint
Optional: drywall hole repair kit for convenience
Step-by-Step: How to Fix a Large Hole in Drywall
Large holes in drywall can be stressful to face, but the good news is, with some basic tools and patience, you can repair them yourself and make your wall look like new again. Whether it’s from accidental damage or wear and tear, here’s a simple, clear, step-by-step guide to fixing a big hole in your drywall no special skills required.
Step 1: Clean the Area
Before you start, clean up the damaged area to create a solid foundation for your repair. Carefully remove any loose debris, crumbling drywall, or broken pieces around the hole. This will prevent future flaking and ensure the patch sticks well.
Using a utility knife, trim the hole into a neat square or rectangle. Odd edges won’t fit well with your patch and can make the repair look uneven. Square edges also make it easier to attach a backing support, which you’ll add in the next step. Take your time here the cleaner the edges, the better the patch will fit.
Step 2: Install Backing Support
Large holes require more than just a patch stuck over them; you need something behind the drywall to anchor your patch securely. This is called backing support.
Start by cutting a strip of wood usually a 1×2-inch board just a bit longer than the width of the hole. Then, carefully slide the wooden strip inside the hole behind the drywall. You want the wood to sit flush behind the damaged drywall edges.
Hold the wooden strip in place while you screw it through the drywall edges on both sides. This gives your patch a sturdy base to attach to, preventing it from moving or sagging later on. Without this backing, patches tend to crack or fall out over time, especially on bigger holes.
Step 3: Cut and Fit the Patch
Next, it’s time to prepare your drywall patch. Cut a piece of drywall that matches the size of the hole you cleaned up earlier. If you’re using a repair kit, you might have a pre-cut patch that fits standard hole sizes. If not, measure carefully and cut your own patch with a drywall saw or utility knife.
Dry-fit the patch by placing it into the hole without attaching it yet. Make sure it fits snugly no gaps around the edges. A tight fit means the patch will blend better with the existing wall and create a smoother final finish.
Step 4: Screw in the Patch
Now that your backing is installed and your patch fits perfectly, secure the patch by screwing it into the wooden backing strip. Use drywall screws that are just long enough to go through the drywall and into the wood behind.
Screw the patch in place so it’s flush with the rest of the wall surface. Be careful not to drive the screws too deep this can damage the drywall paper and make finishing the surface harder. The patch should sit flat and firm, providing a stable canvas for the next steps.
Step 5: Apply Drywall Tape
One of the secrets to a strong, crack-free repair is drywall tape. Tape bridges the seams between your patch and the existing wall, preventing cracks from forming as the wall settles over time.
You can use mesh drywall tape, which is self-adhesive and easy to apply, or traditional paper tape, which requires a layer of mud underneath to stick. Lay the tape carefully over all seams around the patch, pressing it firmly so there are no bubbles or wrinkles.
This step might seem minor, but good taping is what turns a patch job into a professional-looking repair that lasts for years.
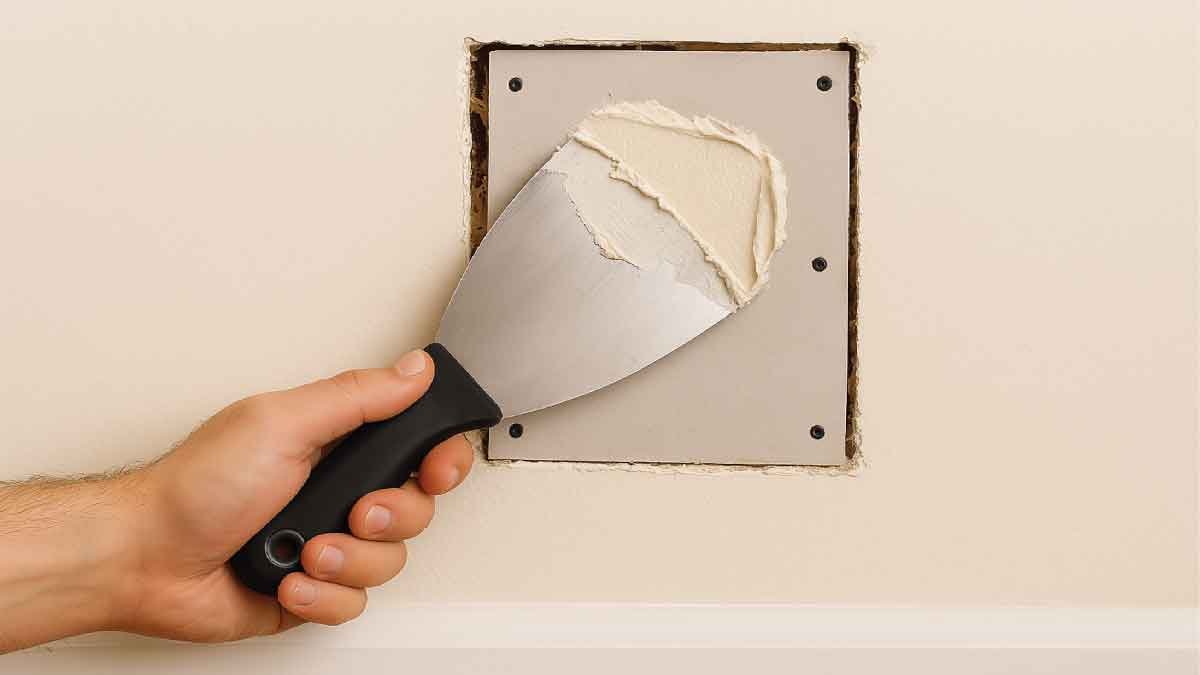
Step 6: Add Drywall Mud
Now comes the messy but crucial part: drywall mud, also called joint compound. Using a putty knife, spread a thin layer of mud over the taped seams. Feather the edges outward to blend it smoothly with the surrounding wall.
Don’t rush this step. Let the mud dry completely, which usually takes several hours or overnight. Once dry, apply a second coat to fill in any low spots or imperfections, then a third if needed. Each layer should be thinner and wider than the last, helping the patch blend seamlessly.
Between coats, lightly sand the area with fine-grit sandpaper or a sanding sponge to smooth out bumps and ridges. Be gentle you want a smooth finish, not scratches.
Step 7: Sand and Smooth
After the final coat of mud has dried, it’s time for the finishing touches. Sand the patched area with a fine-grit sanding sponge or paper, smoothing the surface until it’s flush with the rest of the wall.
Sanding drywall creates a lot of dust, so make sure to wear a dust mask and keep the room ventilated. Take your time here because the smoother the surface, the less noticeable the repair will be after painting.
If you spot any imperfections, apply a tiny bit more mud, let it dry, and sand again. Patience pays off when you want your patch to blend in invisibly.
Step 8: Prime and Paint
The final step is to prime and paint your repaired wall. Primer seals the patched area and ensures that paint adheres evenly. Without primer, your paint might look blotchy or show differences in texture and color between the patch and the surrounding wall.
Choose a primer suitable for drywall repairs and apply it generously over the patched area. After it dries, paint the patch with your wall’s matching color. You may need two coats of paint for full coverage.
Once the paint dries, step back and admire your work your large drywall hole will be completely gone, leaving a smooth, professional finish.
Final Tips
Take your time with each step rushing can cause imperfections.
Use quality tools and materials; cheap drywall mud or tape can crack or peel.
Keep your putty knife clean for smoother mud application.
If you’re unsure about matching paint, bring a chip from the wall to your local paint store for color matching.
Fixing a large hole in drywall might sound intimidating at first, but with these clear steps, it becomes an achievable DIY project. Not only will you save money by doing it yourself, but you’ll also gain confidence to tackle future home repairs with ease.
A Video Guide About How to Patch a Large Hole in Drywall:
Fixing Holes in Drywall: Common Mistakes to Avoid
Even though fixing holes in drywall is not rocket science, it’s easy to make mistakes if you rush. Here are a few things to watch out for:
Skipping the backing support for large holes, causing the patch to sag
Using too much mud at once, which leads to cracking
Not sanding between coats, resulting in a bumpy surface
Skipping primer, which affects paint finish
Following the proper steps and applying these drywall repair tips will save you time and frustration.
Using a Drywall Hole Repair Kit
If you’re new to home repair or want a quicker fix, a drywall hole repair kit is a great option. These kits usually include a mesh patch, joint compound, and a putty knife. They’re best for medium-to-large holes and are especially useful for DIY drywall patch projects.
Just be sure to follow the included instructions and still focus on sanding drywall patches and proper drywall mud application for best results.
Best Way to Fix Drywall Holes Based on Size
Different hole sizes require different techniques. Here’s a quick guide:
Small Holes (under 1 inch)
Use spackle and a putty knife.
No tape or backing needed.
Medium Holes (1–4 inches)
Use a drywall hole repair kit.
May need mesh tape and a couple of coats of mud.
Large Holes (4 inches and up)
Cut out the damaged area.
Add backing strips.
Use a new drywall patch with tape and mud.
Knowing the best way to fix drywall holes based on their size helps you choose the most efficient method.
Patching Drywall Like a Pro: Final Thoughts
Learning how to patch a large hole in drywall is a valuable skill for any homeowner. Whether you’re dealing with damage from plumbing repairs, accidents, or moving furniture, you now have the confidence to take care of it yourself.
By using the right tools and applying proper drywall finishing techniques, your wall can look as good as new. From applying drywall mud to mastering how to use drywall tape, every step matters when aiming for a seamless finish.
Not only does this save you money, but it also gives you a sense of accomplishment. DIY repairs like this can be very satisfying—and sometimes even fun!
Conclusion: Bring Your Walls Back to Life
Don’t let damaged walls bring down the beauty of your home. With this guide, you now understand how to patch a large hole in drywall, from prepping the area to priming and painting. Whether you’re a DIY enthusiast or just looking to save money on home repairs, this process is a great starting point.
Remember to take your time, use the proper tools for drywall patching, and apply these drywall repair tips to get professional-looking results. Happy patching!
FAQs:
What is the easiest way to fix a large hole in drywall?
The easiest way is to use a drywall repair kit. These kits include a mesh patch and joint compound, making the process simple. Just clean the hole, apply the patch, spread the mud, and sand it smooth. It’s a beginner-friendly solution that saves time and looks professional when done right.
Can I patch drywall without using tape?
You can, but it’s not recommended especially for large holes. Drywall tape helps prevent cracks by reinforcing the joint. Skipping the tape might cause the patch to separate or crack over time. For a long-lasting repair, always apply tape before spreading the joint compound.
How do you fix a drywall hole without replacing it?
For small to medium holes, you can use a patch or mesh without cutting out the wall. Clean the area, place the patch, and apply joint compound in layers. Sand between coats for a smooth finish. This method avoids full drywall replacement and works well for cosmetic damage.
How long does it take to patch a large drywall hole?
The actual repair takes about 1–2 hours, but drying time adds up. Joint compound needs 12–24 hours to dry between coats. Add sanding and painting time, and the full process usually spans 1–2 days. It’s mostly waiting so plan ahead!
Do I need to paint after patching drywall?
Yes, painting is essential after patching to blend the repaired area with the rest of the wall. Always prime first so the paint sticks evenly. Skipping paint will make the patch stand out and not in a good way. A fresh coat brings everything together seamlessly.