

A stripped screw can stop a simple repair job in its tracks. You start with confidence—drill in hand, project half planned—and suddenly the screwdriver just spins. No grip. No movement. Just frustration.
If you have ever tried to remove a stripped screw from wood, metal, plastic, or even a tight mechanical part, you already know how annoying it can be.
The good news? You don’t need to panic, break the surface, or replace the entire part. In most cases, you can remove a stripped screw safely using simple tools and a calm approach.
This 5-step guide walks you through proven, real methods that work—from the easiest fixes to stronger solutions when the screw refuses to cooperate.
What Is a Stripped Screw?
A stripped screw is a screw whose head has been damaged so badly that a screwdriver can no longer grip it. This usually happens when:
- The wrong screwdriver size is used
- Too much force is applied
- The screw is overtightened
- The screw material is soft or cheap
- Rust or corrosion weakens the head
Once stripped, the screw head becomes smooth or rounded, making removal difficult—but not impossible.
Tools You May Need (Don’t Worry—Not All at Once)
Before jumping into the steps, gather a few common tools. You may only need one or two depending on the situation.
- Flathead and Phillips screwdrivers
- Rubber band or steel wool
- Pliers (locking pliers work best)
- Hammer
- Screw extractor kit
- Drill with bits
- Penetrating oil (WD-40 or similar)
Step 1: Try the Simple Grip Fix (Rubber Band or Steel Wool)
Always begin with the gentlest solution before moving to advanced tools.
This quick method often works for lightly stripped screws and helps prevent further damage to the screw head or surrounding surface.
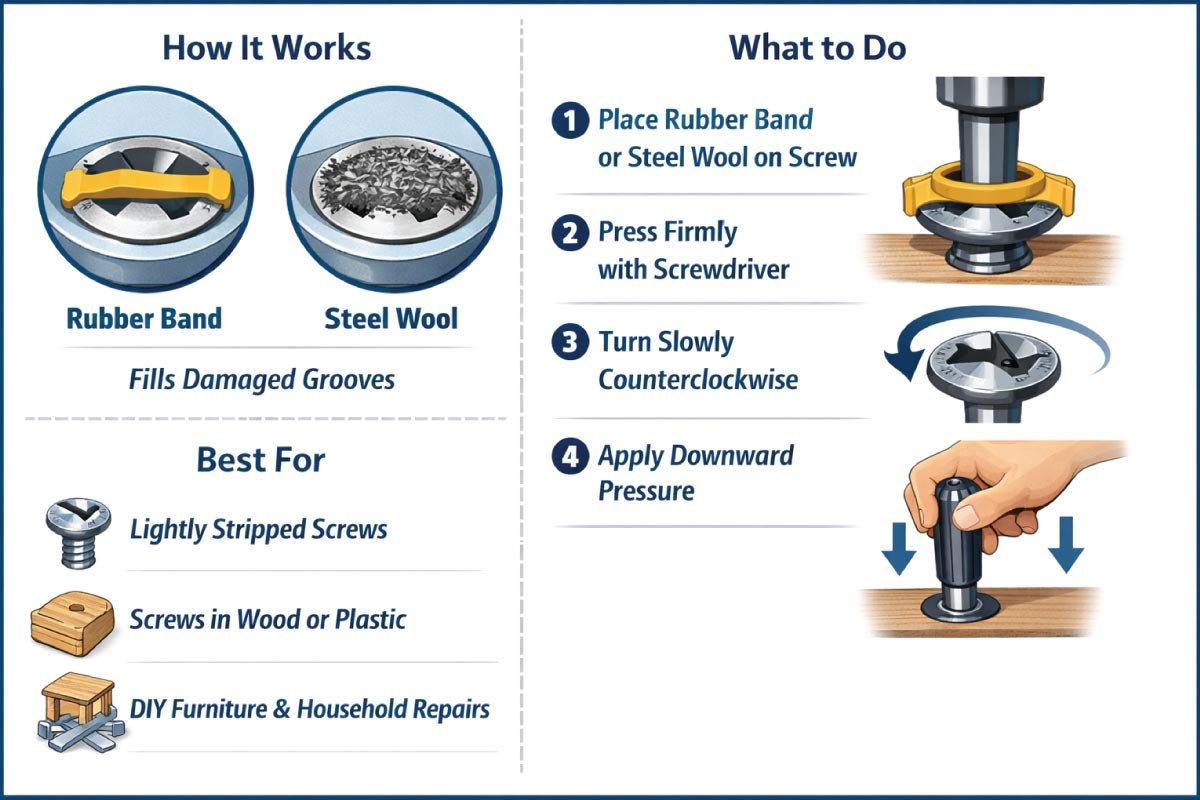
How It Works
Placing a rubber band or steel wool between the screwdriver and the screw increases friction,
allowing the tool to catch the damaged grooves and turn the screw without slipping or causing additional stripping.
What to Do
- Place a wide rubber band or a small piece of steel wool over the screw head
- Press the screwdriver firmly into the screw
- Turn slowly counterclockwise
- Apply steady downward pressure—don’t rush
Best For
- Lightly stripped screws
- Screws in wood or plastic
- DIY furniture and household repairs
Pro Tip
Use slow, controlled force. Fast twisting usually makes stripping worse.
Step 2: Switch to a Flathead Screwdriver (Even for Phillips Screws)
When the original screwdriver keeps slipping, a flathead can provide better control.
Its straight edge often grips worn screw heads more effectively, especially when light pressure and slow turning are applied.
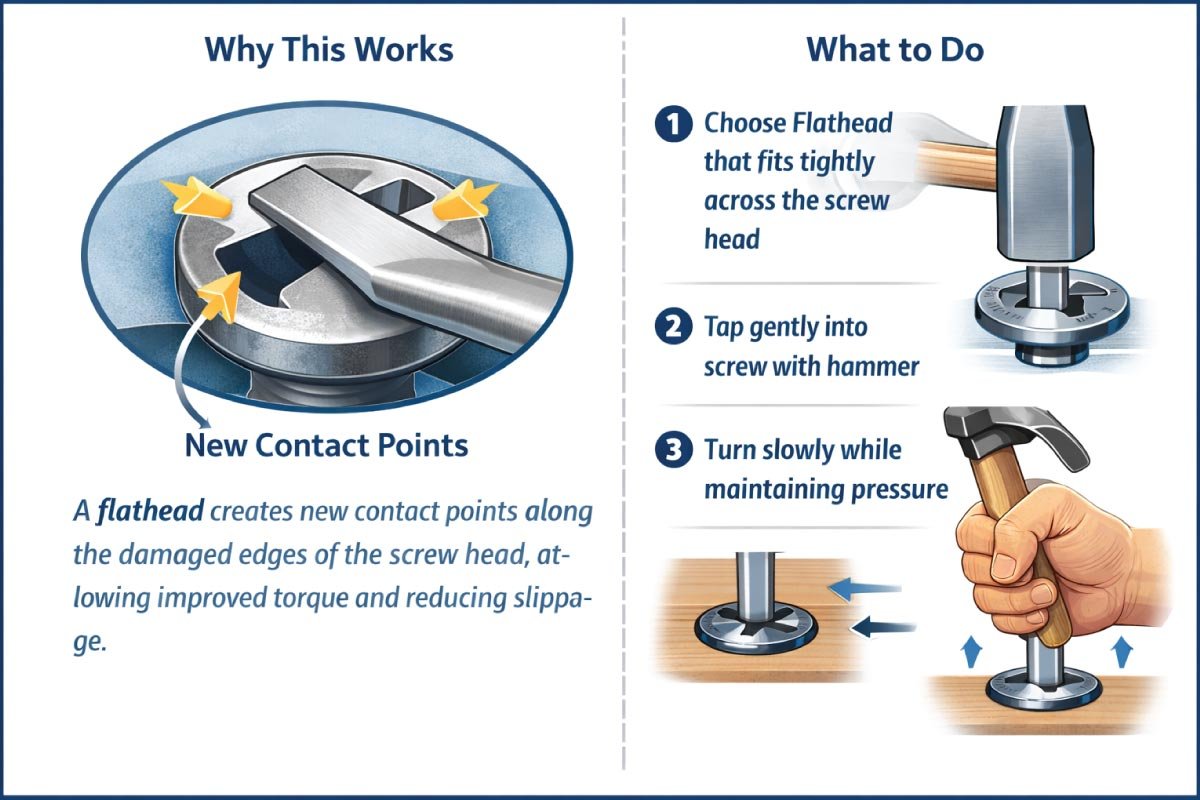
Why This Works
A flathead screwdriver creates new contact points along the damaged edges of the screw head,
allowing improved torque and reducing slippage where cross-shaped grooves are already worn down.
What to Do
- Choose a flathead that fits tightly across the screw head
- Tap it gently into the screw with a hammer
- Turn slowly while maintaining pressure
When to Use This Method
- The screw head still has some shape
- The screw is slightly recessed
- You don’t want to drill yet
This trick alone solves a surprising number of stripped screw problems.
Step 3: Use Locking Pliers for Maximum Grip
When a stripped screw protrudes above the surface, locking pliers offer excellent control.
They grip the screw head firmly, allowing you to apply steady turning force without relying on damaged slots or grooves.
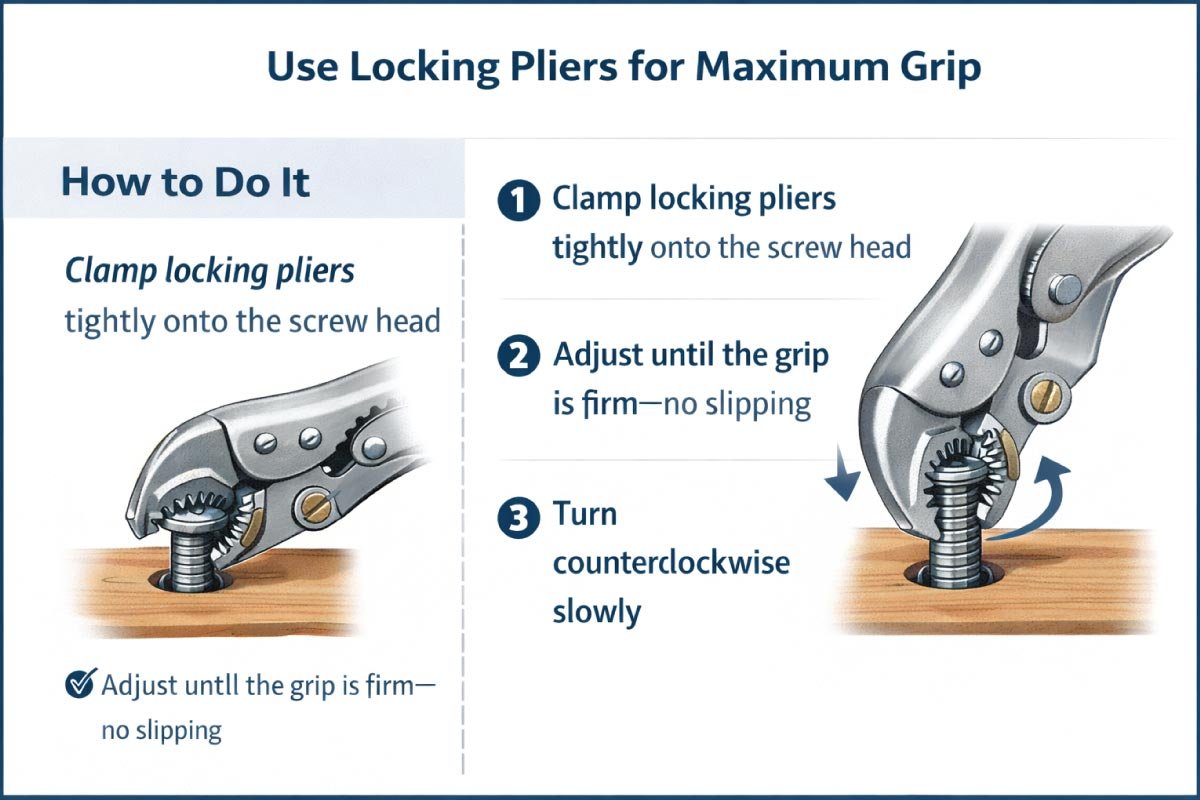
How to Do It
Clamp the locking pliers tightly around the screw head and adjust until there is no movement.
Turn the pliers slowly counterclockwise while maintaining pressure to loosen the screw without snapping or slipping.
- Clamp locking pliers tightly onto the screw head
- Adjust until the grip is firm—no slipping
- Turn counterclockwise slowly
Why This Is Effective
Instead of relying on the damaged head grooves, you’re gripping the entire screw head directly.
Best For
- Screws that protrude above the surface
- Rusted or stubborn screws
- Mechanical or metal applications
Tip
Rock the screw gently back and forth before fully loosening—it helps break resistance.
Step 4: Use a Screw Extractor (The Professional Fix)
When simple fixes don’t work, a screw extractor provides a reliable solution.
It’s designed for severely stripped screws and is commonly used in automotive, mechanical, and professional repair jobs.
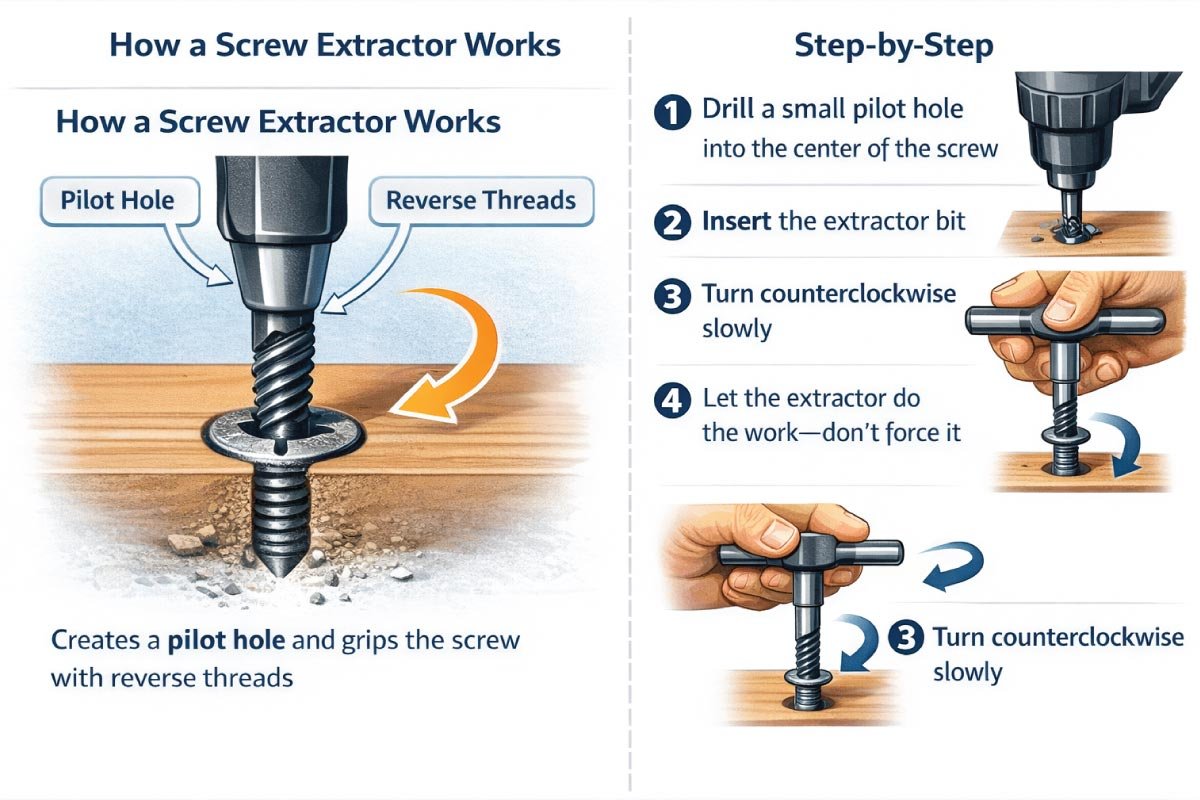
How a Screw Extractor Works
The extractor first creates a pilot hole in the screw, then grips the metal using reverse threads.
As you turn counterclockwise, the tool locks in and gradually backs the damaged screw out.
Step-by-Step
- Drill a small pilot hole into the center of the screw
- Insert the extractor bit
- Turn counterclockwise slowly
- Let the extractor do the work—don’t force it
Best Situations
- Deeply stripped screws
- Hard metal screws
- Automotive or machinery repairs
Important Note
Always drill straight. Angled drilling can snap the extractor.
Step 5: Drill the Screw Head Off (Last Resort)
When the screw is completely damaged and won’t budge, drilling off the head becomes the final solution.
This method allows removal without further stressing the surrounding material or components.
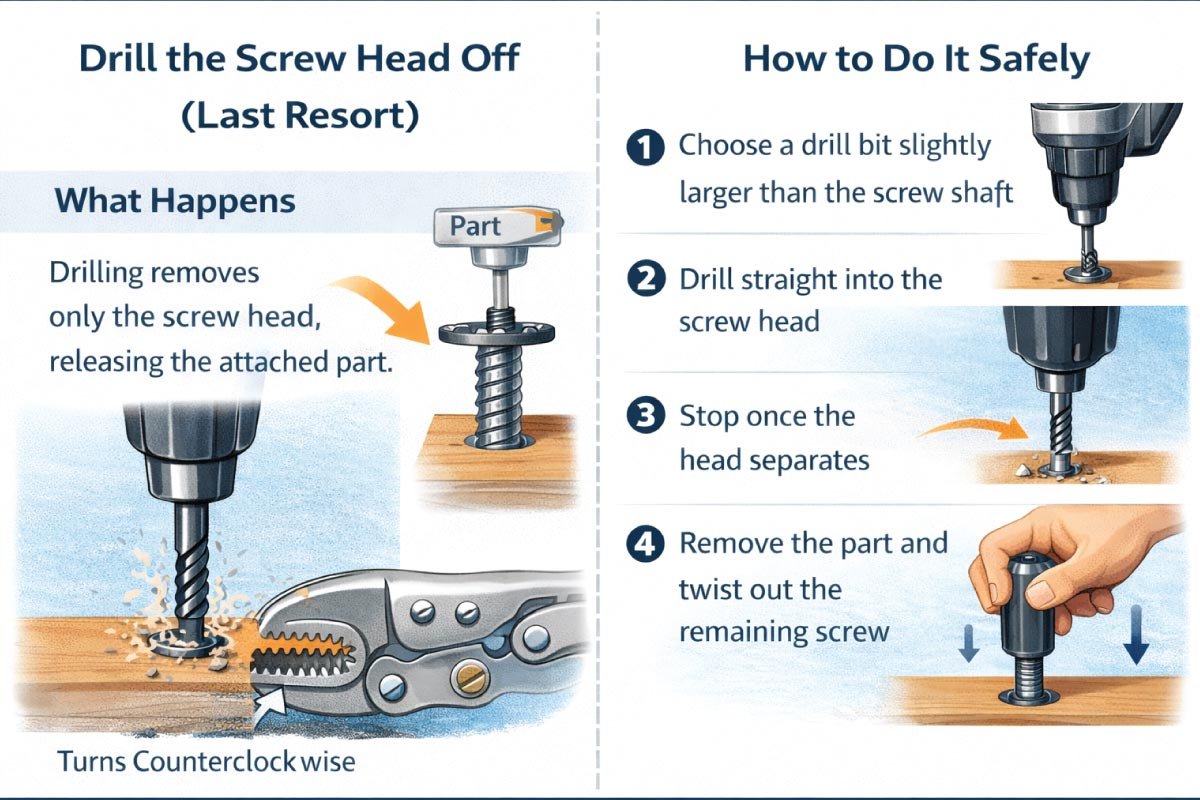
What Happens
Drilling removes only the screw head, releasing the attached part.
Once separated, the remaining screw shaft is exposed and can usually be twisted out easily using pliers or locking grips.
How to Do It Safely
- Choose a drill bit slightly larger than the screw shaft
- Drill straight into the screw head
- Stop once the head separates
- Remove the part and twist out the remaining screw
When to Use This Method
- Completely destroyed screw heads
- Critical repairs where removal is mandatory
- Screws bonded by rust or corrosion
This method works—but use it carefully.
Discover More:
Common Mistakes to Avoid
Removing a stripped screw can go wrong quickly if simple mistakes are made.
Many DIYers rush the process or use improper tools, which often causes more damage and makes an already difficult screw even harder to remove.
- Using the wrong screwdriver size
- Applying too much force too quickly
- Ignoring rust or corrosion
- Skipping simple methods and drilling too early
- Not applying downward pressure
Patience is often the difference between success and damage.
How to Prevent Screws from Stripping in the Future
Preventing stripped screws is easier than fixing them. Using the right technique, proper tools,
and a bit of patience can protect screw heads, improve grip, and save time, frustration, and unnecessary damage during future repairs.
- Always use the correct screwdriver size
- Press firmly and keep the tool straight
- Stop if the screw starts slipping
- Apply penetrating oil to old screws
- Avoid over-tightening
Quality screws and tools also make a huge difference.
Discover More:
Experience Tip
Final Thoughts
A stripped screw doesn’t mean your project is ruined. With the right approach and a step-by-step plan, you can remove almost any damaged screw without breaking surrounding material or losing your patience.
Start simple. Move up only when needed. And remember—most stripped screws come out with calm pressure, the right tool, and a bit of patience.
If you handle screws often—whether for home repairs, woodworking, or mechanical work—mastering these five steps will save you time, money, and frustration.
Discover More: