

Are you wondering how to use a sewing pattern? Sewing is a rewarding and creative skill, and patterns help achieve professional results. Whether you’re a beginner or an experienced sewist, mastering pattern use is essential for well-fitted garments. This step-by-step guide will walk you through selecting the right pattern, preparing fabric, and completing your project with confidence.
Step 1: Choose the Right Sewing Pattern
Before you start sewing, it’s crucial to pick a pattern that matches your skill level and project goals. The right pattern will make the process enjoyable and help you build confidence in your sewing skills. Here are some factors to consider:
Skill Level
Patterns are usually labeled as beginner, intermediate, or advanced. If you’re a beginner, start with a simple pattern that has minimal details, such as a basic skirt or a simple tote bag. Intermediate patterns may include zippers, darts, or pleats, while advanced patterns often involve intricate designs, linings, and special techniques.
Garment Type
Think about what you want to make. Sewing patterns are available for various items, including dresses, skirts, shirts, pants, and accessories. Choose a pattern that suits your personal style and needs.
Pattern Size
Compare the size chart on the pattern envelope with your body measurements to find the right fit. Sizes in sewing patterns often differ from ready-to-wear clothing sizes, so take accurate measurements of your bust, waist, and hips.
Fabric Recommendation
Check the fabric suggestions on the pattern. Some patterns work best with lightweight fabrics like cotton, while others require heavier fabrics such as denim or wool. Choosing the right fabric ensures your garment drapes correctly and looks as intended.
Notions and Accessories
Some patterns require additional materials such as zippers, buttons, elastic, or interfacing. Make sure to check the materials list on the pattern envelope so you can gather everything before you start sewing.
Step 2: Gather Your Materials
Once you’ve chosen a pattern, collect all the necessary materials to ensure a smooth sewing process. Having everything ready before you start prevents interruptions and makes the experience more enjoyable.
Essential Materials:
- Sewing pattern
- Fabric (as specified on the pattern envelope)
- Fabric scissors and paper scissors (for cutting fabric and pattern pieces separately)
- Measuring tape
- Pins or pattern weights
- Sewing machine and matching thread
- Hand-sewing needles (for finishing touches)
- Iron and ironing board
- Marking tools (chalk, washable pen, or tailor’s tacks)
- Seam ripper (for fixing mistakes)
- Interfacing (if required by the pattern)
Step 3: Read the Pattern Instructions
Before cutting anything, take time to read the instructions included with your pattern. The guide provides valuable information, including:
- The pattern pieces required for your project
- Fabric layout suggestions to minimize fabric waste
- Sewing steps and techniques
- Seam allowances and notches
- How to adjust for a better fit
Understanding these details will help you avoid mistakes and ensure a smooth sewing process. Pay close attention to any special instructions related to darts, pleats, or gathering.
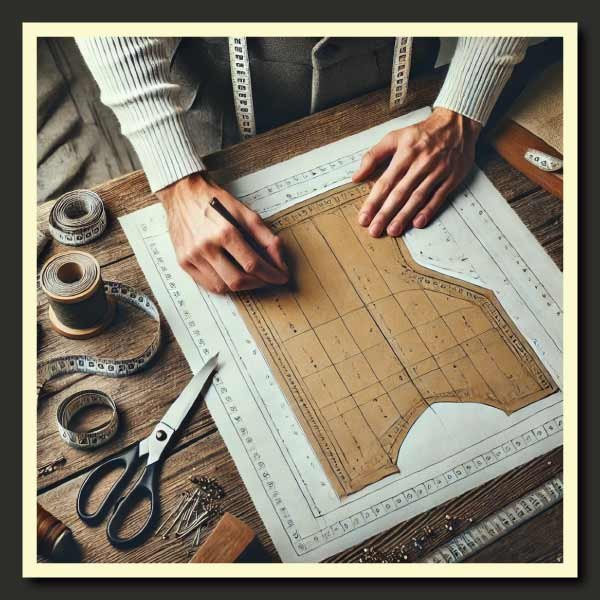
Step 4: Prepare and Cut the Fabric

Accurate fabric preparation ensures a successful sewing project. Wash and iron the fabric to prevent shrinkage. Lay out pattern pieces correctly, aligning with the grain. Pin them securely before cutting along the lines. Transfer necessary markings for precise assembly.
Pre-wash Your Fabric
Fabrics may shrink after the first wash. To prevent size changes in your final project, wash and iron the fabric before cutting. This step also removes chemicals and wrinkles, ensuring better handling, accurate sizing, and a professional-looking finished product.
Lay Out Your Pattern Pieces
Proper pattern placement is crucial for an accurate fit. Follow the layout instructions, ensuring grainline alignment. Incorrect positioning may distort drape and shape. Take time to arrange pieces properly, maximizing fabric use while maintaining the design’s intended structure and flow.
Pin or Weigh Down the Pattern
Prevent pattern pieces from shifting by securing them with pins or pattern weights. Properly anchored patterns result in cleaner cuts and accurate sizing. This step is essential for maintaining alignment, preventing mistakes, and ensuring the fabric remains stable during cutting.
Cut Along the Lines
Use sharp fabric scissors or a rotary cutter for precise cutting. Follow pattern lines carefully to maintain accurate sizing and shaping. A clean, controlled cut prevents fraying and inconsistencies, ensuring each piece fits together correctly during the assembly process.
Transfer Markings
Mark important details such as darts, pleats, and notches using tailor’s chalk, a fabric pen, or tailor’s tacks. These markings guide the sewing process, ensuring correct alignment and shaping, ultimately contributing to a well-constructed and professionally finished garment.
Step 5: Assemble the Pieces
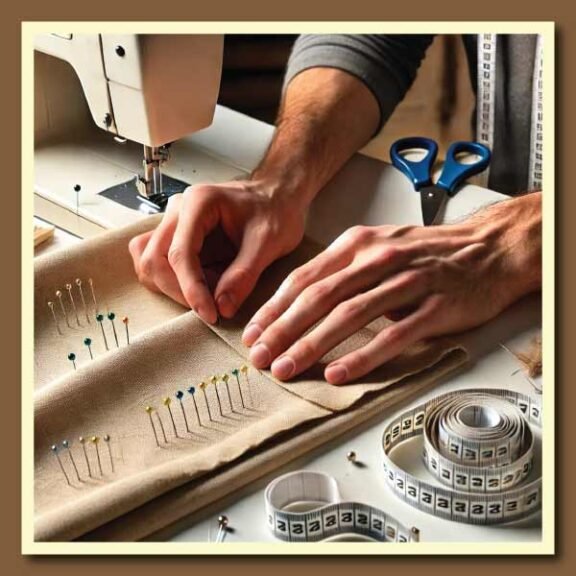
With your fabric cut, it’s time to piece everything together. Align and pin fabric pieces with precision. Sew along the seam allowance, press seams neatly, and finish raw edges. Checking the fit before final stitching ensures an accurate and comfortable fit.
Match and Pin Pieces
Lay fabric pieces with right sides facing each other, aligning edges precisely. Pin along seams to hold pieces in place before sewing. This step ensures stability, prevents misalignment, and contributes to a well-fitted, structured final garment with clean seams.
Sew Along the Seam Allowance
Follow the seam allowance indicated in the pattern, usually 5/8-inch. A consistent seam allowance is crucial for accurate garment construction. Using a straight stitch, sew slowly and evenly to ensure durability, correct shape, and a polished, professional-looking final product.
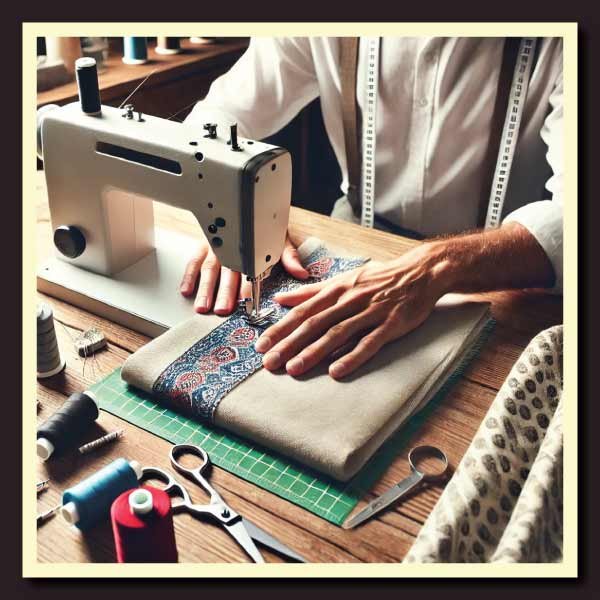
Press the Seams
Ironing seams as you sew enhances garment appearance and structure. Pressing open or to one side reduces bulk and helps pieces lay flat. Using the right heat setting for the fabric type prevents damage and ensures a crisp, refined finish.
Finish Raw Edges
Prevent fabric edges from fraying by using pinking shears, a serger, or a zigzag stitch. Properly finished seams extend garment durability, providing a neat inside appearance while maintaining structural integrity. This step is essential for professional, long-lasting sewing projects.
Check for Fit
Before finalizing stitching, try on the garment to ensure proper fit. Baste pieces together if necessary for adjustments. Making alterations at this stage prevents costly mistakes, ensuring a comfortable, flattering final product that meets the intended design and measurements.
Step 6: Add Finishing Touches

Complete your garment with professional finishing details. Hem the fabric neatly, attach closures like zippers or buttons, and add topstitching for reinforcement. Linings and facings enhance structure and comfort, ensuring the final piece looks polished, durable, and well-made.
Hems
Fold and stitch the hem following pattern instructions to create a clean, polished edge. Pressing the hem enhances its crisp appearance. A properly finished hem prevents fraying, maintains shape, and contributes to the garment’s professional quality and durability.
Zippers or Buttons
Add functional and decorative fastenings, including zippers, buttons, or hook-and-eye closures. Securely attaching these elements ensures durability and ease of wear. Proper placement maintains design integrity while enhancing convenience and aesthetic appeal in the finished garment.
Topstitching
Topstitching reinforces seams and adds a decorative element. It provides extra durability while enhancing the design’s structure. Using a matching or contrasting thread, apply evenly spaced topstitching along edges, collars, and pockets to achieve a stylish, professional-quality finish.
Facings and Linings
Facings and linings add structure, comfort, and durability. They create a polished interior while preventing fabric from stretching or losing shape. Properly sewing and securing linings ensures a high-quality finish, making the garment feel and look professionally constructed.
Step 7: Try On and Make Adjustments
Before finalizing your project, try on your garment to check for fit issues. Make any necessary adjustments, such as:
- Taking in or letting out seams
- Shortening or lengthening the hem
- Adjusting darts for shaping
Checking the fit before completing the project saves time and ensures a polished result.
Step 8: Enjoy Your Handmade Creation!
Once you’ve made all the final adjustments, press your garment one last time, and it’s ready to wear! Enjoy the satisfaction of creating something unique with your own hands. Handmade garments offer a sense of accomplishment and allow for creativity in fashion.
Conclusion on How to Use a Sewing Pattern
Using a sewing pattern might seem complicated at first, but with practice, it becomes second nature. By following this step-by-step guide, you can confidently tackle your sewing projects and create beautiful garments that fit well. Whether you’re sewing for yourself or making gifts for others, mastering the art of using sewing patterns will open the door to endless creative possibilities. Happy sewing!
Also Read:
Manufacturing Process of a Pencil: From Wood to Writing Tool
High Quality Mechanic Tool Sets for Professionals
Maintenance Technician Tool List: Essential Tools for Every Job