
If you have ever tried tightening or removing a Delta shower handle, chances are you’ve run into a little hidden screw that requires a specific tool to get the job done. That tool is an Allen wrench, also known as a hex key. But not just any Allen wrench will do. So, the big question is: What size Allen wrench do you need for a Delta shower handle?
Let’s walk through this together like a neighbor helping you out on a weekend DIY project. We will explore the right size Allen wrench, how to remove the handle properly, and a few helpful tips to avoid damage or frustration.
The Simple Answer: 1/8-Inch Allen Wrench
For most Delta shower handles, the correct size of the Allen wrench is 1/8 inch. This size fits the set screw that’s typically located beneath or behind the handle. These set screws are what secure the handle to the valve stem, and Delta uses a 1/8-inch hex head for many of their models.
But let’s not stop there. While 1/8 inch is the most common size, it’s still a good idea to check your specific model, especially if your Delta shower handle looks different or is part of a newer or older collection. There are exceptions, and we’ll talk about how to confirm the size below.
Why Allen Wrenches?
You might be wondering why Delta (and other manufacturers) use Allen wrenches for shower handles in the first place. Here’s the logic:
Discreet installation: Set screws using a hex key can be hidden underneath or behind the handle, giving the shower a cleaner, sleeker look.
Firm grip: Allen screws hold the handle firmly in place without requiring big, obvious bolts.
Tool accessibility: Allen wrenches are cheap and easy to find, often included in basic home toolkits.
So while they might seem tricky at first, Allen screws are a practical and thoughtful design choice once you know how to work with them.
How to Remove a Delta Shower Handle Using an Allen Wrench
Let’s break this down step by step, just like I would if I were standing in your bathroom walking you through it:
What You’ll Need:
A 1/8-inch Allen wrench (hex key)
A flashlight (optional, but helpful)
A soft cloth or towel (to prevent scratching)
Some patience!
Step-by-Step Instructions:
Turn off the water supply (optional but safer):
You don’t always need to turn off the water to remove the handle, but it’s a good precaution—especially if you’re replacing parts deeper in the valve.
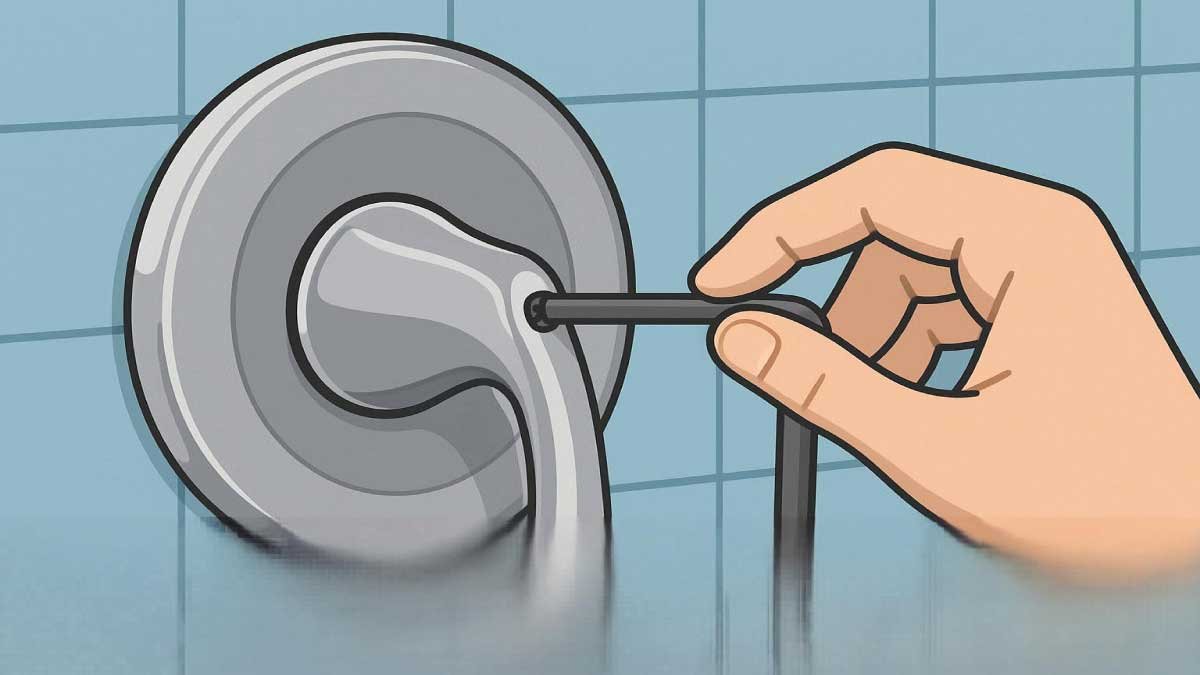
Locate the set screw:
Look under or behind the handle. Sometimes there’s a small round cap you’ll need to pop off with your fingernail or a flathead screwdriver. Behind that, you’ll find the set screw.
Insert the Allen wrench:
Insert the short end of the 1/8-inch Allen wrench into the set screw. You might need a flashlight to see clearly.
Loosen the set screw:
Turn counterclockwise. It might take a bit of force at first, especially if there’s some mineral buildup. Be patient—don’t strip the screw head.
Gently pull the handle off:
Once the screw is loose, the handle should slide right off. If it feels stuck, wiggle it gently. Avoid using too much force to prevent damage to internal parts.
Set the parts aside safely:
Keep the set screw, handle, and wrench in a safe place. Putting them on a towel nearby is a great way to keep track of everything.
What If the 1/8-Inch Allen Wrench Doesn’t Fit?
Every so often, a Delta shower handle might use a different screw size, especially in older models or certain designer collections. If your 1/8-inch wrench doesn’t fit:
Try a 3/32-inch or 5/32-inch wrench – these are the next most common sizes used by Delta and other manufacturers.
Inspect the screw head – make sure there’s no corrosion or debris making it hard to insert the wrench. Clean it gently with a toothbrush if needed.
Check your manual – if you still have the box or installation guide, it often lists the exact Allen wrench size needed.
Visit Delta’s website – you can search your specific model number and often find technical specs or customer support.
A Few Pro Tips
From one DIYer to another, here are some extra tips that’ll help:
1. Buy a complete Allen wrench set
If you do not already have one, a full set (both metric and standard) is inexpensive and extremely handy. You never know what size you’ll need for different fixtures.
2. Use a T-handle or ball-end hex wrench for tight spots
These types give you better leverage and access in cramped spaces like behind shower handles.
3. Apply penetrating oil for stuck screws
If the screw won’t budge, a drop or two of penetrating oil (like WD-40) can work wonders. Let it sit for 10-15 minutes before trying again.
4. Do not overtighten during reinstallation
Once you are done fixing or replacing parts, reinstall the handle carefully. Tighten the set screw just enough to secure the handle do not force it, or you could strip the threads.
When to Call for Help
While most homeowners can handle a shower handle removal, sometimes things don’t go smoothly. Here are signs it’s time to call a plumber:
The set screw is stripped or rusted.
The handle is completely stuck despite all efforts.
You’re replacing internal valve parts and aren’t sure what you’re doing.
There’s leaking or water pressure issues after reinstallation.
There’s no shame in asking for help, especially when dealing with plumbing. A good plumber can save you time, stress, and potential water damage.
Final Thoughts
To recap: the most common Allen wrench size for Delta shower handles is 1/8 inch. It’s a good idea to have a full set on hand in case your model uses a different size. With the right tool and a little patience, removing and reinstalling your Delta shower handle is totally doable, even for beginners.
Whether you are replacing a cartridge, fixing a leak, or just cleaning the inside of the handle, knowing the right Allen wrench size is the first step. And once you’ve done it once, you’ll feel more confident handling other similar projects around the house.
Happy DIY-ing, and here’s to smooth plumbing projects ahead!
FAQs:
What size Allen wrench do I need to remove a Delta shower handle?
Most Delta shower handles use a 1/8-inch Allen wrench. That’s the standard size for loosening the small set screw under or behind the handle. Always double-check before turning, though older or specialty models may vary. If 1/8 inch doesn’t fit snugly, try a 3/32-inch or 5/32-inch wrench to be safe.
Where is the set screw on a Delta shower handle?
The set screw is usually underneath or behind the handle. Some models have a small decorative cap you will need to pop off first. Grab a flashlight and take a closer look, it can be a bit hidden. Once located, use the proper Allen wrench to loosen it and slide the handle off easily.
Can I use a metric Allen wrench on a Delta shower handle?
You can try, but it’s not ideal. Delta usually uses imperial sizes, like 1/8 inch. A metric wrench might feel close, but it won’t fit as snugly and could strip the screw. If you’re unsure, investing in a complete Allen wrench set (both metric and imperial) is a smart move for future projects.
What if my Allen wrench doesn’t fit the Delta handle screw?
First, make sure there’s no debris or corrosion in the screw head. If your 1/8-inch wrench doesn’t work, try a slightly smaller or larger size like 3/32-inch or 5/32-inch. Still no luck? Look up your Delta model online or contact Delta support. Each model may vary slightly, especially older or custom ones.
Do I need to turn off the water to remove a Delta shower handle?
Not always, but it’s a good idea, especially if you’re going beyond just the handle. If you are only removing the handle to tighten or inspect, it’s usually safe. But if you’re working on the valve or cartridge, shut off the water supply to avoid any unexpected leaks or bursts.
How do I reinstall the Delta shower handle after fixing it?
Slide the handle back onto the valve stem, then use the same 1/8-inch Allen wrench to tighten the set screw. Turn it until the handle feels snug not overly tight. If your handle had a decorative cap, snap it back in place. Test it to make sure it turns smoothly. Done!