
Measuring pipe diameter correctly is one of the most important steps in plumbing, mechanical work, and DIY projects. Whether you are replacing a pipe, selecting fittings, or designing a system, even a small mistake in measurement can lead to leaks, poor performance, or costly rework.
In this complete guide, you will learn how to measure pipe diameter easily, understand different pipe sizing methods, and use a simple pipe size chart to get accurate results every time.
Why Measuring Pipe Diameter Correctly Matters
Accurately measuring a pipe’s diameter is essential for any plumbing or mechanical project. Proper measurements prevent costly mistakes, ensure system integrity, and make installation smoother. Whether in home plumbing or industrial piping, correct sizing guarantees functionality, efficiency, and long-term durability.
- Ensures proper fitting and connection
- Prevents leaks and pressure loss
- Helps select the right valves and connectors
- Saves time and money in repairs
- Improves system efficiency
Incorrect measurements can cause mismatched fittings, leading to leaks, downtime, or even system failure. Investing a little time to measure correctly saves headaches, reduces waste, and ensures your plumbing or piping system works reliably every time.
Understanding Pipe Diameter Basics
Before measuring, it’s important to understand the different types of pipe diameters. Each term—Outside Diameter, Inside Diameter, and Nominal Pipe Size—serves a unique purpose in selecting and installing pipes. Knowing these ensures accurate measurements and proper component selection.
1- Outside Diameter (OD)
The total diameter from one outer edge to the other
Easy to measure using basic tools
Common in copper and plastic pipes
2- Inside Diameter (ID)
The open space inside the pipe
Important for flow calculations
Harder to measure directly
3- Nominal Pipe Size (NPS)
A standard pipe size used in industry
Does NOT always match actual OD or ID
Used mainly for steel pipes
👉 For example:
A “1-inch pipe” does not actually measure exactly 1 inch in diameter. Understanding these basics prevents confusion when buying fittings or calculating fluid flow.
Tools You Can Use to Measure Pipe Diameter
Measuring pipe diameter doesn’t have to be complicated. From simple household tools to precise measuring instruments, there are many ways to get an accurate reading. Choosing the right tool depends on the pipe material, size, and accuracy required.
Basic Tools
- Measuring tape
- Ruler
- String (for circumference method)
Advanced Tools
- Vernier caliper
- Digital caliper
- Pipe measuring gauge
For most DIY tasks, a measuring tape or string works perfectly. However, for industrial or precision projects, using a caliper ensures a more accurate reading, avoiding costly errors in installation or maintenance.
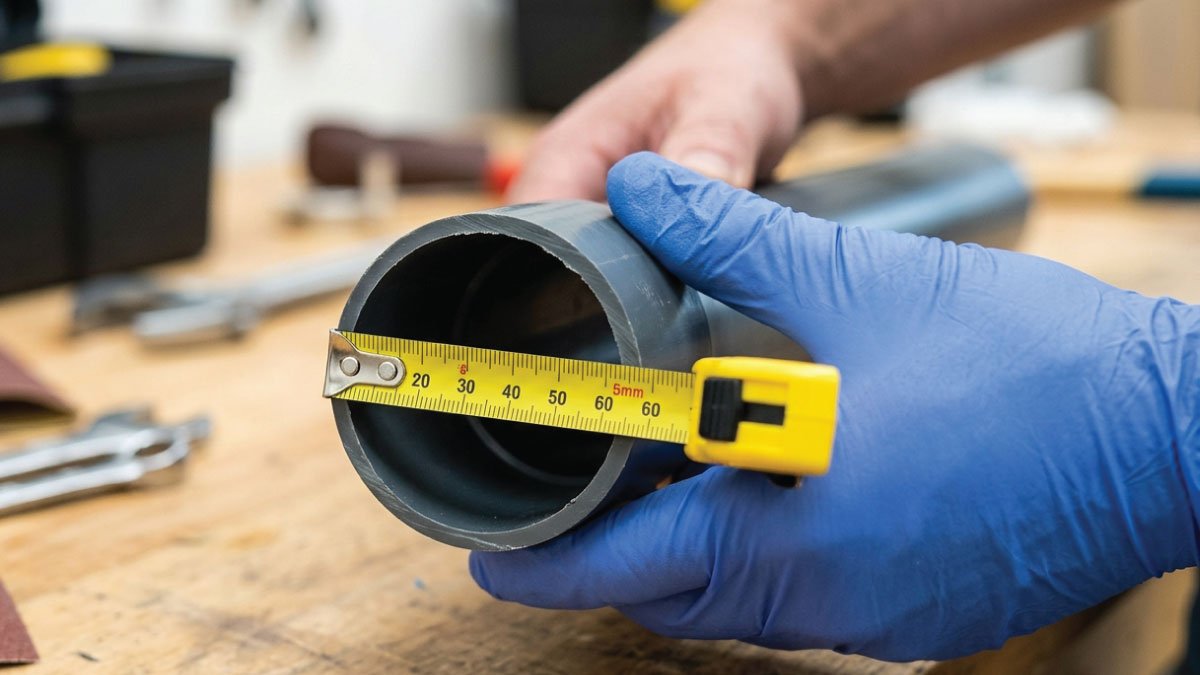
Method 1: Measure Pipe Diameter Using a Tape (OD Method)
Using a measuring tape is the simplest and most widely used way to determine a pipe’s outside diameter (OD). It’s ideal for DIY projects or easily accessible pipes and provides a quick, reliable measurement without specialized tools.
Steps:
- Place the measuring tape across the pipe
- Measure from one outer edge to the other
- Record the value
👉 This gives you the outside diameter (OD)
Example:
Measured OD = 33.4 mm
Standard size ≈ 1 inch pipe
Method 2: Measure Pipe Using Circumference (String Method)
The string method works best for pipes that are difficult to access or already installed. By measuring the pipe’s circumference, you can calculate the diameter accurately, making this method practical for tight spaces and retrofit projects.
Steps:
- Wrap a string around the pipe
- Mark the point where it overlaps
- Measure the length using a ruler
- Use this formula: Diameter = Circumference ÷ 3.1416
Example:
Circumference = 94.2 mm
Diameter = 94.2 ÷ 3.1416 ≈ 30 mm
This method is very useful when pipes are already installed.
Method 3: Use a Caliper for Accurate Measurement
For precise work in plumbing, engineering, or industrial applications, a caliper provides highly accurate pipe diameter readings. Digital or vernier calipers are preferred tools for professionals who need exact measurements for fitting or fluid flow calculations.
Steps:
- Open the caliper jaws
- Place them around the pipe
- Read the measurement
👉 This gives the most accurate outside diameter
Method 4: Measure Inside Diameter (ID)
Measuring the inside diameter requires a bit more care but is essential for calculations involving fluid flow or pipe engineering. Using a caliper inside the pipe ensures precise measurement, which is especially critical for matching components and ensuring proper system performance.
Steps:
- Use a caliper inside the pipe
- Expand it until it touches both inner walls
- Record the value
👉 Used mainly in engineering and fluid calculations
Pipe Size Chart (Common Reference)
Use this chart to match your measurement with standard pipe sizes:
| Nominal Size | Outside Diameter (OD) | Inside Diameter (Approx.) |
|---|---|---|
| 1/2 inch | 21.3 mm | 15 mm |
| 3/4 inch | 26.7 mm | 20 mm |
| 1 inch | 33.4 mm | 25 mm |
| 1.25 inch | 42.2 mm | 32 mm |
| 1.5 inch | 48.3 mm | 40 mm |
| 2 inch | 60.3 mm | 50 mm |
| 3 inch | 88.9 mm | 80 mm |
| 4 inch | 114.3 mm | 100 mm |
👉 Always match your measured OD with this chart to find the correct nominal size.
How to Identify Pipe Size Quickly
Sometimes, you don’t have time for detailed calculations, but you still need to know the pipe size accurately. The quickest way is to measure the outside diameter (OD) of the pipe. Once you have this measurement, simply compare it with a standard pipe size chart to find the closest match.
Steps:
- Measure the outside diameter
- Compare it with the pipe size chart
- Match the closest standard size
👉 This method works in 90% of real-world situations, making it ideal for plumbers, DIY enthusiasts, and engineers who need fast, reliable sizing without complex tools. A simple tape measure or caliper is often enough for these quick checks.
Metric vs Imperial Pipe Sizes
Pipe measurements are not universal—they follow either the imperial system or the metric system. Understanding which system you’re dealing with is crucial for accurate installation and component matching.
Imperial (Inches)
- Common in the USA and older installations
- Example: 1″, 2″, 3″
Metric (Millimeters)
- Used in modern systems worldwide
- Example: 25 mm, 50 mm
⚠️ Important: Metric and imperial sizes are not always directly equivalent. A “1-inch” pipe may not exactly equal 25 mm. Always refer to a reliable conversion or pipe size chart to avoid mistakes. Misreading the system can lead to wrong fittings and wasted materials.
Read More:
Common Mistakes to Avoid
Measuring pipes may sound simple, but even experienced professionals can make mistakes. Avoid these common errors:
Confusing OD with Nominal Size: Many beginners assume the outside diameter equals the nominal size — it does not. Nominal size is a standard label used for reference, not an exact measurement.
Ignoring Wall Thickness: The pipe wall affects the inside diameter. Failing to account for it can lead to poor flow calculations and misfit connectors.
Using Rough Measurements: Relying on approximate measurements often results in errors. Take precise readings to ensure fittings match perfectly.
Not Using a Chart: Even if you measure carefully, skipping the size chart can lead to choosing the wrong standard pipe size.
By avoiding these mistakes, you can save time, prevent leaks, and ensure a professionally installed piping system.
Tips for Accurate Pipe Measurement
To make your measurements as reliable as possible, follow these simple tips:
- Clean the pipe surface before measuring to remove dirt or residue
- Measure twice to confirm accuracy and avoid mistakes
- Use calipers for precision work, especially on small or metal pipes
- Always cross-check your measurement with a pipe size chart
- Label pipes immediately after measurement to avoid confusion later
Implementing these steps ensures you always know the correct size, whether working on household plumbing or complex industrial systems.
Measuring Different Types of Pipes
Different pipe materials require slightly different measurement approaches:
PVC Pipes
- Measured by outside diameter
- Easy to measure with a tape or ruler
- Lightweight and flexible, so minor variations are tolerable
Steel Pipes
- Use nominal pipe size (NPS) as reference
- OD remains consistent for a given size
- Stronger and less forgiving, so accuracy matters
Copper Pipes
- Measured by nominal size
- OD may slightly differ depending on wall thickness
- Often used in plumbing and HVAC systems
Knowing the type of pipe helps determine the best measurement method and prevents installation issues.
Read More:
Example
Let’s put it into practice:
Suppose you measure a pipe and get:
OD = 60 mm
Next, check the standard pipe size chart:
- Closest value = 60.3 mm
- Pipe size = 2 inch
👉 This simple process allows you to quickly identify pipe size and match fittings correctly. It works for most standard pipes you encounter in homes, workshops, or factories.
When You Need Exact Measurement
Certain situations demand extreme precision:
- Designing piping systems for industrial or residential use
- Working in mechanical engineering projects
- Installing high-pressure or critical systems
- Purchasing expensive fittings where mismatch is costly
In these cases, a digital caliper or micrometer is essential. They provide highly accurate readings of both outside and inside diameters, ensuring components fit perfectly and the system functions reliably. Precision reduces errors, prevents leaks, and saves money on replacements.
Final Thoughts
Learning how to measure pipe diameter easily can save you from costly mistakes and project delays. Whether you are a beginner, technician, or engineer, mastering simple methods like using a tape or string can make your work faster and more accurate.
Always remember:
👉 Measure carefully
👉 Use a reliable chart
👉 Double-check your results
With these simple steps, you can confidently select the right pipe size for any project.
Read More:
FAQs:
How do I measure pipe diameter?
To measure a pipe diameter, use a tape measure, caliper, or string method. For outside diameter (OD), measure across the outer edges. For inside diameter (ID), use a caliper inside the pipe. Always cross-check with a pipe size chart for accurate standard size identification.
What is the OD of a 2 inch pipe?
The outside diameter (OD) of a 2-inch nominal pipe size depends on the material. For standard steel pipe (Schedule 40), the OD is 2.375 inches (≈60.3 mm). OD is always slightly larger than the nominal size to accommodate wall thickness and standard fittings.
What size is 40mm pipe?
A 40 mm pipe refers to its nominal size in metric units. Its outside diameter (OD) is usually slightly larger, around 48 mm for PVC or metal pipes, depending on the material. Always check a size chart to match nominal size with exact OD and ID for fittings.
How to calculate OD of pipe?
To calculate a pipe’s outside diameter, you can use the formula OD = ID + 2 × wall thickness. Measure the inside diameter (ID) and the wall thickness accurately, then apply this formula. This helps determine the correct outside measurement for fittings and system design.
Is pipe diameter ID or OD?
Pipe diameter can refer to either inside diameter (ID) or outside diameter (OD). ID measures the internal flow space, while OD measures the total outer width. Nominal pipe size (NPS) is often used for reference and may not exactly match ID or OD. Always clarify which measurement is needed.
How is 2 inch pipe measured?
A 2-inch pipe is measured using its nominal pipe size (NPS). Its OD is slightly larger than 2 inches (≈2.375 inches for standard steel pipe), while ID varies by wall thickness. Use a tape measure or caliper and cross-check with charts to determine the correct nominal size for fittings.