
If you work with metal, machinery, automotive parts, or fabrication—even basic DIY projects, you will quickly come across one of the most important mechanical processes: drilling and tapping threads.
At first, it looks simple: drill a hole and insert a bolt. But in reality, it requires precision. If the drill size is even slightly wrong, the tap can break, threads can become weak, or the entire workpiece can get damaged.
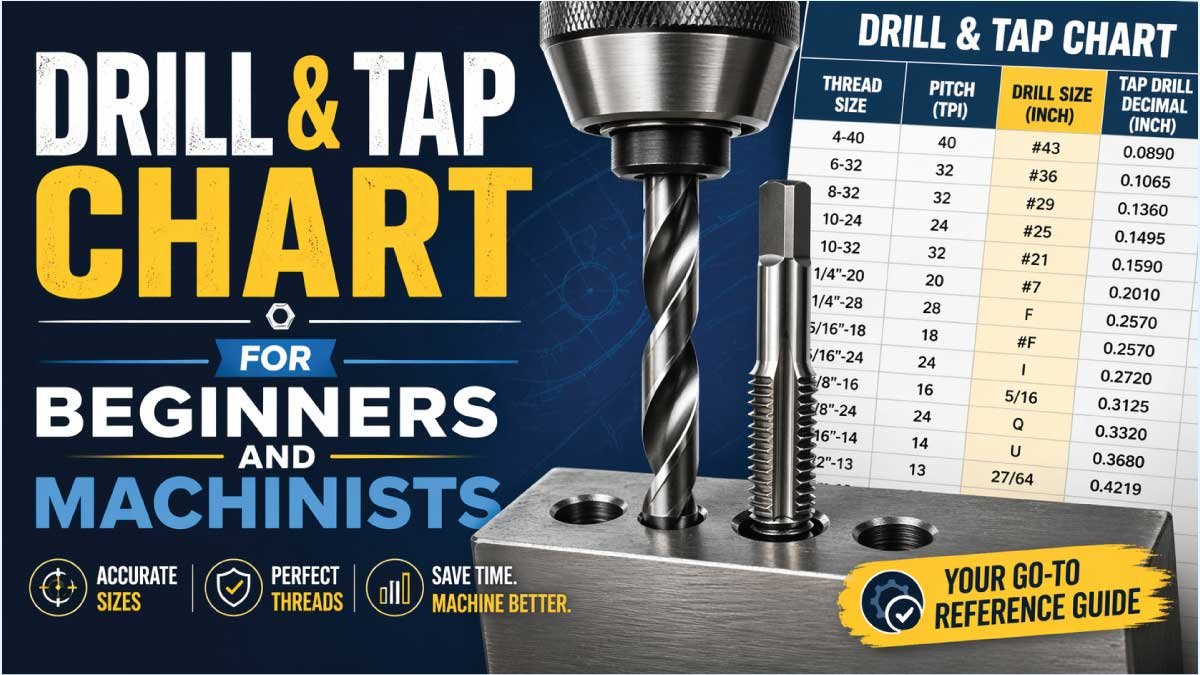
That is why professionals always rely on a Drill & Tap Chart instead of guessing sizes.
This complete guide explains everything in a simple way so beginners, students, and machinists can confidently select the correct drill size every time.
What is Drilling and Tapping?
Before learning about charts, sizes, and technical calculations, it is important to clearly understand the basic machining processes of drilling and tapping. These two operations are widely used in mechanical, automotive, construction, and fabrication work to create strong and reliable fasteners in different materials.
🔧 Drilling
Drilling is the process of creating a round hole in a solid material using a rotating drill bit. This hole serves as the starting point for many operations, especially when bolts or screws need to be inserted. The quality of drilling affects alignment, strength, and accuracy of the final threaded connection.
Drilling can be done on:
- Metal
- Wood
- Plastic
- Concrete
A properly drilled hole must have correct diameter, smooth edges, and accurate positioning. Even a small error in drilling can lead to misalignment during tapping, which may weaken the entire joint or cause tool failure.
🔧 Tapping
Tapping is the process of cutting internal threads inside a pre-drilled hole. These threads allow a bolt or screw to fit securely, creating a strong mechanical connection. This step transforms a simple hole into a functional threaded hole used in assemblies.
Think of it like this:
- Drill = creates space
- Tap = creates grip inside that space
Once tapping is completed, the hole becomes capable of holding fasteners tightly without slipping. Proper tapping requires correct drill size, lubrication, and steady tool handling to avoid breaking the tap or damaging threads.
Simple Workflow
The complete process follows a basic and logical sequence that ensures accuracy and strength in fastening operations:
- Drill the hole
- Tap internal threads
- Insert bolt or screw
If any step is done incorrectly—such as wrong drill size, poor alignment, or improper tapping—the entire fastening system may fail. Proper technique ensures long-lasting, precise, and professional-quality results in all mechanical applications.
Why Drill & Tap Size Matters So Much
Threading is one of the most precision-sensitive operations in mechanical and fabrication work. Even a very small deviation in drill size can affect the entire threading process. Proper sizing ensures that the tap cuts clean, accurate threads without excess stress on the tool or the workpiece.
❌ If the drill size is wrong:
Tap may break inside the hole
Threads become weak or incomplete
Bolt may not fit properly
Workpiece may get permanently damaged
✔ If the drill size is correct:
Smooth tapping process
Strong internal threads
Long-lasting mechanical strength
Professional-quality finish
In industries like automotive, aerospace, and precision manufacturing, even a 0.1 mm error can lead to serious assembly failure, safety risks, or costly rework. That is why correct drill and tap sizing is considered critical in all engineering applications.
Basic Tap Drill Formula (For Beginners)
If a standard chart is not available, machinists can estimate the correct drill size using a simple formula. This helps in basic workshop calculations, especially when quick decisions are needed during fabrication or repair work.
Formula:
Ddrill = Dtap − P
Where:
D_drill = Drill bit size
D_tap = Thread diameter
P = Thread pitch
Simple Explanation
This formula means you subtract the thread pitch from the tap diameter to find the correct drill size for tapping. It provides a quick estimate, but it may not always give perfect industrial accuracy.
In real workshop practice, machinists prefer using standard drill and tap charts because they are faster, more reliable, and already tested for precision across different materials and thread types.
Metric Drill & Tap Chart (Most Common System)
The metric system is the most widely used standard in engineering, workshops, and manufacturing industries around the world. It is based on millimeters, making it easy to understand, measure, and apply in both manual machining and CNC operations. This system provides standardized tap sizes and drill bit recommendations, ensuring accuracy and consistency in threaded connections across different applications.
🛠️ Metric Drill & Tap Chart
| Tap Size | Pitch | Drill Bit Size |
|---|---|---|
| M3 | 0.5 | 2.5 mm |
| M4 | 0.7 | 3.3 mm |
| M5 | 0.8 | 4.2 mm |
| M6 | 1.0 | 5.0 mm |
| M8 | 1.25 | 6.8 mm |
| M10 | 1.5 | 8.5 mm |
| M12 | 1.75 | 10.2 mm |
| M14 | 2.0 | 12.0 mm |
| M16 | 2.0 | 14.0 mm |
Why Metric System is Popular
The metric system is widely accepted because it simplifies machining calculations and reduces confusion in measurement conversions. Engineers and machinists prefer it for its global compatibility and ease of use in both design and production environments. It is also the standard system in most modern manufacturing industries and CNC programming.
- Easy to understand
- Widely standardized
- Used in CNC machines and engineering drawings
UNC Drill & Tap Chart (American Standard – Coarse Threads)
UNC (Unified National Coarse) threads are commonly used in the United States for general-purpose mechanical applications. These threads are designed with a larger pitch, making them stronger in rough conditions and easier to assemble in fieldwork or mass production environments where speed and durability are important.
🛠️ UNC Drill & Tap Chart
| Tap Size | Drill Bit Size |
|---|---|
| #6-32 | #36 (4.1 mm) |
| #8-32 | #29 (4.8 mm) |
| #10-24 | #25 (5.0 mm) |
| #10-32 | #21 (5.2 mm) |
| 1/4-20 | #7 (5.3 mm) |
| 5/16-18 | F (6.5 mm) |
| 3/8-16 | 5/16 (7.9 mm) |
| 1/2-13 | 27/64 (10.7 mm) |
Where UNC is Used
UNC threads are preferred in applications where strength and ease of assembly are more important than fine precision. They are widely used in industries where components are exposed to vibration, heavy loads, or frequent assembly and disassembly.
- Automotive parts
- General machinery
- Structural components
UNF Drill & Tap Chart (Fine Threads)
UNF (Unified National Fine) threads are designed for applications that require tighter fastening and higher precision. Because of their smaller pitch, they offer more threads per inch, resulting in stronger resistance to vibration and improved holding power in critical assemblies.
🛠️ UNF Drill & Tap Chart
| Tap Size | Drill Bit Size |
|---|---|
| 1/4-28 | #3 (5.0 mm) |
| 5/16-24 | F (6.5 mm) |
| 3/8-24 | 5/16 (7.9 mm) |
| 1/2-20 | 29/64 (11.5 mm) |
Why Fine Threads Are Used
ine threads are chosen when precision, strength, and vibration resistance are essential. They provide better load distribution across threads and are commonly used in high-performance and safety-critical engineering applications.
- Better grip in vibration environments
- Stronger holding power
- Used in aerospace and precision machinery
Also Read:
How Beginners Should Read This Chart
Drill and tap charts can look confusing at first, but once you understand the logic behind them, they become very easy to use. The key is to follow a fixed order instead of guessing.
Step 1: Identify Thread Type
First, determine what type of thread you are working with. This tells you which standard chart to follow. Common types include:
Metric (M series) like M6, M8, M10
UNC (coarse threads) commonly used in general mechanical work
UNF (fine threads) used for precision and vibration resistance
Understanding the thread system is the foundation of correct drilling and tapping.
Step 2: Select Tap Size
Next, choose the exact tap size you need based on your project. For example:
M8 for metric systems
1/4-20 for imperial coarse threads
M6 for smaller fasteners
This step defines the thread diameter and helps you move to the correct drill size.
Step 3: Find Drill Size
Now match your tap size with the correct drill bit using a chart. Each tap has a specific drill size that ensures proper thread formation. Using the correct size is very important for strength, alignment, and smooth tapping without breaking tools.
Step 4: Drill the Hole
Once you have the correct drill bit:
- Keep the drill perfectly straight
- Use proper and steady speed
- Avoid overheating by not applying too much pressure
A clean and accurate hole is essential for successful tapping.
Step 5: Tap the Hole
Insert the tap carefully into the drilled hole and begin turning slowly. Apply cutting oil to reduce friction. Rotate clockwise and periodically reverse slightly to break chips. This prevents jamming and ensures smooth, strong internal threads.
Common Beginner Mistakes
Beginners often make simple errors that can lead to broken taps or poor-quality threads. Understanding these mistakes helps improve accuracy and safety.
❌ Guessing Drill Size
This is one of the most dangerous mistakes. Guessing often leads to incorrect hole size, which can break taps or create weak threads. Always use a proper drill and tap chart instead of estimation.
❌ Not Using Lubrication
Skipping cutting oil increases friction and heat during tapping. This reduces tool life and increases the risk of tap breakage. Lubrication ensures smoother cutting and better thread quality.
❌ Skipping Chip Removal
Metal chips build up quickly during tapping. If they are not removed, they can jam the tap and cause it to break. Always reverse the tap slightly to break chips and clear them regularly.
❌ Using Wrong Tap Type
Each tap has a specific purpose:
Taper tap → starting holes easily
Plug tap → general-purpose threading
Bottoming tap → blind holes with full depth threads
Using the wrong type can make tapping difficult or damage the workpiece.
Also Read:
Machinist Tips for Better Threading
Professional machinists rely on practical habits and small technical adjustments that greatly improve threading accuracy and tool life. These tips help reduce mistakes, prevent tap breakage, and ensure smooth, clean, and strong internal threads in different materials.
✔ Always Verify Pitch
Before starting any drilling or tapping operation, always confirm the thread pitch carefully. Even a small mismatch can completely ruin the fit of the bolt or screw and damage the workpiece.
Example:
M8 × 1.25 is NOT the same as M8 × 1.0
✔ Use Drill Press When Possible
A drill press provides stability and ensures perfectly straight holes. Hand drilling can cause slight angle errors, which later lead to misaligned threads and tapping difficulties.
✔ Apply Cutting Fluid
Cutting fluid reduces friction, controls heat buildup, and improves cutting performance. It also extends tool life and helps produce smoother, cleaner threads during tapping.
✔ Drill Slightly Deeper
Drilling a little deeper than the required thread length allows proper chip clearance. This prevents chips from clogging the tap and reduces the risk of tap breakage inside the hole.
✔ Always Test Fit
Before final assembly, always test the bolt or screw in the threaded hole. This ensures correct sizing, smooth engagement, and avoids assembly issues during final installation.
Material-Based Adjustments
Different materials react differently during drilling and tapping, so adjusting technique, speed, and drill size is important for achieving best results. Understanding material behavior helps prevent cracking, tool wear, and poor thread quality.
🟦 Aluminum
Aluminum is soft and easy to machine, but it can deform if not handled properly. Slight adjustments in drill size help improve thread grip and prevent stripping during fastening.
🟥 Steel
Steel requires precise drilling and proper lubrication. Using cutting oil is essential to reduce heat and ensure clean, strong internal threads without damaging tools.
🟩 Stainless Steel
This is a tough and heat-resistant material that requires careful machining. Use cobalt drill bits and slow cutting speeds to avoid tool wear and overheating.
🟨 Plastic
Plastic is sensitive to cracking and stress. A slightly larger hole is recommended to prevent splitting and ensure smooth threading without deformation.
Drill Bit Types for Tapping Work
Choosing the correct drill bit is just as important as selecting the right size in tapping operations. The drill bit directly affects hole quality, tapping smoothness, and final thread strength. Using the wrong type can lead to tool breakage, poor threads, or excessive wear during machining.
🔩 HSS (High-Speed Steel)
High-Speed Steel drill bits are the most commonly used type in workshops. They are affordable, easy to use, and suitable for general-purpose drilling. These bits work well on wood, plastic, and soft metals, making them ideal for beginners and light fabrication work.
🔩 Cobalt Drill Bits
Cobalt drill bits are designed for tougher materials like stainless steel and hard alloys. They offer excellent heat resistance and maintain sharpness even under high friction conditions. This makes them suitable for industrial and heavy-duty tapping applications where durability is essential.
🔩 Carbide Bits
Carbide drill bits are high-performance tools used in CNC machining and industrial fabrication. They are extremely hard and can cut through hardened materials with precision. Although more expensive, they provide superior accuracy, long tool life, and excellent performance in demanding production environments.
Also Read:
Quick Troubleshooting Guide
Even experienced machinists face issues during drilling and tapping. Understanding common problems and their causes helps in quick correction and prevents damage to tools and workpieces.
Problem: Tap Breaks
✔ Hole too small
✔ No lubrication used
A tap usually breaks when excessive force is applied due to an undersized hole or dry machining conditions that increase friction.
Problem: Loose Threads
✔ Drill hole too large
Oversized holes reduce thread engagement, resulting in weak or loose-fitting bolts that may fail under load.
Problem: Tap Jams
✔ Chips not removed properly
When metal chips are not cleared during tapping, they accumulate inside the hole and block smooth tool movement, causing jamming.
Problem: Rough Threads
✔ Dull tap or incorrect speed
Worn-out tools or incorrect tapping speed can produce uneven and rough threads, reducing the quality and strength of the final connection.
Final Thoughts
A Drill & Tap Chart is an essential tool for anyone working in mechanical, automotive, construction, or fabrication fields. It removes guesswork and ensures precision in every project.
Key Takeaways:
✔ Always match tap size with correct drill bit
✔ Use lubrication for smoother cutting
✔ Follow correct speed and alignment
✔ Never guess—always use a chart or formula
✔ Consider material before drilling
With proper understanding and practice, even beginners can achieve professional-level threading results, while experienced machinists can improve speed, accuracy, and tool life.