
When you work with metal, fabrication, or mechanical parts, threading is something you simply cannot avoid. Whether you are fixing a machine, assembling components, or doing DIY work, creating strong and accurate threads is essential.
And here’s the truth many beginners learn the hard way:
👉 Even a tiny mistake in drill size (just 0.1–0.5 mm) can ruin the entire thread.
The tap might break, threads may come out weak, or the bolt won’t fit properly. That’s why understanding the metric drill tap chart is not just helpful—it’s critical.
In this guide, I will walk you through everything in a simple, practical way so you can confidently choose the correct drill size every time.
What is a Metric Tap Drill Size?
A metric tap drill size is the diameter of the drill bit you use before cutting threads with a tap.
Think of the process like this:
- The drill bit creates the hole
- The tap cuts the threads inside the hole
- The correct size ensures proper thread engagement
For example, if you want to create an M6 thread, you don’t drill a 6 mm hole. Instead, you drill a slightly smaller hole so the tap has material to cut threads into.
This balance is extremely important. If the hole is too tight, the tap struggles. If it’s too loose, the threads won’t hold.
Why Tap Drill Size Matters
Metric threads are based on precise measurements, especially the pitch, which is the distance between threads. Because of this precision, even a small error can cause major problems.
Here’s what happens in different situations:
❌ Hole too small
The tap faces too much resistance. This can lead to overheating, excessive friction, and eventually the tap breaking inside the hole—which is very difficult to remove.
❌ Hole too large
Threads become shallow and weak. The bolt may feel loose or may not hold under load, which can lead to mechanical failure.
✔ Correct hole size
You get strong, clean, and accurate threads with proper engagement. The bolt fits perfectly, and the assembly remains reliable over time.
In professional workshops, machinists never guess drill sizes—they always follow charts or formulas.
Simple Formula for Metric Tap Drill Size
When a standard tap drill chart isn’t available, this simple formula becomes extremely useful in practical situations. It helps machinists, engineers, and DIY users quickly estimate the correct drill size for threading. This method saves time and reduces dependency on reference tables.
Ddrill = Dtap − P
Where:
D₍drill₎ = Drill bit diameter
D₍tap₎ = Nominal thread diameter
P = Thread pitch
Example:
Understanding the formula becomes easier when applied to a real-world example. By using a common metric thread like M10 × 1.5, you can clearly see how subtracting pitch from the tap diameter gives an accurate drill size for proper thread formation.
Let’s take a common thread:
M10 × 1.5
Tap size = 10 mm
Pitch = 1.5 mm
So:
👉 10 − 1.5 = 8.5 mm drill bit
Why This Formula Works
This formula works because the pitch represents the depth of the thread that will be cut into the material. By subtracting it from the nominal diameter, you create enough space for the tap to form strong, clean threads without excessive resistance or breakage risk.
This formula works for most standard metric threads and is a great backup method when a chart is not available.
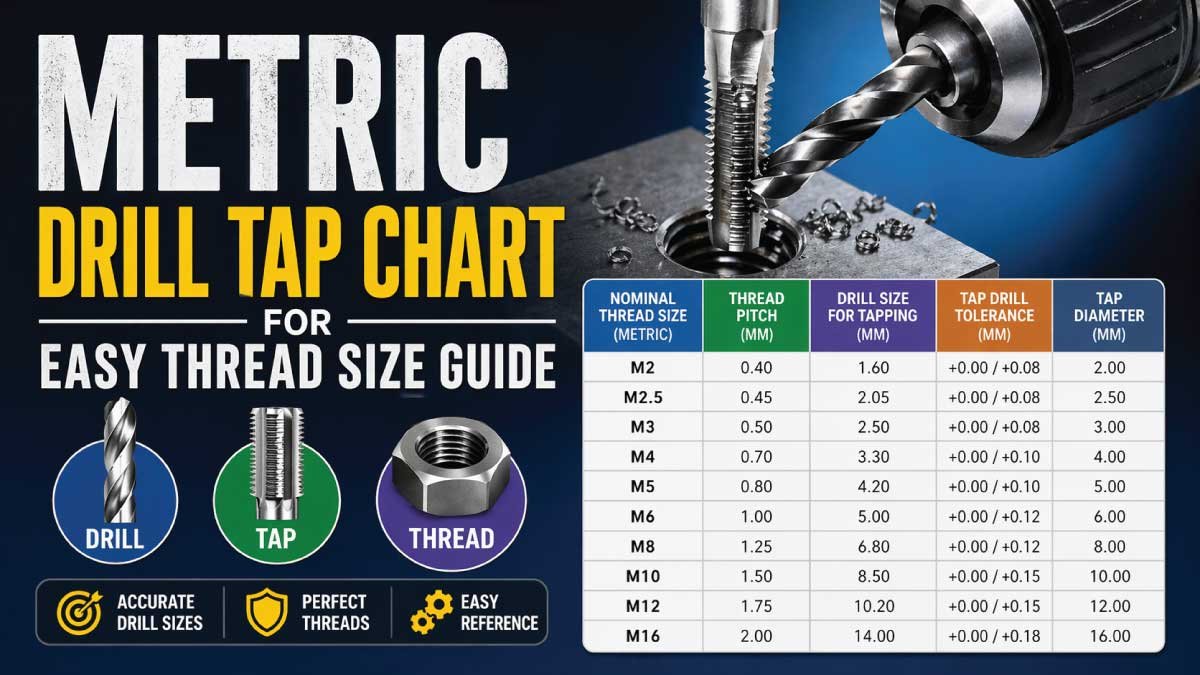
Metric Drill Tap Size Chart (Complete Reference)
A metric tap drill chart is one of the most reliable tools used in workshops and machining environments. It provides pre-calculated values, eliminating guesswork and ensuring consistent accuracy when drilling holes before tapping threads in different materials.
🛠️ Metric Tap Drill Size Chart
| Metric Tap Size | Pitch (mm) | Drill Bit Size |
|---|---|---|
| M3 × 0.5 | 0.5 | 2.5 mm |
| M4 × 0.7 | 0.7 | 3.3 mm |
| M5 × 0.8 | 0.8 | 4.2 mm |
| M6 × 1.0 | 1.0 | 5.0 mm |
| M8 × 1.25 | 1.25 | 6.8 mm |
| M10 × 1.5 | 1.5 | 8.5 mm |
| M12 × 1.75 | 1.75 | 10.2 mm |
| M14 × 2.0 | 2.0 | 12.0 mm |
| M16 × 2.0 | 2.0 | 14.0 mm |
| M18 × 2.5 | 2.5 | 15.5 mm |
| M20 × 2.5 | 2.5 | 17.5 mm |
This chart is widely accepted and used in both manual and CNC machining.
Practical Use of the Chart
This chart is widely used in fabrication shops, mechanical workshops, and CNC machining operations. It helps users quickly match tap sizes with the correct drill bit, improving efficiency, reducing tool damage, and ensuring accurate, strong threads in various materials.
This chart is widely accepted and used in both manual and CNC machining.
Also Read:
Quick Memory Trick (Easy Method)
If remembering full charts feels difficult, this simple subtraction trick can help you estimate drill sizes quickly. It’s especially useful for beginners and fieldwork situations where quick decisions are required without access to detailed reference materials.
👉 Drill size ≈ Tap size − pitch
Practice Examples
Practicing with a few common thread sizes helps reinforce the memory trick. Over time, these values become second nature, allowing you to work faster and more confidently without constantly referring to charts or formulas.
M6 × 1 → 6 − 1 = 5 mm
M8 × 1.25 → 8 − 1.25 = 6.8 mm
M10 × 1.5 → 10 − 1.5 = 8.5 mm
Final Tip for Beginners
Consistency comes with practice, so don’t worry if you can’t remember everything at first. Start with commonly used sizes like M6, M8, and M10. As you use the formula and chart regularly, selecting the correct drill size will become quick and automatic.
Tap Types (Important for Accuracy)
Before starting any threading work, understanding tap types is essential for precision and efficiency. Each tap is designed for a specific stage of the threading process. Using the correct type not only improves accuracy but also reduces the chances of tool breakage and ensures smoother, stronger threads.
🔧 1. Taper Tap
This tap features a long, gradual taper at the cutting edge, typically spanning 8–10 threads. This design makes it easier to align and start threading straight, especially for beginners. It reduces cutting resistance and minimizes the risk of cross-threading during the initial stages.
🔧 2. Plug Tap
The plug tap has a shorter taper compared to the taper tap, usually around 3–5 threads. It is the most commonly used tap for general threading tasks. It provides a balance between easy starting and deeper thread cutting, making it suitable for most workshop applications.
🔧 3. Bottoming Tap
This tap has almost no taper, allowing it to cut threads very close to the bottom of blind holes. It cannot start threads efficiently on its own, so it is typically used after a taper or plug tap. It ensures maximum thread depth and full engagement.
Using the correct tap type at the right stage significantly improves threading accuracy, enhances surface finish, and reduces unnecessary wear on tools, especially when working with harder materials or precision components.
Step-by-Step Threading Process
Creating clean, accurate threads requires a systematic approach rather than rushing through the process. Following a proper step-by-step method ensures better thread quality, prevents tool damage, and improves overall efficiency. Each step plays a critical role in achieving professional-level results.
Step 1: Select Metric Tap Size
Start by choosing the correct metric (M) tap size based on the bolt or component requirement. Pay close attention to thread pitch, as even a small mismatch can cause improper fitting. Always verify specifications using a standard chart or design reference before proceeding.
Step 2: Find Drill Size
Once the tap size is selected, determine the correct drill bit size using a tap drill chart or a simple formula. Accurate drill size ensures proper thread engagement. A hole that is too small can break the tap, while too large weakens the threads.
Step 3: Drill the Hole
Drill the hole carefully while keeping the drill perfectly perpendicular to the surface. Apply steady pressure and avoid excessive speed, especially when working with metal. Proper drilling ensures a clean hole, which directly affects the quality and alignment of the threads.
Step 4: Apply Cutting Fluid
Before tapping, apply cutting fluid generously to the hole and tap. This reduces friction, dissipates heat, and improves cutting efficiency. It also helps produce smoother threads and significantly lowers the chances of tap breakage, especially in hard materials like steel.
Step 5: Start Tapping Slowly
Begin threading by turning the tap clockwise with gentle, consistent pressure. After every one or two turns, reverse slightly to break chips. This technique prevents chip buildup, reduces friction, and ensures smoother cutting while protecting the tap from jamming or snapping.
Step 6: Clean Threads
After completing the threading process, remove all chips and debris from the hole using compressed air or a brush. Clean threads ensure smooth bolt insertion, proper fit, and better performance. Neglecting this step can lead to poor engagement or damage during assembly.
Also Read:
Common Mistakes in Metric Tapping
Even experienced machinists and DIY workers can make small mistakes during tapping, but these errors often lead to broken tools or poor thread quality. Understanding and avoiding these common issues will save time, reduce material waste, and help you achieve clean, accurate threads every time.
❌ Wrong drill size
This is the most common cause of tapping failure. If the hole is too small, the tap experiences excessive stress and can break easily. If it’s too large, the threads become weak and unreliable. Always double-check the correct drill size using a chart or formula before drilling.
❌ No lubrication
Skipping lubrication increases friction between the tap and material, generating excessive heat. This not only wears out the tap faster but also produces rough and uneven threads. Always use cutting fluid or oil, especially when working with steel or other hard metals, to ensure smooth cutting.
❌ Rushing the process
Tapping is not a fast operation and requires steady, controlled movement. Applying too much force or turning the tap too quickly can cause it to bind or snap inside the hole. Slow, consistent rotation with proper technique ensures better thread quality and tool safety.
❌ Not clearing chips
During tapping, metal chips accumulate inside the hole and along the tap flutes. If not cleared regularly, these chips can jam the tap, increase resistance, and damage the threads. Reverse the tap periodically to break and remove chips for a smoother operation.
Pro Tips for Perfect Thread Cutting
Even if you have the correct drill size and tap, small mistakes can still affect the final thread quality. These practical, expert-level tips help improve accuracy, extend tool life, and ensure smooth, clean threads—whether you’re working in a workshop, garage, or on a professional machining setup.
✔ Always check pitch carefully
For example, M8 × 1.25 and M8 × 1.0 look similar but require different drill sizes.
✔ Use sharp drill bits
Dull bits create oversized or rough holes, reducing thread quality.
✔ Adjust speed based on material
Steel → slow speed
Aluminum → higher speed
✔ Drill deeper than required
This provides space for chips and prevents bottoming issues.
These small improvements can take your work from average to professional level.
Material-Based Adjustments
Different materials react differently during drilling and tapping, so using the same approach for all can lead to poor results or tool damage. Adjusting drill size, speed, and technique based on material type ensures better thread quality, reduces wear on tools, and prevents costly mistakes.
🟦 Soft Materials (Aluminum, Plastic)
Soft materials are easier to cut but can sometimes produce gummy chips that stick to the tool. Using a slightly smaller drill size helps create tighter threads with better grip. However, proper lubrication is still important to prevent material buildup and ensure smooth cutting.
🟥 Hard Materials (Steel, Stainless Steel)
Hard materials require precision and care during tapping. Always use the exact recommended drill size because a smaller hole increases cutting force and can quickly break the tap. Use slower speeds, consistent pressure, and proper cutting fluid to reduce heat and tool wear.
🟩 Cast Iron
Cast iron is unique because it naturally forms small, brittle chips that break away easily during cutting. This makes tapping smoother compared to other metals. Standard drill sizes work well, and lubrication is often optional, though it can still improve surface finish and tool life.
Understanding how different materials behave allows you to adjust your technique effectively, leading to cleaner threads, fewer tool failures, and more efficient work whether in a workshop or a professional machining environment.
Also Read:
Drill Bit Types for Metric Tapping
Selecting the right drill bit is just as important as choosing the correct size. The material and quality of the drill bit directly affect hole accuracy, surface finish, and tool durability. Using the appropriate type ensures smoother drilling and better preparation for tapping.
🔩 HSS (High-Speed Steel)
HSS drill bits are the most commonly used due to their versatility and affordability. They work well on wood, plastic, and softer metals like aluminum. For general-purpose tapping tasks, HSS bits provide a good balance between performance, durability, and cost-effectiveness.
🔩 Cobalt Drill Bits
Cobalt drill bits are designed for tougher materials such as stainless steel and hardened metals. They offer excellent heat resistance and maintain their hardness at high temperatures. This makes them ideal for heavy-duty applications where standard HSS bits would wear out quickly.
🔩 Carbide Bits
Carbide drill bits are extremely hard and wear-resistant, making them suitable for industrial use and CNC machining. They can handle very high speeds and tough materials but are more brittle and expensive. Proper handling is required to prevent chipping or breakage.
Choosing the correct drill bit type not only improves drilling efficiency but also ensures better thread quality, reduces tool wear, and enhances overall productivity in both small-scale and professional machining operations.
Quick Troubleshooting Guide
Even with the right tools and setup, issues can still happen during tapping. This quick troubleshooting guide helps you identify common problems early and fix them efficiently, preventing damage to your workpiece, saving tools, and improving overall thread quality in both manual and machine operations.
Here’s how to quickly diagnose and fix common issues:
Problem: Tap breaks inside hole
✔ Cause: Hole too small or no lubrication
Problem: Threads feel loose
✔ Cause: Drill hole too large
Problem: Tap gets stuck
✔ Cause: Chips not cleared properly
Problem: Rough thread finish
✔ Cause: Dull tap or incorrect speed
By identifying the problem early, you can prevent damage and save time.
Final Thoughts
The metric drill tap chart is one of the most essential tools in mechanical work, fabrication, and DIY projects. It acts as a reliable reference that helps you avoid costly mistakes, ensuring every threaded hole is precise, clean, and strong enough for long-term use.
Using the correct drill size ensures:
✔ Strong internal threads
✔ Smooth and accurate bolt fitting
✔ Longer tool life
✔ Reduced chances of failure
Key Takeaways:
👉 Always match the tap size and pitch before drilling
👉 Use the formula or chart for accuracy
👉 Never guess the drill size
Once you understand this system, threading becomes simple, reliable, and highly professional. With regular practice, you’ll develop confidence in selecting the right drill size quickly. Whether you’re working in a workshop or at home, mastering this skill will save you time, money, and frustration.