
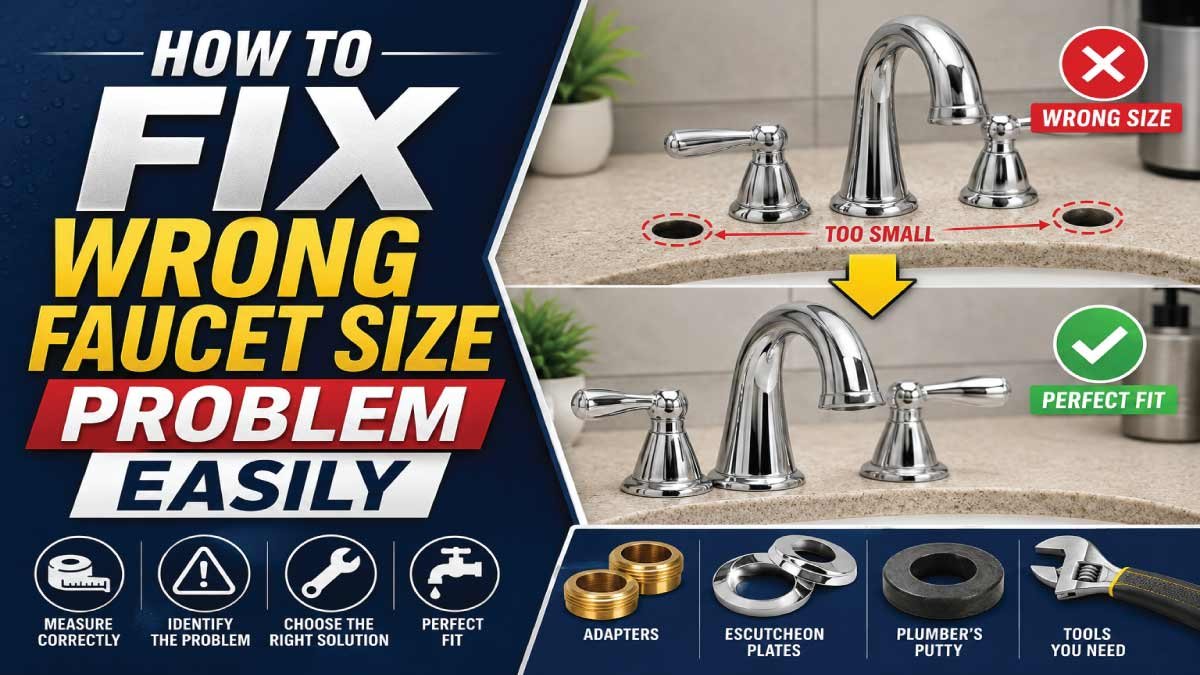
A wrong faucet size problem is one of the most common plumbing issues in homes, kitchens, and bathrooms. Many people buy a new faucet online or from a hardware store, only to discover that it does not fit the sink or pipe connection. This usually happens because of differences in thread size, mounting hole diameter, or connector type.
The good news is that this problem is fixable in most cases without replacing the entire plumbing system. With the right tools, basic measurements, and simple adapters, you can easily solve faucet size mismatch issues at home.
In this detailed guide, you will learn what causes faucet size problems, how to identify them, and step-by-step methods to fix them safely and effectively.
Understand the Wrong Faucet Size Problem
A wrong faucet size problem occurs when the faucet does not physically or technically match the sink or plumbing connection. Even if the faucet looks perfect, it may fail to install properly due to incompatible dimensions or thread types.
There are three main areas where size mismatch happens:
- Faucet base does not fit sink hole
- Faucet threads do not match supply pipe
- Faucet connectors are incompatible with valves
In simple terms, the faucet and plumbing system are speaking “different size languages,” which prevents proper installation or sealing.
If ignored, this problem can lead to leaks, unstable fittings, or even damage to the sink surface.
Common Causes of Wrong Faucet Size Issues
Understanding the causes of wrong faucet size issues is important for avoiding installation problems and unnecessary replacement costs. Most of these issues occur due to poor measurement, lack of compatibility checks, or selecting faucets based only on appearance instead of technical requirements. Identifying these causes in advance helps ensure a smooth and accurate installation process.
1. Incorrect Sink Hole Size
One of the most common reasons for faucet fitting issues is selecting a faucet that does not match the sink’s mounting hole size. Kitchen and bathroom sinks are manufactured with different hole diameters, and even a small difference can prevent proper installation. This mismatch can cause instability, leakage around the base, or the need for additional modifications.
2. Thread Size Mismatch
Faucet connections rely heavily on precise thread compatibility. If the thread size or type—such as BSP or NPT—does not match the water supply pipe, the faucet cannot be securely tightened. This often results in leakage, loose fittings, or complete installation failure, even if the faucet itself is of high quality.
3. Wrong Faucet Type
Using the wrong type of faucet for a specific setup is another common cause of size-related issues. Basin faucets, kitchen mixer faucets, and wall-mounted faucets are all designed for different installation styles and pipe arrangements. Choosing an incompatible type can lead to poor alignment, improper fitting, and difficulty in connecting water lines correctly.
4. Old Plumbing Standards
Older buildings often use outdated plumbing systems that do not match modern faucet designs. In such cases, new faucets may not align with existing pipe sizes or thread standards. This compatibility gap creates installation challenges and may require adapters or full pipe modifications to achieve a proper fit.
5. Lack of Measurement Before Purchase
Many installation problems occur when users purchase faucets based only on design or appearance without taking proper measurements. Without checking sink hole size, thread dimensions, and pipe compatibility, the chances of selecting the wrong size increase significantly. This leads to wasted time, extra cost, and installation delays.
Tools You Will Need
Before fixing a faucet size problem, it is important to prepare all the necessary tools in advance. Using the right tools not only makes the installation or repair process smoother but also helps prevent damage to threads, pipes, and fittings. Proper preparation saves time, reduces mistakes, and ensures a safer and more efficient working process.
1. Adjustable wrench
An adjustable wrench is essential for tightening and loosening faucet connections. It allows you to grip different sizes of nuts and fittings securely without damaging them. This tool is especially useful when working with mixed plumbing sizes or when fittings are tightly secured due to long-term use.
2. Measuring tape or caliper
A measuring tape or caliper is used to determine accurate dimensions of sink holes, pipes, and threads. Proper measurement is crucial for selecting the correct faucet size and avoiding compatibility issues. A caliper provides more precise readings, especially for small or technical measurements in plumbing systems.
3. Thread seal tape (PTFE tape)
Thread seal tape, also known as PTFE tape, is used to prevent water leakage in threaded connections. It helps create a tight seal between pipe threads and faucet fittings. When applied correctly, it improves sealing performance and ensures a leak-free and stable water connection.
4. Faucet adapter (if needed)
A faucet adapter is useful when there is a mismatch between faucet threads and existing pipe connections. It helps bridge compatibility gaps between different sizes or standards such as BSP and NPT. Using an adapter prevents forcing mismatched threads, which could otherwise cause permanent damage.
5. Screwdriver set
A screwdriver set is required for removing or securing screws during faucet installation or replacement. Different faucet designs may use various screw types, so having a complete set ensures you are prepared for any situation. It also helps in disassembling handles or mounting parts safely.
6. Bucket or towel (to control water)
A bucket or towel is important for managing water during the repair process. It helps catch any residual water from pipes and keeps the working area clean and dry. This simple tool also prevents water damage to surrounding surfaces and makes the overall process more organized.
Step-by-Step Guide to Fix Wrong Faucet Size Problem
Fixing a faucet size issue depends on identifying the exact mismatch type. Follow these steps carefully to ensure a proper and leak-free installation.
Common Mistakes to Avoid
Many faucet installation problems occur because of small but critical mistakes that are often overlooked. These errors can lead to leakage, poor fitting, or even permanent damage to plumbing parts. By understanding and avoiding these issues, you can ensure a smoother installation process and a more reliable long-term water connection.
1. Forcing the faucet into place
Forcing a faucet into position is a serious mistake that can damage the threads and fittings permanently. When parts do not align properly, applying pressure instead of correcting the alignment can strip threads or deform the connection. This often results in leaks and may require full replacement of damaged components.
2. Ignoring measurements
Ignoring proper measurements is another common reason for faucet installation failure. Relying on guesswork instead of accurate sizing can lead to selecting the wrong faucet or fittings. Even a small mismatch in dimensions can prevent proper installation and create long-term alignment and sealing issues.
3. Using wrong adapter
Using an incorrect adapter can make the problem worse instead of solving it. Adapters must match both thread type and size precisely; otherwise, they can create weak joints or increase leakage points. A poor adapter choice often leads to instability in the connection and reduces overall system reliability.
4. Over-tightening connections
Over-tightening faucet connections is a frequent mistake that can cause serious damage. Excessive force may crack fittings, strip threads, or distort sealing surfaces. Instead of improving the seal, it often weakens the connection and increases the risk of future leaks or breakage under pressure.
5. Skipping leak test
Skipping a leak test after installation is a risky oversight. Even if the faucet appears properly installed, small leaks can still develop at threaded joints or seals. Testing ensures that all connections are secure and helps identify hidden issues before they cause water damage or system failure.
When You Should Call a Plumber
There are situations where a faucet size problem becomes too complicated or risky to handle on your own. If the plumbing system involves old pipes, damaged threads, or structural modifications, it is better to rely on a professional plumber. This ensures safety, accuracy, and prevents further damage to your plumbing system.
Sometimes faucet size problems are too complex to fix at home. You should call a professional plumber if:
- Pipes are old or corroded
- Threads are heavily damaged
- Sink modification is required
- Water pressure issues persist
A professional can ensure safe installation and prevent costly damage.
Our Trending Post:
Final Thoughts
Fixing a wrong faucet size problem is not difficult when you understand the root cause and follow a proper step-by-step approach. Most issues can be solved at home using basic tools, accurate measurements, and suitable adapters without needing major plumbing changes or expensive replacements.
The most important principle is to avoid forcing incompatible fittings and instead focus on identifying the correct size and compatibility. With patience and careful handling, you can achieve a secure and leak-free installation that lasts for years.
By taking your time and following the right process, you can install your faucet safely, prevent leaks, and ensure long-lasting performance.
👉 Remember: “Measure first, install second—never guess faucet size.”