
Drill diameter is one of the most important measurements in drilling work. Whether you are working with wood, metal, plastic, or concrete, choosing the correct drill diameter ensures accuracy, strength, and a clean finish.
Even a small mistake in drill size can lead to loose fittings, cracked material, or wasted effort. That is why professionals always rely on a drill diameter chart instead of guessing sizes.
This guide gives you a complete and simple drill diameter chart along with easy explanations so beginners and professionals can quickly pick the right size without confusion.
What is Drill Diameter?
Drill diameter is the width of the hole created by a drill bit. In simple words, it is the size of the hole you make when you drill into any material.
- Smaller diameter → small hole
- Larger diameter → big hole
Drill diameter is measured in:
✔ Inches (imperial system)
✔ Millimeters (metric system)
✔ Sometimes centimeters (for rough estimation)
Understanding this basic concept is important because every screw, bolt, anchor, and fitting depends on it.
For example:
- A 3 mm drill bit creates a 3 mm hole
- A 1/4 inch drill bit creates a 0.25 inch hole
This relationship seems simple, but selecting the wrong size can completely ruin your project.
Why Drill Diameter Matters (Importance of Correct Hole Size)
Choosing the correct drill diameter is not just a small technical step, it directly affects the quality, strength, and safety of your entire project. Whether you are working on 1/4-20 tapping, mechanical parts, or construction fittings, even a small mistake in hole size can lead to serious issues.
✔ 1. Fit of Screws and Bolts
The drill diameter determines how well a screw or bolt fits into the material. If the hole is too small, the fastener will not enter properly and may damage threads or break the tap. If the hole is too large, the bolt will feel loose and will not hold securely, reducing reliability.
✔ 2. Strength of Joints
A correctly sized drill hole ensures proper thread engagement between the bolt and material. This tight fit creates strong mechanical bonding, improving load-bearing capacity and durability. Incorrect diameter weakens the joint and increases the risk of failure under stress or vibration.
✔ 3. Accuracy of Work
In precision work like machining, fabrication, or mechanical assembly, even a small error in drill size can cause misalignment. A difference of just 0.5 mm can affect how parts fit together, leading to poor assembly, uneven load distribution, or operational problems in machinery.
✔ 4. Safety in Installations
Safety is a major reason why correct drill diameter matters. Loose or poorly fitted fasteners in machinery, automotive systems, or construction structures can loosen over time. This may lead to vibrations, mechanical failure, or even accidents, making accurate drilling essential for safe operation.
What Happens When You Use Wrong Drill Diameter?
Using the wrong drill diameter is one of the most common mistakes in drilling and tapping work, especially for beginners. Even a small mismatch can seriously affect thread quality, joint strength, and overall safety of the final assembly. The correct size ensures proper fit, while incorrect sizing leads to poor performance and failure.
❌ Too Small Diameter
When the drill bit is too small, it creates excessive resistance during drilling and tapping. This not only makes the process harder but can also damage tools and materials.
- Drill bit may get stuck
- Material may crack (especially wood or plastic)
- Overheating of drill bit
❌ Too Large Diameter
When the hole is too large, there is not enough material left for proper grip. This directly affects the strength and stability of the connection.
- Screws become loose
- Weak joint strength
- Poor finishing and unstable structure
In both cases, the final result becomes unprofessional and unsafe, especially in mechanical or load-bearing applications.
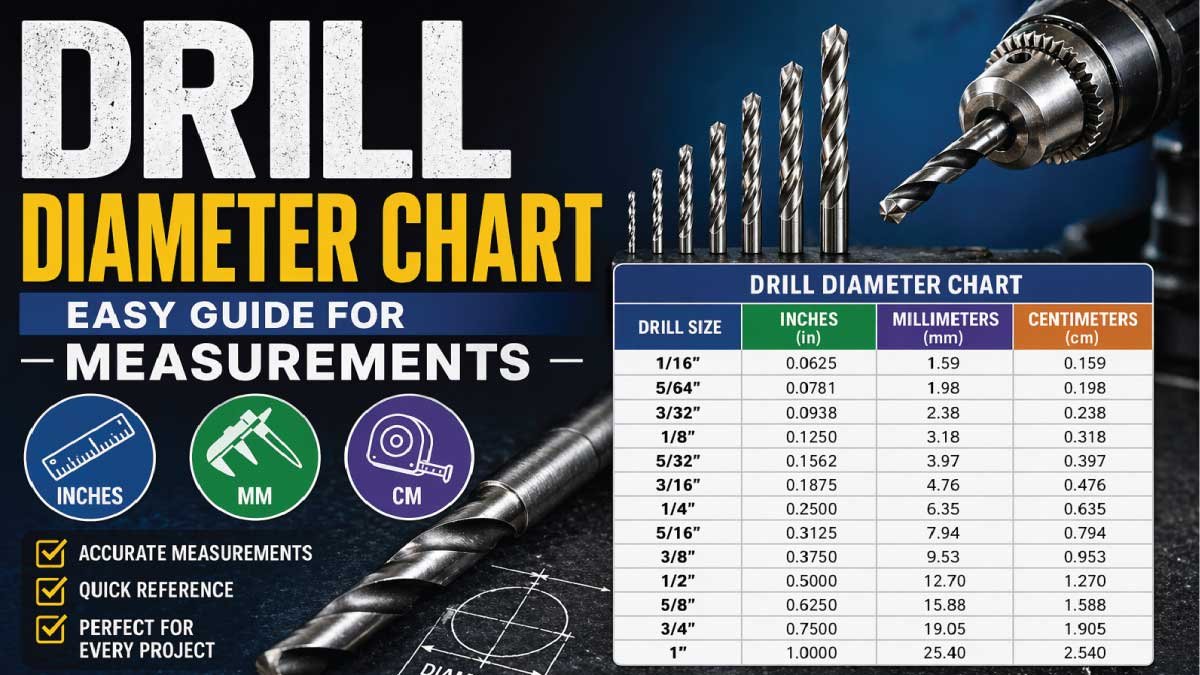
Simple Drill Diameter Chart (Inches, mm, cm)
This universal reference chart helps you quickly select the correct drill size for different tasks, from precision electronics to heavy industrial applications. It is useful for workshops, DIY projects, and mechanical engineering work.
| Inches | mm | cm | Common Use |
|---|---|---|---|
| 1/64″ | 0.4 mm | 0.04 cm | Precision work |
| 1/32″ | 0.8 mm | 0.08 cm | Electronics |
| 1/16″ | 1.6 mm | 0.16 cm | Small pilot holes |
| 3/32″ | 2.4 mm | 0.24 cm | Light screws |
| 1/8″ | 3.2 mm | 0.32 cm | General drilling |
| 5/32″ | 4.0 mm | 0.40 cm | Anchors & screws |
| 3/16″ | 4.8 mm | 0.48 cm | Masonry fixing |
| 1/4″ | 6.4 mm | 0.64 cm | Medium bolts |
| 5/16″ | 7.9 mm | 0.79 cm | Heavy screws |
| 3/8″ | 9.5 mm | 0.95 cm | Structural work |
| 1/2″ | 12.7 mm | 1.27 cm | Heavy-duty drilling |
| 5/8″ | 15.9 mm | 1.59 cm | Industrial use |
| 3/4″ | 19.0 mm | 1.90 cm | Large holes |
| 1″ | 25.4 mm | 2.54 cm | Pipes & fittings |
Metric Drill Diameter Chart (mm Based)
The metric system is the global standard in engineering, manufacturing, and construction. It provides precise measurements in millimeters, making it easier to select drill sizes accurately for different materials and applications. This chart is especially useful for workshops, fabrication, and industrial projects.
| mm Size | Inch Equivalent | Use |
|---|---|---|
| 1 mm | 0.039″ | Precision electronics |
| 2 mm | 0.079″ | Small fasteners |
| 3 mm | 0.118″ | Light assembly |
| 4 mm | 0.157″ | Screws & anchors |
| 5 mm | 0.197″ | General use |
| 6 mm | 0.236″ | Medium bolts |
| 8 mm | 0.315″ | Heavy fasteners |
| 10 mm | 0.394″ | Structural work |
| 12 mm | 0.472″ | Large fittings |
| 16 mm | 0.630″ | Industrial drilling |
| 20 mm | 0.787″ | Heavy-duty use |
Also Read:
Simple Drill Diameter Selection Rules (Easy Practical Guide)
You don’t need to memorize complex charts to choose the correct drill diameter. Instead, follow a few simple rules based on the type of fastener or application. These rules help ensure strong fitting, accurate work, and long-lasting results in drilling and tapping tasks.
✔ Rule 1: Screws
For screws, always use a slightly smaller drill diameter than the screw size. This allows the screw threads to bite into the material properly. The tighter fit increases grip strength and prevents loosening over time, especially in wood, plastic, and light metal applications.
✔ Rule 2: Bolts
For bolts, use a hole that is equal to or slightly larger than the bolt diameter. This ensures smooth insertion without force or damage. Bolts are usually secured with nuts or threads, so the hole should allow easy alignment without creating stress on the material.
✔ Rule 3: Anchors
For wall or expansion anchors, always use the exact recommended drill diameter. Anchors depend on tight mechanical expansion inside the hole to hold firmly. If the hole is too large or too small, the anchor will fail to grip properly and may become unstable.
✔ Rule 4: Tapping (Thread Cutting)
For tapping operations, use a smaller drill diameter based on a standard formula:
👉 Drill Diameter = Tap Size − Pitch
This ensures enough material remains for thread formation, creating strong and precise internal threads without weakening the hole structure.
Drill Diameter by Material
Different materials respond differently to drilling, so the drill size must be adjusted based on material behavior to achieve best results.
🟦 Wood
Wood requires a slightly smaller drill diameter. This helps the screw grip tightly as the material naturally compresses and expands. It also reduces the risk of splitting, especially in softwood or edge drilling applications.
🟥 Metal
Metal requires exact drill diameter for accurate results. Precision is very important because even small errors can affect tapping or bolt fit. Cutting oil is recommended to reduce heat and improve drilling smoothness, especially in steel or aluminum.
🟩 Plastic
Plastic works best with a slightly larger drill diameter. This prevents cracking, stress buildup, and material deformation during fastening. Plastic is sensitive to heat and pressure, so a looser fit ensures safer and cleaner installation.
🟨 Concrete
Concrete requires anchor-specific drill sizes depending on the anchor type. Always follow manufacturer guidelines for best results. A hammer drill is usually required to penetrate the surface properly and create a secure base for strong anchoring.
Also Read:
Common Drill Diameter Mistakes
Even in professional workshops, small errors in selecting or using drill diameters can lead to weak joints, broken taps, or poor-quality work. Understanding these common mistakes helps improve accuracy, safety, and overall project performance.
❌ Guessing the Size
One of the most common mistakes is estimating the drill size instead of using a proper chart or measuring tool. Guessing often leads to incorrect hole dimensions, which affects fitting, strength, and thread quality. Always rely on a tap drill chart or gauge for accurate results.
❌ Mixing Units (mm vs inches)
Confusing metric and imperial units is a serious and frequent error. For example, mixing millimeters and inches can result in completely wrong hole sizes. This leads to loose fittings or broken taps. Always double-check the unit system before selecting any drill bit.
❌ Using Dull Drill Bits
A dull drill bit does not cut cleanly and can create rough, oversized, or uneven holes. It also generates extra heat and requires more force, which affects accuracy. Over time, this can unintentionally increase hole diameter and reduce overall precision and tool life.
❌ Ignoring Material Type
Different materials respond differently to drilling pressure, speed, and heat. Ignoring material type can cause cracking, melting, or oversized holes. For example, metal requires precision, while plastic needs care to avoid deformation. Always adjust technique and drill size based on the material being worked on.
Pro Tips for Perfect Drilling
Getting clean, accurate, and professional drilling results is not just about using the right drill bit—it’s about technique, control, and preparation. These practical tips are widely used in workshops to improve precision and reduce mistakes.
✔ Always Measure Twice
Before you start drilling, always double-check the drill size and marking. A small mistake in measurement can lead to incorrect hole diameter, poor fitting, or wasted material. Taking a few extra seconds to verify ensures accuracy and avoids rework.
✔ Use Sharp Drill Bits
Sharp drill bits cut smoothly and efficiently, producing cleaner and more accurate holes. Dull bits generate excess heat, require more force, and can damage the material. Keeping tools sharp also improves speed and extends the life of both the drill bit and the workpiece.
✔ Start with Pilot Holes
Pilot holes are small starter holes that guide larger drill bits. They are especially useful in thick wood, metal, or hard materials. This technique improves accuracy, reduces drill wandering, and makes it easier to achieve perfectly centered and straight holes.
✔ Control Drill Speed
Adjusting drill speed according to material is very important:
Wood → high speed for fast cutting
Metal → medium speed for controlled cutting
Concrete → low speed with hammer mode for effective penetration
Correct speed prevents overheating, tool damage, and rough edges.
✔ Keep Drill Straight
Always maintain a straight angle while drilling. A tilted drill can create oval-shaped holes, misalignment, and weak fittings. Proper alignment ensures that bolts, screws, or taps fit correctly and function as intended in the final assembly.
✔ Use Lubrication for Metal
When drilling or tapping metal, always use cutting oil or lubricant. It reduces friction, controls heat, and improves cutting efficiency. Lubrication also helps produce smoother hole surfaces and extends the life of your drill bits and tapping tools significantly.
Also Read:
Drill Diameter vs Drill Bit Size
Many beginners confuse these two terms, but understanding the difference is important for accurate drilling and professional results.
Drill diameter = final hole size
Drill bit size = tool used to create that hole
👉 In most cases, both are equal, but in special applications like tapping, anchoring, or precision fitting, the selected drill bit size may be slightly adjusted to achieve the correct final hole diameter.
Example
Imagine you are installing a shelf:
If you use a small hole → screw won’t fit
If you use a large hole → shelf will be loose
If you use correct diameter → strong and stable installation
This simple example clearly shows how even a small mistake in drill size can affect the strength, stability, and safety of everyday work.
Final Thoughts
A drill diameter chart is essential for anyone working in DIY projects, construction, mechanical work, or fabrication. It removes guesswork and ensures accurate results, helping you save time and avoid costly errors while improving overall workmanship quality.
Key Takeaways:
✔ Always match drill diameter with application
✔ Use correct unit system (mm or inches)
✔ Never guess—always use a chart
✔ Consider material before selecting size
✔ Follow proper drilling technique for best results
With this understanding, you can now confidently choose the right drill sizes and achieve stronger, cleaner, and more reliable results in any project.