
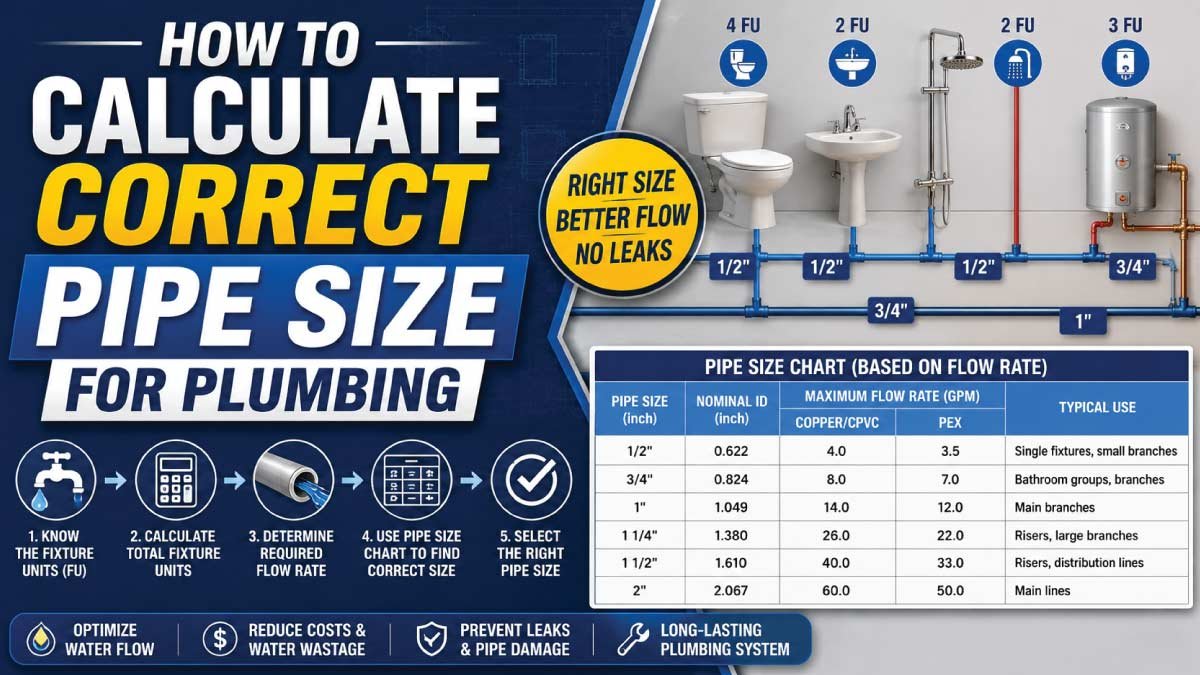
Choosing the correct pipe size is one of the most important steps in any plumbing system. Whether you are working on a home water supply, irrigation system, or workshop piping, the right pipe size ensures proper water flow, pressure balance, and leak-free performance.
If the pipe is too small, you will face low water pressure and blockages. If it is too large, it increases cost and reduces system efficiency. In many real-life cases, plumbing issues like leaks, noise, and pressure drops happen simply because the pipe size was not calculated correctly.
In this guide, you will learn how to calculate the correct pipe size for plumbing step-by-step, understand key formulas in simple terms, and also discover a complete fix guide for sizing mistakes.
Why Pipe Size Calculation Is Important
Pipe size calculation is a crucial part of plumbing design because it directly affects how efficiently water moves through a system. If pipes are too small, pressure drops and flow becomes weak. If they are too large, installation costs increase unnecessarily. Proper sizing ensures balanced performance, safety, and long-term reliability of the entire plumbing network.
Correct pipe sizing helps to:
- Maintain proper water pressure throughout the system
- Ensure smooth and consistent water flow
- Reduce energy consumption in pump systems
- Prevent pipe noise and vibration
- Avoid leaks caused by excessive pressure buildup
- Increase the lifespan of plumbing components
Even a small sizing error can cause major long-term issues, especially in high-pressure systems.
Basic Factors That Affect Pipe Size
Before calculating pipe size, it is important to understand the key physical and technical factors that influence how water behaves inside a pipe. These factors determine the required diameter, flow efficiency, and pressure stability of the system.
1. Water Flow Rate (GPM or LPM)
Water flow rate is one of the most important factors in pipe sizing. It represents the volume of water passing through a pipe in a specific time period. Higher flow demand requires a larger pipe diameter to maintain smooth and stable water movement without pressure loss or turbulence.
Flow rate means how much water passes through the pipe in a given time.
Higher flow rate requires a larger pipe diameter.
2. Water Pressure
Water pressure is the force that pushes water through the plumbing system. It determines how efficiently water reaches different outlets such as taps, showers, and appliances. Incorrect pipe sizing with pressure imbalance can lead to weak flow, burst pipes, or long-term leakage problems.
Pressure is the force that pushes water through pipes.
- Low pressure systems may need larger pipes
- High pressure systems can use slightly smaller pipes
However, too much pressure in small pipes causes damage and leaks.
3. Pipe Length
Pipe length plays a major role in determining pressure loss due to friction. The longer the pipe, the more resistance water faces while flowing through it. This reduction in pressure often requires larger pipe sizes to maintain consistent water delivery at the final outlet.
Longer pipe runs create more resistance, reducing water pressure at the outlet.
Longer distance = larger pipe size may be needed
4. Number of Fixtures
The total number of water outlets in a system directly affects pipe size requirements. Each fixture adds to overall water demand, and multiple fixtures running simultaneously increase flow requirements. Proper calculation ensures the system can handle peak usage without pressure drops or inefficiency.
Fixtures include:
- Faucets
- Showers
- Toilets
- Washing machines
More fixtures = higher total water demand = larger pipe size
5. Pipe Material
Pipe material also influences flow efficiency because different materials have different internal surface textures. Smooth materials allow water to flow easily, while rough or corroded surfaces increase resistance. This resistance affects pressure loss and may require adjustments in pipe size for optimal performance.
Different materials affect internal flow:
- PVC (smooth, good flow)
- Copper (excellent durability)
- Galvanized steel (higher friction over time)
Rough interior surfaces increase resistance and may require larger sizing.
Standard Pipe Size Measurement System
Pipe sizes are measured using standardized systems to ensure compatibility across fittings and plumbing components. However, it is important to understand that labeled sizes do not always represent the actual internal diameter, which is why calculations are essential for accurate system design and performance.
Pipe sizes are usually measured in:
- Inches (1/2″, 3/4″, 1″, etc.)
- Nominal Pipe Size (NPS)
- Outer Diameter (OD)
- Inner Diameter (ID)
Important note:
The labeled pipe size is NOT always the actual inner diameter. That’s why calculations are necessary.
Simple Formula for Pipe Size Calculation
Pipe size calculation can be simplified using a basic hydraulic formula that relates water flow rate, velocity, and pipe diameter. This formula helps plumbers estimate the correct pipe size needed to maintain smooth water flow without excessive pressure loss or turbulence in the system.
A commonly used simplified formula in plumbing is based on flow rate and velocity:
D=4QπVD = \sqrt{\frac{4Q}{\pi V}}
Where:
- Flow Rate = volume of water per second
- Velocity = speed of water (recommended: 1–2 m/s for domestic plumbing)
- π = 3.14
You don’t always need to solve this manually in real life, but understanding it helps you choose correctly.
Our Trending Post:
Understand the Formula in Simple Terms
This formula basically helps you determine the correct pipe diameter based on how much water is flowing and how fast it is moving. If the flow rate increases, the pipe diameter must also increase to avoid pressure drop. Similarly, if water velocity is too high, it can cause noise, vibration, and pipe damage.
In simple words, the formula balances three important things:
- How much water is needed
- How fast it moves
- How wide the pipe should be
This balance ensures efficient water delivery without stressing the plumbing system.
Why Velocity Matters in Pipe Sizing
Water velocity is an important factor because it directly affects pressure stability and pipe safety. If water moves too slowly, it may reduce system efficiency. If it moves too fast, it increases friction, noise, and the risk of pipe wear over time.
Recommended velocity for domestic plumbing is usually between 1–2 meters per second, which provides a good balance between efficiency and safety.
Practical Use of Pipe Size Calculation
In plumbing, professionals often use charts, software, or standard sizing tables instead of solving formulas manually. However, understanding this equation helps you make better decisions when selecting pipe sizes, especially for:
- Home plumbing systems
- Bathroom and kitchen installations
- Pump-based water systems
- Small industrial setups
It ensures you choose the right pipe size instead of relying only on guesswork.
Key Takeaway
Pipe size calculation is not just a mathematical concept—it is a practical tool for ensuring long-lasting and efficient plumbing systems. Even if you do not calculate it manually, knowing how flow rate and velocity affect pipe diameter helps you avoid common installation mistakes and system failures.
Our Trending Post:
Common Pipe Sizing Mistakes
Many plumbing system problems occur because of incorrect pipe sizing decisions. Even small errors in selecting pipe diameter or layout design can lead to long-term issues such as low pressure, poor water distribution, and system inefficiency. Understanding these common mistakes helps ensure a more balanced, efficient, and reliable plumbing system.
1. Choosing Pipe Size Based on Guesswork
Selecting pipe size without proper calculation or measurement often leads to serious performance problems. Guessing can result in low water pressure, uneven flow distribution across different outlets, and gradual system failure over time as demand increases beyond capacity.
2. Using One Size for Entire System
Using a single pipe size for the whole plumbing system is a major design mistake. Different sections of a system have different flow requirements. Main lines, branch lines, and fixture connections all need appropriate sizing to ensure balanced pressure and efficient water delivery.
3. Ignoring Future Demand
Many systems are designed only for current usage without considering future expansion. Ignoring future demand, such as additional bathrooms or appliances, can lead to undersized piping. This results in pressure issues and costly upgrades later when system load increases.
4. Overlooking Pipe Length
Pipe length plays a significant role in water pressure and flow efficiency. Longer pipe runs naturally reduce pressure due to friction losses. If this factor is ignored, the system may deliver weak flow at distant points, especially in large buildings or multi-floor setups.
5. Mixing Incompatible Standards
Mixing different pipe standards without proper adapters can cause serious compatibility issues. It often leads to leakage, incorrect sizing, and installation confusion. Ensuring standard compatibility such as BSP or metric systems is essential for a secure and stable plumbing network.
Fix Guide: How to Correct Pipe Size Problems
If your plumbing system already has sizing issues, there are several effective methods to correct them. These solutions focus on improving flow, restoring pressure, and optimizing the overall system layout without unnecessary waste or repeated failures.
Fix 1: Upgrade Pipe Diameter
If the system is suffering from low water pressure, upgrading the pipe diameter is one of the most effective solutions. Replacing smaller pipes with larger ones increases flow capacity. It is especially important to upgrade the main line first, as it controls the overall system pressure. For example, upgrading from 1/2 inch to 3/4 inch piping can significantly improve water flow and system performance.
Fix 2: Add Booster Pump
When replacing pipes is not possible, installing a water pressure booster pump is a practical alternative. A booster pump helps maintain steady and consistent water flow throughout the system, especially in multi-story buildings or areas with naturally low supply pressure. It improves performance without requiring structural pipe changes.
Fix 3: Reduce Pipe Length Loss
Reducing unnecessary pipe length can improve overall system efficiency. Long and complicated routes increase friction loss and reduce pressure. By removing unnecessary bends, straightening pipe paths where possible, and minimizing the number of fittings, you can significantly improve water flow and system performance.
Fix 4: Replace Old or Corroded Pipes
Old or corroded pipes often develop internal rust buildup that reduces their effective diameter. This restricts water flow and lowers pressure throughout the system. Replacing such pipes with modern materials like PVC or copper restores full diameter capacity and immediately improves flow efficiency.
Fix 5: Balance System with Correct Branching
Uneven pressure distribution often occurs when branching is not properly designed. If one area receives high pressure while another has low pressure, the system needs adjustment. Using correctly sized branch lines and installing flow control valves helps balance pressure and ensures uniform water distribution across all outlets.
Our Trending Post: