
Choosing the correct CNC end mill size is one of the most important decisions in CNC machining. Whether you are working on aluminum, steel, wood, or plastics, the end mill diameter, flute length, and overall tool size directly affect cutting quality, tool life, accuracy, and machining speed.
Many beginners think “bigger is better” or “smaller gives more detail,” but the truth is more balanced. The right end mill size depends on part geometry, material, machine rigidity, and depth of cut.
In this guide, you will learn how to choose the perfect CNC end mill size using a practical size chart, engineering logic, and real machining rules.
What Is a CNC End Mill?
A CNC end mill is a precision rotating cutting tool used in CNC milling machines to remove material from a workpiece. It is designed for shaping, profiling, and finishing operations in metals, wood, and plastics with high accuracy and smooth surface quality.
Unlike drill bits that only cut vertically into the material, end mills are capable of multi-directional cutting, making them far more versatile in CNC machining applications.
- Sideways (profiling)
- Downwards (plunging)
- In 3D paths (contouring)
This makes end mills essential for producing complex shapes, cavities, and precision-engineered parts in modern manufacturing industries.
End mills come in different shapes, coatings, and geometries, but size selection is mainly focused on four key physical parameters that directly impact performance and machining results.
- Cutter diameter
- Flute length
- Shank diameter
- Overall length
As noted in machining guides, end mills are available in a wide range of standard sizes starting from micro tools as small as 0.1 mm and going beyond 20 mm for heavy-duty industrial machining, depending on the application requirements and machine capability (cnccookbook.com).
Why End Mill Size Matters So Much
End mill size is not just about whether the tool fits inside a design. It directly influences cutting performance, machining stability, tool life, and the final surface quality of the workpiece. Selecting the wrong size can lead to poor accuracy or tool failure.
Proper sizing ensures efficient chip removal, stable cutting forces, and balanced machining performance across different materials and operations.
1. Tool Strength
A larger diameter tool provides significantly more strength and rigidity during cutting operations. It reduces the risk of bending or snapping under load, especially when machining harder materials or performing heavy roughing cuts.
2. Cutting Speed
Larger end mills remove more material per pass, which allows faster machining cycles. This improves productivity and reduces overall production time, especially in bulk manufacturing or large surface machining tasks.
3. Detail Level
Smaller diameter tools are capable of producing fine details, sharp edges, and intricate geometries. They are ideal for engraving, precision parts, and complex 3D contouring work where accuracy is critical.
4. Deflection Control
Long and thin end mills are more prone to bending or deflection during cutting. This can lead to inaccurate machining results, rough surface finish, and in severe cases, complete tool breakage.
- Inaccurate cuts
- Poor surface finish
- Tool breakage
5. Chip Clearance
Smaller tools often struggle to clear chips efficiently, especially during deep cuts or high-speed operations. Poor chip evacuation can cause heat buildup, tool wear, and reduced cutting performance.
👉 In CNC machining, the rule is often:
Use the largest tool that can safely fit your design
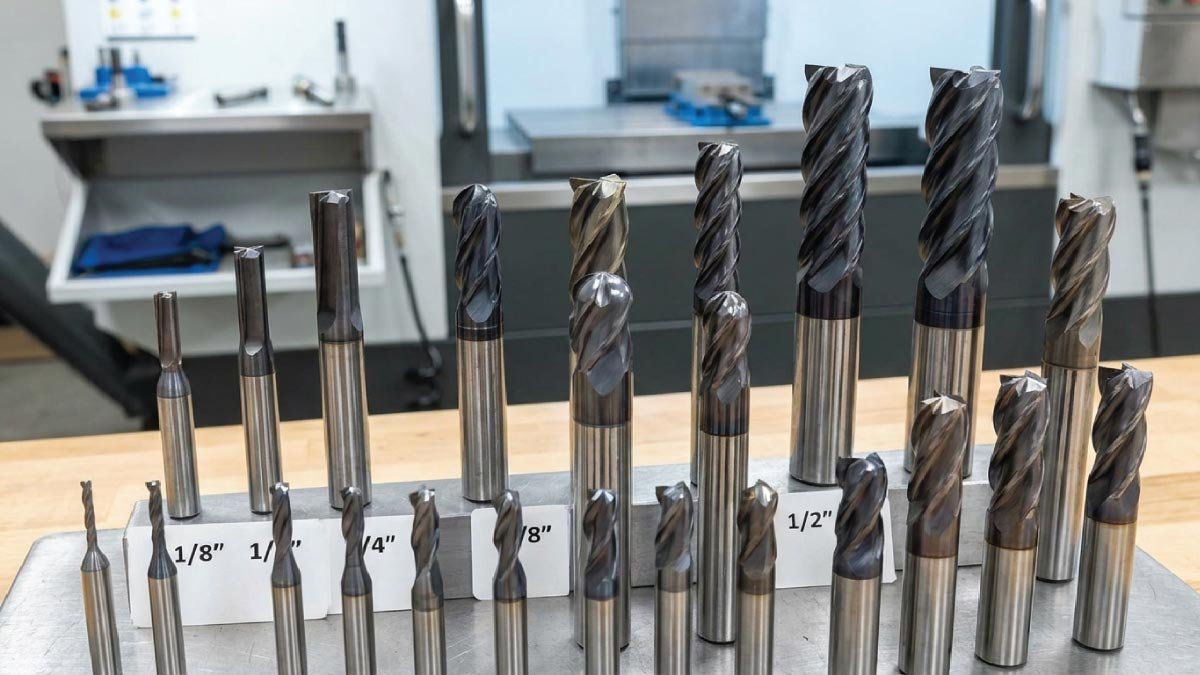
CNC End Mill Size Selection Chart
Below is a practical CNC end mill size chart used in real machining workflows.
CNC End Mill Size Chart (Imperial & Metric)
| Diameter (in/mm) | Best Use Case | Material Suitability | Cutting Strength |
|---|---|---|---|
| 1/32″ (0.8 mm) | Micro engraving, PCB | Plastics, soft metals | Very low |
| 1/16″ (1.5 mm) | Fine detail work | Aluminum, brass | Low |
| 3/32″ (2.4 mm) | Small pockets | Soft metals, wood | Low-medium |
| 1/8″ (3.175 mm) | General CNC work | Wood, aluminum | Medium |
| 3/16″ (4.75 mm) | Stronger cutting | Aluminum, mild steel | Medium-high |
| 1/4″ (6.35 mm) | Most common size | All-purpose machining | High |
| 5/16″ (8 mm) | Faster material removal | Steel, aluminum | High |
| 3/8″ (10 mm) | Heavy cutting | Steel, hard plastics | Very high |
| 1/2″ (12.7 mm) | Industrial machining | Hard metals | Very high |
Also Read:
How to Choose CNC End Mill Size (Step-by-Step)
Choosing the correct CNC end mill size is a structured process that requires analyzing your design, material, machine capability, and cutting conditions. Following a step-by-step method helps avoid tool breakage, poor surface finish, and machining errors while improving efficiency and accuracy.
Practical CNC End Mill Size Rules
In real-world CNC machining, experienced machinists rely on practical rules instead of guesswork. These rules help improve tool life, machining speed, and part accuracy while reducing tool breakage and production errors. Following them ensures more stable and predictable cutting performance.
Rule 1: Use the largest tool possible
One of the most important principles in CNC machining is to always select the largest end mill that can safely fit the design geometry. Larger tools distribute cutting forces more efficiently and reduce stress on the cutter.
Bigger tools:
- Reduce machining time
- Improve rigidity
- Increase tool life
Larger diameter tools also allow higher material removal rates, which makes production faster and more efficient. They are less prone to vibration and produce smoother cutting performance in most materials.
Rule 2: Avoid long, thin tools unless necessary
Long and thin end mills should only be used when absolutely required by deep cavities or restricted geometry. These tools are much weaker and less stable compared to shorter, thicker tools.
Thin tools:
- Break easily
- Vibrate during cutting
- Reduce machining accuracy
Tool deflection becomes a major issue with long tools, especially at high speeds or when cutting hard materials. Whenever possible, reduce tool length to improve rigidity and stability.
Rule 3: Internal corners limit tool size
Internal geometry directly controls the maximum tool diameter you can use. The tool must physically fit into the smallest internal radius of the part without collision or leftover material.
- Tool radius = internal corner radius
If a design requires sharp 90° internal corners, standard round tools cannot achieve them perfectly. In such cases, machinists either use smaller tools or apply special design techniques like:
- Dog-bone fillets
- T-bone fillets
- Corner relief strategies
These methods ensure proper fit and manufacturability without compromising design intent.
Rule 4: Depth-to-diameter ratio matters
The depth-to-diameter ratio is a critical stability factor in CNC machining. It defines how deep a tool can safely cut relative to its diameter before deflection or breakage becomes likely.
Safe ratio:
- Aluminum: up to 3× diameter
- Steel: 1–2× diameter
Higher ratios increase tool flexing, vibration, and cutting instability. Staying within safe limits ensures better accuracy, smoother finishes, and longer tool life.
Also Read:
Common Mistakes When Choosing End Mill Size
Many CNC beginners make predictable mistakes when selecting end mill sizes. These errors often lead to poor machining results, tool damage, or inefficient production cycles. Understanding them helps prevent costly failures.
1. Choosing Too Small a Tool
Using an unnecessarily small tool may seem like a safe choice, but it often creates more problems than benefits. Small tools are fragile and less efficient for material removal.
- Breakage risk increases
- Machining becomes very slow
- Surface finish may worsen due to vibration
Small tools should only be used when required for fine details or tight internal features.
2. Choosing Too Large a Tool
Oversized tools can also cause machining issues when they do not match the design geometry. If the tool is too large, it physically cannot reach certain areas.
- Cannot fit into features
- Leaves uncut material
- Requires rework with smaller tools
Proper tool selection must always balance accessibility and efficiency.
3. Ignoring Flute Length
Flute length determines how deep the cutting portion of the tool extends. Ignoring it can lead to unsafe machining conditions and tool failure.
- Tool rubs against material
- Excess heat generation
- Premature tool wear or breakage
Always ensure flute length is sufficient for the intended cutting depth without exposing the non-cutting shank inside the material.
4. Ignoring Machine Limits
Even the best end mill will fail if the CNC machine is not capable of handling it. Machine rigidity, spindle power, and stability are crucial factors.
Weak machines cause:
- Excess vibration
- Poor surface finish
- Frequent tool breakage
Selecting tool sizes beyond machine capability reduces accuracy and increases operational risks significantly.
Recommended CNC End Mill Sizes for Beginners
If you are new to CNC machining, selecting the right end mill sizes from the start can make your learning process much easier and safer. Beginners should focus on a small set of versatile tools that can handle most basic operations without increasing tool breakage risk or machining complexity.
Starting with standard sizes helps you understand cutting behavior, material response, and machine limitations in a controlled way.
If you are just starting CNC machining, use:
- 1/8″ (3.175 mm) → fine detail work
- 1/4″ (6.35 mm) → general machining (best starter tool)
- 3/8″ (9.5 mm) → heavy roughing (if machine allows)
👉 These three sizes cover 80% of CNC projects.
The 1/4″ tool is especially important because it offers the best balance between strength, flexibility, and cutting efficiency. It is widely used for general-purpose machining and is considered the most reliable beginner-friendly end mill size.
Material-Based End Mill Size Selection
Different materials behave differently during cutting, so end mill size must be matched with material hardness, heat generation, and chip evacuation requirements. Choosing the right size improves tool life and machining performance.
1- Aluminum
Aluminum is a soft but sticky material that requires efficient chip removal and high-speed cutting to avoid clogging or tool wear.
- Best sizes: 1/8″ to 3/8″
- High RPM, fast feed possible
Smaller tools are useful for detailed work, while larger tools are ideal for faster material removal and production efficiency.
2- Wood
Wood is relatively easy to machine but requires careful tool selection to prevent tear-out and burning, especially in soft or layered wood types.
- Best sizes: 1/4″ to 1/2″
- Use upcut or compression bits
Larger tools are preferred for smoother cuts and faster routing, while specialized flute designs help maintain clean edges and reduce splintering.
3- Steel
Steel is a hard and demanding material that requires strong, rigid tools and controlled machining parameters to avoid tool failure.
- Best sizes: 3/16″ to 1/2″
- Lower speed, stronger tools needed
Smaller depth of cut and stable tool paths are essential to reduce heat buildup and maintain cutting accuracy during machining operations.
4- Plastics
Plastics are sensitive to heat, which can cause melting or deformation if cutting conditions are not properly controlled.
- Best sizes: 1/8″ to 1/4″
- Avoid heat buildup
Sharp tools with proper chip evacuation are essential to prevent melting and ensure smooth surface finishes during machining.
Advanced Tip: Balancing Speed and Precision
In CNC machining, there is always a trade-off between speed and precision. Tool size plays a major role in determining this balance, and understanding it helps optimize machining strategies.
- Small tool = high precision, slow speed
- Large tool = low precision, fast speed
Small tools are ideal for detailed finishing work, engraving, and complex geometries, while large tools are best for roughing operations and bulk material removal.
Best practice:
👉 Rough with large tool
👉 Finish with small tool
This workflow is known as the roughing + finishing strategy in CNC machining, and it is widely used in both industrial and professional workshops to achieve high efficiency and excellent surface quality.
Also Read:
Final Thoughts
Choosing CNC end mill size is not random—it is a balance of:
- Part design requirements
- Material type
- Machine strength
- Depth of cut
- Required precision
If you follow the size chart + selection steps, you will reduce tool breakage, improve surface finish, and significantly increase machining efficiency.
Simple Rule to Remember:
👉 “Use the biggest tool that safely fits your smallest feature.”