
A leaking pipe joint is one of the most common plumbing problems in homes and workshops. Most of the time, the real cause is not just a “bad seal,” but a pipe joint size mismatch or incorrect fitting selection. When pipe threads or diameters don’t align properly, water finds even the smallest gap and starts leaking.
The good news is that most of these issues can be fixed without replacing the entire plumbing line. In this guide, you will learn why pipe joint leaks happen, how size issues develop, and how to fix them step by step using practical methods.
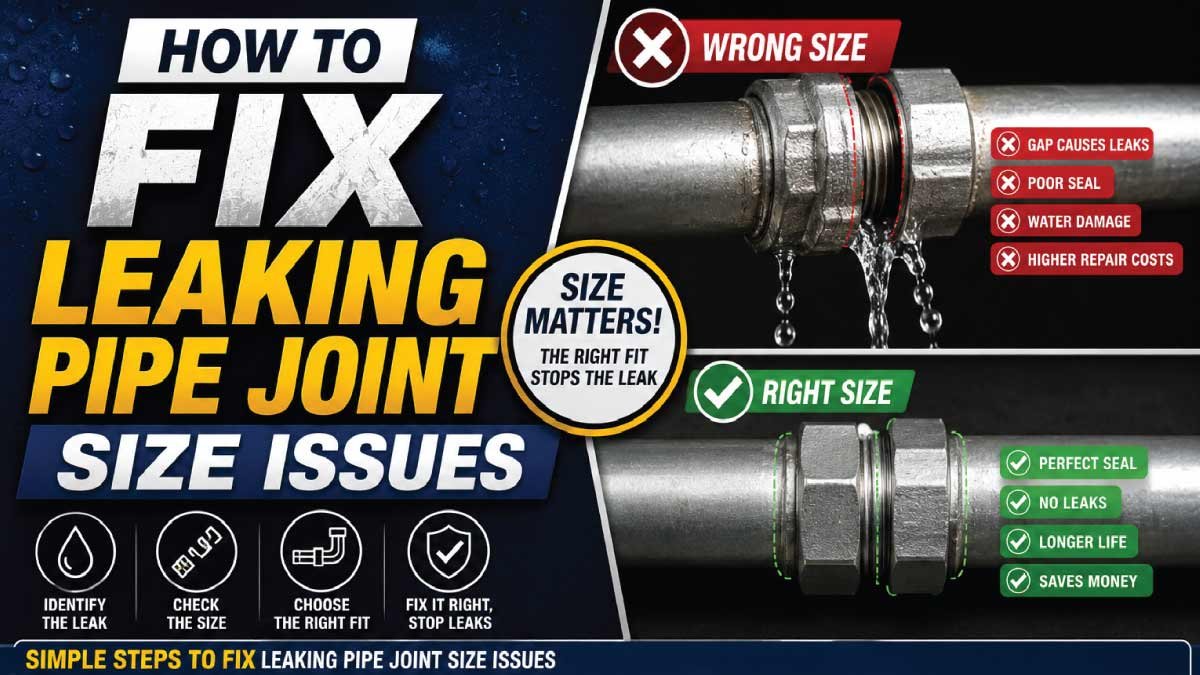
Understand The Pipe Joint Size Issues
Before repairing a leaking pipe joint, it is important to clearly understand what a “size issue” means in plumbing systems. These problems usually occur when pipe fittings do not match correctly in terms of diameter, thread type, or sealing method. Even a small mismatch can compromise the entire connection and lead to persistent leaks or pressure failure.
Pipe joints can fail due to:
- Different thread standards (BSP vs NPT)
- Incorrect pipe diameter matching
- Worn-out or stripped threads
- Loose fittings due to incorrect tightening
- Poor sealing material or installation method
Even a small mismatch between two pipe fittings can create pressure gaps, leading to continuous dripping or sudden leaks under pressure.
Common Causes of Leaking Pipe Joints
Pipe joint leaks are usually caused by a combination of poor fitting selection, incorrect installation, or worn plumbing components. Understanding the root causes helps you fix the problem correctly instead of repeatedly repairing the same joint. Below are the most common reasons behind leakage in pipe connections.
1. Thread Size Mismatch
Thread size mismatch occurs when two pipe fittings that look similar actually have different dimensions or thread profiles. For example, a 1/2-inch pipe may appear compatible but still fail to seal properly due to slight differences in measurement or manufacturing standards. This creates small gaps that allow water to leak.
This is one of the most common issues is connecting two pipes with different thread sizes. For example, a 1/2-inch pipe may be forced into a slightly different standard, which leads to improper sealing.
This creates micro-gaps where water escapes slowly at first, then worsens over time.
2. Different Thread Standards (BSP vs NPT)
Thread standards play a very important role in pipe sealing. Even if sizes look identical, different standards such as BSP and NPT are not naturally compatible. Their thread angles and sealing methods differ, which means they may fail to create a proper watertight connection without using adapters or sealants.
In plumbing systems, thread types matter as much as size. The two most common standards are:
- BSP (British Standard Pipe)
- NPT (National Pipe Thread)
They may look similar, but their thread angles and sealing methods are different. When mixed, they rarely seal properly without adapters.
3. Over-Tightening or Under-Tightening
Improper tightening is a major cause of pipe joint failure. Applying too much force can damage threads, deform fittings, or crack materials, while insufficient tightening leaves gaps that allow water to leak. Both situations reduce sealing efficiency and compromise the long-term durability of the plumbing connection.
Incorrect tightening is another major reason for leaks.
- Over-tightening can damage threads and deform fittings
- Under-tightening leaves gaps for water to escape
Both situations weaken the seal and cause long-term leakage issues.
4. Worn or Damaged Threads
Pipe threads naturally wear out over time due to corrosion, rust, or repeated use. When threads lose their original shape, they cannot form a tight seal even if the correct fitting is used. This often results in slow leaks that gradually become worse under pressure.
Old plumbing systems often develop corrosion or thread wear. Once threads lose their shape, even correctly sized fittings may not seal properly.
5. Missing or Improper Sealant
Sealants such as PTFE tape or pipe joint compound are essential for filling microscopic gaps between threads. Without proper sealing material, even correctly matched fittings may leak under pressure. Incorrect application of sealant can also reduce effectiveness, leading to repeated leakage problems in pipe joints.
Many pipe joints require sealing materials like PTFE tape or pipe joint compound. Without proper sealing, water pressure can easily pass through tiny gaps.
Our Trending Post:
Tools and Materials You Will Need
Before starting any plumbing repair work, it is important to collect all the necessary tools and materials in advance. Proper preparation ensures a smooth repair process, reduces downtime, and prevents unnecessary damage to pipes or fittings. Using the right equipment also improves accuracy and helps achieve a strong, leak-free connection.
1. Adjustable wrench
An adjustable wrench is essential for loosening and tightening various pipe and faucet connections. It can fit different nut sizes, making it highly versatile during repair work. This tool helps you apply controlled force without damaging the fittings when used correctly.
2. Pipe wrench (for tight fittings)
A pipe wrench is used for stubborn or tightly fixed pipe connections that cannot be loosened with a regular wrench. Its strong grip and heavy-duty design make it ideal for metal pipes and old fittings that require extra torque during removal or installation.
3. PTFE (Teflon) tape
PTFE tape is used to seal threaded pipe joints and prevent water leakage. It fills small gaps between threads and ensures a tighter, more secure connection. When wrapped properly, it improves sealing efficiency and reduces the risk of future leaks.
4. Pipe thread sealant (optional but helpful)
Pipe thread sealant provides an additional layer of protection against leaks in threaded joints. It is especially useful in high-pressure systems or when working with metal fittings. Unlike tape, it forms a durable seal that enhances long-term connection strength.
5. Pipe cutter (if replacement is needed)
A pipe cutter is required when damaged sections of pipe need to be removed or replaced. It ensures clean, straight cuts, which are essential for proper fitting installation. A precise cut helps maintain alignment and improves overall sealing quality.
6. Cleaning brush or cloth
A cleaning brush or cloth is used to remove dirt, rust, and debris from pipe threads before installation. Clean surfaces are important for proper sealing and smooth fitting connection. This step helps prevent leaks and improves the durability of the repair.
7. Replacement fittings or adapters (if required)
Replacement fittings or adapters are necessary when existing parts are damaged or incompatible. They help bridge size or thread mismatches and ensure proper connection between different pipe systems. Using the correct replacement parts is key to achieving a secure and long-lasting repair.
Having the right tools and materials ready before starting work makes the entire repair process faster, safer, and more efficient. It also reduces the chances of errors and ensures a professional-quality plumbing result.
Step-by-Step Guide to Fix Leaking Pipe Joint Size Issues
Now let’s move into a practical, real-world method for fixing leaking pipe joint size problems. This step-by-step approach helps you safely identify the issue, correct mismatched fittings, and restore a strong, leak-free connection without damaging your plumbing system.
Step 1: Turn Off the Water Supply
The first and most important step is to completely shut off the water supply before touching any pipe joint. This prevents water pressure from pushing through the system while you are working and avoids accidental flooding or spray during disassembly.
After turning off the water, open a nearby tap to release any remaining pressure inside the pipes. This helps drain residual water and makes the repair process safer and cleaner.
Step 2: Identify the Exact Leak Point
Before repairing anything, carefully locate the exact point where the leak is occurring. Sometimes the visible drip is not the actual source, so close inspection is necessary to avoid fixing the wrong area.
Look for:
- Water droplets forming at the joint
- Damp areas around fittings
- Rust or mineral buildup
- Loose connections
Sometimes the leak appears at the bottom of the joint but actually originates from the thread connection.
Step 3: Check for Size Mismatch
Once the leak point is identified, check whether the pipe fittings are properly matched in size and type. Many leaks happen simply because two incompatible fittings were forced together without proper checking.
Ask yourself:
- Do both pipes have the same diameter?
- Are both threads compatible?
- Was an adapter used incorrectly?
If you notice forced connections or misaligned threads, size mismatch is likely the main issue.
Step 4: Disassemble the Joint Carefully
Carefully loosen and remove the pipe joint using the correct wrench. This step should be done slowly to avoid damaging the threads, which are essential for proper resealing.
Important tips:
- Do not force it open too quickly
- Avoid damaging threads during removal
- Clean any debris or old sealing material
Once disassembled, inspect both male and female threads for wear, cracks, or deformation.
Step 5: Clean the Threads Properly
Cleaning is a crucial step because dirt, rust, and leftover sealing materials can prevent proper sealing when reassembling the joint. Even small particles can create gaps that lead to leakage under pressure.
Use a wire brush or clean cloth to remove all debris from both threads. If corrosion is severe, consider using a thread repair tool or replacing the fitting entirely.
Our Trending Post:
Step 6: Fix Size Mismatch Using Correct Adapter
If you confirm that pipe sizes do not match, the correct solution is never to force them together. Forcing mismatched pipes will only damage threads and worsen the leak over time.
Instead, use:
- Reducer fittings (for different diameters)
- Thread adapters (for BSP to NPT conversion)
- Couplings for joining similar sizes
This ensures proper alignment, secure sealing, and long-term durability.
Step 7: Apply PTFE Tape Properly
PTFE tape is essential for improving sealing performance in threaded pipe joints. It fills microscopic gaps between threads and prevents water from escaping under pressure.
Correct method:
- Wrap clockwise direction
- Apply 2–4 layers (depending on gap size)
- Press it lightly so it sticks to threads
Proper application of PTFE tape significantly reduces leakage risk and improves joint strength.
Step 8: Reassemble the Joint
Now carefully reconnect the pipe joint after preparing all components. Proper alignment is very important at this stage to avoid cross-threading or damage.
Make sure:
- Threads align properly
- No cross-threading occurs
- Fitting is hand-tight before using tools
Once aligned, tighten using a wrench with controlled force. Avoid over-tightening, as it can damage threads or crack fittings.
Step 9: Turn Water Supply Back On
Slowly restore the water supply and carefully observe the repaired joint. Do not rush this step because sudden pressure can reveal hidden leaks.
Check for:
- Dripping
- Moisture around fitting
- Sudden pressure leaks
If everything remains dry after a few minutes, the repair is considered successful.
Step 10: Recheck After a Few Hours
Some leaks do not appear immediately and may develop after pressure builds up over time. That’s why it is important to recheck the joint after a few hours and again after a full day.
Inspect the area carefully to ensure there is no slow leakage or moisture buildup. This final check guarantees a long-lasting and reliable repair.
Our Trending Post: